cylindrical UV stretched seam bug - WIP Star Altar
 MysticWings
Posts: 226
Hello!
Back to my model project... And I decided to make a WIP thread since it's not working so well now.
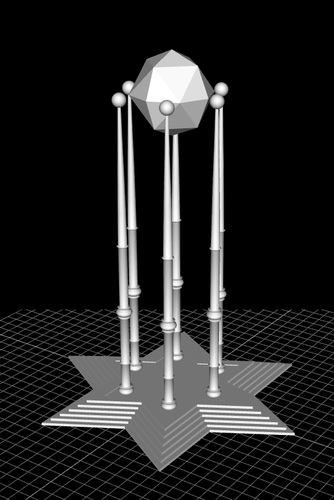
I have two pictures. One is just the geometry with no textures so you can see the project.
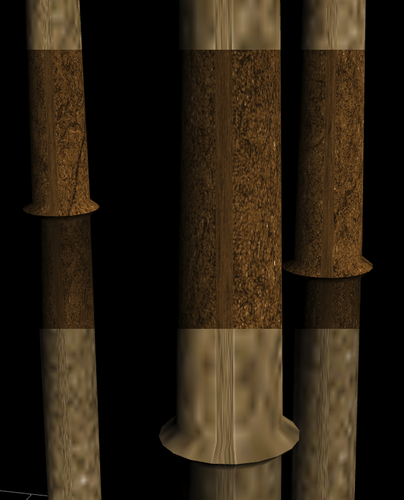
Now, regarding the other one. As some of you already know, I'm quite new at 3d and just have Carrara for some weeks. So when it came to texturing I wanted to do it for now in Daz Studio to see how uv mapping is working since I am more familiar with the software. I will soon know how to do it in Carrara to, but one step at a time and is more quick if I try to see how things are working. I know this is a carrara forum, but I think that this problem as more to do with something in uv mapping than with daz studio, since I'm using the same technic I use to retexture objects in daz and this never happened.
As you can see, there's this part of the pilar where the texture is stretched. I believe it as something to do with the edges of the shape in uv map. It happens with every type of uv map I do. In this case is a cylindrical uv, but I've already tried planar, box... and it always give this kind of stretch.
Does anyone have an idea of why is this happening and how can I correct it?


Comments
We have tools that help to make UV Mapping easier for us, but I doubt it will ever be entirely easy.
I have no clue what you might have done in DS. Does it have UV Mapping tools?
Anyways, yup. Not stretched, squished. That's what I'm talking about when a polygon's face shows as a line in the UV Map. This is the result of two edges being either on top of one another, or being very close, where in the actual model, they are not.
In Carrara, for those leg thingies, I would begin with a cylindrical projection, which might even solve the problem with no additional tweaking. ;)
Soon (I keep saying that) I will be learning more DAZ Studio. In the meantime, I'll be of no-to-little help on that side of things.
I imported the object and the uv maps of carrara, so the uv mapping is from carrara, not daz studio...
daz studio makes some automatic uv maps if you don't have one made in the model program, but you cannot export them as images to create maps (bump, transparent, displacement...).
This is a cylindrical projection of carrara... :( let me go check how my polygons are in the uv one by one.
So, in Carrara now :)
I guess this is the problem for what you explained. This particular polygon appears like 2 lines in the uv map.
It seems that is keeping this polygons out and just using the edges to finish the map. Those 2 edges that appear in red on the uv map (one from each side of the polygon) should be the projection of just 1 edge, but for some reason carrara is doing it like this.
This is a cylindrical projection.
Have no clue what to do... :P
There are ways that we can get automated UV Mapping. One is like we've just done, 'projection'. Another way is to unwrap, where you actually assign seems and pinned areas to have the software unwrap the model into a flat plane - and that is incredibly awkward for me to try and explain. When you get to Phil's Advanced Training, he shows in ggod detail how it's done, but even learning that - unwrapping is not always an easy task.
The quickest method that I can describe here, let's use your above image as an example.
You can see how when the one polygon is selected it makes a line, right?
What needs to happen is to take one of those edges and slide it over in the Map window.
Here's what you really need to watch out for - if you select and drag the wrong (of the two) edge, the texture will suddenly invert on that polygon, making the result that you have now, but worse.
So after making the change with one, do a test render to see what happens. Pay attention to which one needs to be moved to get the proper result. You can see which is actually selected by looking at the selection on the model in the left window.
Just remember that all of the polygons along that row, up and down, have the same problem - so you'll have to fix one edge for each all the way up.
The hardest part will be moving one without grabbing the other in the process.
And this is one of those things....
To try without damaging all my work, I used the first pilar I've done and that was still in another vector object document with no uv done.
So I did a cylindric projection on it and tried to see the error...
And it worked perfectly.... no error...
I think as I was doing uv mapping for the first time I must have done something strange that I now will never find out what, since I did lot's of trial and error.
Fortunately I've been saving different files every time I do one more step, so I have a file from before I've done any uv.
Will try to start from the beginning from that file and see what happen. :)
I actually started trying to do what you told me in the map I had before (the one that gave this problem) and I could understand perfectly what you said. In one of the sides there were two lines one on top of the other. It's good to know because I can only see it when I select edge by edge and not all of the vertical line.
Thank you Dartan :)
My pleasure.
Don't worry... the same problem will occur at other time. These things have that tendency ;)
I'm just glad that it worked in the final run.
You know, sometimes we forget to set the right axis to follow, or select a different projection, or just assign it a projection instead of applying a new one... all manner of possibilities. Saving 'pure' files is a must! So I'm very glad that you did :)
Intriguing design... will be interested to see more of it. Thanks for asking questions that I scratch my head over all the time till I sometimes stumble on the answer....and sometimes not.
:) SileneUK
Thank you! And you are welcome.
Sometimes I make questions just because I got completely stuck, can't think in nothing else...
Don't know why, most of the times I just need to make the question for the answer to come, either from one of you directly, or indirectly because your answers make me do something new instead of being blocked on that.
I will keep posting here pictures of the model while I advance ;)
I'm very glad you taught me that on time ;)
Thanks for bringing this up, Tania - I've just spotted I have the same problem myself!
Yeap... modeling is really the easy part... uv mapping and texturing is the real deal... :P
So, I've been doing the uv maps again and until now it seems that there's no problem.
For what I'm seeing, and is the thing I'm doing differently, here's the thing:
On uv map mode, you have model, display, operations and unfold.
In operations you can change the projection and I was doing the maps using this.
This time I didn't change anything on here, but on the model tab. So I was working with the projection but not the mapping.
That polygon continues to appear as 2 lines, but it doesn't seem to be giving problem now...
If I find anything else I let you know.
HI Tania :)
when you apply Cylindrical mapping,. ..Carrara automatically split's the object (Virtually) and flattens it out in the mapping grid view.
the same thing happens with the other mapping types.
this allows the object to be flattened into a 2D shape, so that a texture map can be projected onto it.
hope it helps ;)
That I understand, it's just that is not doing it the more logic way cause it always misses a line of polygons of the pilar.
Actually, and after years studying geometry, which means projecting a 3d object in 2d, and being a top student on that, I can say that 3d softwares really make a big confusion of something very simple.
I don't know anything about software programming, but I can say for sure that if you give me a pencil, a set square and one of this things to make circles (don't know the name in english) I would do this projections perfectly in half of the time... but sometimes it seems that who did this uv map tools didn't had that much practice with geometry or computers are not very good with geometry (think is probably the second option).
Tim A - If you are still having this problem, just to say that after all I had to do one more thing. It was working very well, but then I had to resize the map to have a proportion more close to the one of the columns or the texture would be very strange. When I did that, that squeeze part appeared again. So what I did was:
1 - selected all the polygons on that row
2 - in "operations" did a projection of that polygon (only that polygons, not the entire column)
3 - align the points of that projection manually so that they would stay in the part they were should be
As you can see in the first image, that red lines are a separated part from the rest. That's the line of polygons I projected separately. It was with a really strange shape when I projected, but after a little work it's perfect. Just take attention to the edges - you must chose a side to join them and you must join the lines that correspond to the same edge.
In the second image you can see how it works in daz. You now see the join of the two sides of the projection. But it almost doesn't appear in the render. You can make the join perfect working on the texture so that the 2 ends fit nicely.
when you apply Cylindrical mapping,. ..Carrara automatically split's the object (Virtually) and flattens it out in the mapping grid view.
the same thing happens with the other mapping types.
this allows the object to be flattened into a 2D shape, so that a texture map can be projected onto it.
hope it helps ;)
Almost, it seems, but not quite. What seems to happen is that 19 of a 20-side cylinder are laid out exactly as you describe. But the last one, No 20, wraps back from the right side to the left. Maybe this is a bug, because it seems to me that it shouldn't do that. Or perhaps you have to specify a seam, like when you do unwrapping? I haven't tried that.
What I did on mine was detach the "back" poly (actually, a row of polys) and then move it into position next to the others, and resize. May not be the best way, but it does seem to work. :-)
You detached on the UV map?? Because mine does not detach... :S
Or you detached in the model?
In UV edit mode mode. Select the line of polys on the model (left pane) using the polygon selector tool (triangle button on the right), then go to the operations tab and click Detach Polygons. One of the two lines will change from bright red to dull red. You can then drag the poly away from the rest. Drag it from a vertex, not from an edge.
Nop.... that detach doesn't seem to work very well for me. That I tried and tried and tried and nothing.
Anyway, in the end, our solution is the same but made in a different way ;) We have to put that line of polygon in the place! :) Glad it worked well for both!!
I have tried other times, and couldn't make detach work. Sometimes the ways of Carrara are a mystery!
Almost, it seems, but not quite. What seems to happen is that 19 of a 20-side cylinder are laid out exactly as you describe. But the last one, No 20, wraps back from the right side to the left. Maybe this is a bug, because it seems to me that it shouldn't do that. Or perhaps you have to specify a seam, like when you do unwrapping? I haven't tried that.
What I did on mine was detach the "back" poly (actually, a row of polys) and then move it into position next to the others, and resize. May not be the best way, but it does seem to work. :-)
Right. I agree that it should be considered a bug, because it really should work right the first time. Still, I'm happy that it gets me as close as it does. And methods like that are what I try to use to make such corrections.
Other times I might actually add seems and unwrap it. But I'm not so great with that yet.
Sometimes I can foresee how I want to deal with my mapping early enough in the modeling phase, where I'll apply my UV Mapping early on, and then work my model from there, and then check the results and do whatever tweaks it might need - but that's so far been unsuccessful toward the intended result - being much better to do the mapping later.
But like Tania says, this is the important stuff. It may not be easy, but it really needs some good attention. Any improvements that could be made to this function would excite the living daylights out of me! :)
I think the big reason for UV mapping as you go along is so you only do a little bit at a time, and then it feels like you're still making progress. Otherwise days on end of UV mapping feels like you've ground to a halt.
Of course, parts that you are likely to reuse - columns, pillars, kerb stones etc should be mapped before you duplicate them, or you'll have to repeat the mapping for each instance.
I actually like uv mapping. Don't really have a problem with days on end on uv mapping.
I started with a small project cause it was the first and wanted to learn each part at a time. Actually the project is bigger, I just did this part before so I could learn all the steps with a small model. But now I think that when modeling I will uv map and test after I finnish every part, always saving a pure file for each step. Just for one reason, because now I see I could have done the star geometry on a different way that would be better in uv, but changing that now it's almost like starting from the beginning and optimizing everything again. Besides that, I saw I can uv map and weld the points after and the uv keeps nice. But I just know that now because I did it the way I did.
Right now, I just happy that my first model is coming pretty well for a complete newbie! :)
Absolutely, great job!
Also, it can be easier to map and to work with in other regards, to just keep each stage of the model as a separate vertex object, and then group them together. Duplicate the pillars in the group, etc.,
But each inspiration requires its own process. I usually enjoy UV Mapping as well.
I started with just the one building, and that's all it was going to be. But it looked lonely on its own, so I started to add the others. Feature Creep, I think they call it, lol
Not saying UV mapping isn't enjoyable, but on the outside, your model still looks the same as it did before (even though progress is *actually* happening. But if you've added a tree or a fence, or a new prop or whatever, it *looks* like progress, IYSWIM
So, my Wacom arrived yesterday and I've spent a good amount of time around my new toy... :)
But I got back to my model before I got lost in digital painting.
For now, I just have the textures in the diffuse channel... I really worked out so that the joining parts would be clean and it really took me hours on photoshop make them join perfectly in the columns and spheres. Thankfully, in the top crystal I figure it out at first try! :)
Now, let's go work this surfaces so that they look really nice!! There's still lot of texture work in front of me!! :)
Wow!
That's looking fantastic!
I'm still learning to use my Wacom, but largely due to me forgetting to grab it and use it! It's all plugged in and working great... I've just grown so accustomed to using my mouse, I forget to grab my Wacom! LOL
Anyways, what are you painting in? I am using Project Dogwaffle Pro: Howler 9, which is so fun that I use it at least several times a day! I got in with the development team, too... so I am now using the latest and greatest Howler 9.2 beta! (lucky me :) )
Regular Dogwaffle (Artists edition doesn't have animation stuff) feels like real paint, pencil, conte, etc., with my Wacom!
Thank you my friend! :)
I have the mouse to, don't really like to use digital pen in 3d software. But was really crazy to get my wacom so I can go to digital paint. The tablet I had don't have the sensibility to paint, specially for me that am used to hand drawing.
I'm using photoshop since I'm more familiar with this software. Would like to learn manga studio to. But had never heard about Dogwaffle until now.
We have a lot of fun in Dogwaffle! :)
Here's some great videos that help to show how much fun we really have!
Howler 9 Playlist
My Own Playlists I made for learning how to Howl!
EDIT:
Oh... and they sell it here, at DAZ 3D, too! PD Pro - Howler 9.1
Here's their whole store here: Staigerman (because Staiger is The MAN!!!)
Their store is cool. They keep older versions alive and offer them for much less! This way people who don't want all of the new fancy stuff can still Waffle and Howl!
The Artist Edition is much less cost, but is the same software without the animation stuff - so I guess it's not at all the same anymore, because Howler 9.1 just added a whole slew of excellent new animation features. Even more to come soon!
Ooops... I don't mean to sound like a commercial! Sorry! I get carried away sometimes :ahhh:
I was already looking through the net, but then I got to the page and saw it's a pc project...
Mac user here... no pc in this house... :(
The few I saw really looked great!! It seems a really great software for lot's of things... So I don't want to see more :P since I can't use it.
Can you move some strings so that they make a mac version?? lololol just kidding... kind of... (in Portugal we have a saying: playing playing the truths are said).