Genesis in Carrara
 TangoAlpha
Posts: 4,584
Over the holiday weekend I thought I'd have a go at making a render with some of the DLC that comes with Carrara... oh joy, that didn't work out so good!
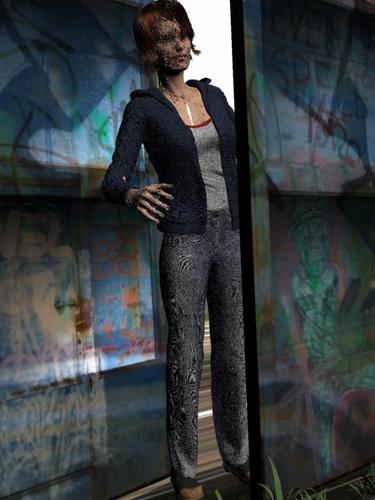
I set up a simple scene - V5 peering through a doorway, which was fine, until I came to render it. Oh dear. V5 looks like she needs an urgent visit to the plague clinic, and the clothing has all sorts of horrid moire fringing on it. Any idea what the problem is (hopefully it's something simple, but Carrara really isn't very noob-friendly sometimes!)
For reference the character is Gabi, Aldora Hair, Vest & hoodie from Mall Girl, jeans from Town & Country. Doorway is Stonemason's new Abandoned Warehouse (that bit is great!)


genesis.jpg
600 x 800 - 58K


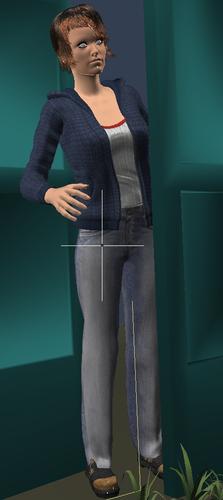
Screen_Shot_2014-04-22_at_12.34_.26_.jpg
442 x 990 - 85K


Comments
Looks like it has imported with the bump settings too high - try reducing the bump amounts and I think that should fix it.
Yeah, and with figures having so many domains, it also helps to consolidate shaders first, so you have less changes to make (Edit > Remove Unused Masters > Consolidate Duplicate Shaders)
For higher resolution of bump maps in a render, you need to set object and shadow accuracy higher in the render room. Otherwise, if you want lower accuracy for faster renders, like I do, just turn the bump channels lower. and that cheese look will go away.
This Article might help.
I tried reducing the bump map - in fact i completely removed all bump mapping from any of the skin shaders. I also tried consolidating them, re-importing the figure, & using a different character, different eye/lip options etc, but to no avail. Here is a close up of the face in all its gory detail...
Just noticed: 100th post! Yay! :-)
Tim_A,
It looks like you have displacement turned up too high. Try turning that off also.
Except the hair, she looks like my mother-in-law!
It is unusual to see any displacement on an imported figure, but it certainly looks like that is what you have here. After you have cleared the displacement, you may want to reinstate a bit of the bump!
I prefer to load Genesis in by using the Character presets from the DAZ Studio library (unless I have it already saved to Carrara) and change the textures myself, in the texture room, rather than applying material presets to them - again, unless I have the Carrara preset for the character shaders.
I prefer to load Genesis in by using the Character presets from the DAZ Studio library (unless I have it already saved to Carrara) and change the textures myself, in the texture room, rather than applying material presets to them - again, unless I have the Carrara preset for the character shaders.
I've noticed a few Genesis figures loading in Carrara with a displacement map set--I just can't recall which ones. I think one was Rawart's "The Victorian Monster". I'll try a few tonight to see what happens. I've never had one with that much displacement, though.
I tend to load the figure in DS and save it, then import into Carrara just to get a look at what the textures were designed to like before I start tweaking. I 'm not recommending that workflow--it's just the way I do it.
Of course, when talking shaders and Carrara, I can't imagine living without Fenric's "Shader Doctor"...what a time saver!
Yeah, that's not bump map, that's displacement map. You need to clear that out. The Carrara displacement map is really brutal on characters, but nice on terrain. Displacement is on the Displacement tab when your editing a shader.
Boojum the brown bunny
I should have mentioned, there is *no* displacement map. It's set to "None", and "use" is untucked. I've even tried replacing the skin shaders with regular shaders from the tray - glass, metal, the default grey etc, but there's no difference. It does this regardless.
So what else could it be? Cos I'm convinced by a process of elimination that it isn't bump mapping or displacement mapping...
Check the displacement maps on the HIP object instead of the displacement maps on the Figure object and see if they show up there. ;) Specifically, select the hip texture, then edit the textures by going to the texture room. Slide down until you see the Face Texture and double click to open it. Then check that for bump and texture maps.
Boojum the brown bunny
Ah, now that's interesting...
When I look at the hip object, it seems to be using the ground shader from the scenery, rather than one of the skin shaders (why on earth would it use that?), and that *does* have displacement. Just kicked off a render now, but it looks promising.
Thanks for the suggestion - I would have never thought to look there, or even guessed that it could somehow be using a shader from a different object! :red:
Now, any ideas what I can do about the moire fringing on the clothing? It's pretty bad, especially on the jeans...
Assuming that the jeans don't have excessive bump or displacement, you could try increasing the aliasing level in your render settings?
On Genesis, when you have the figure selected and go to the Texture room you are not actually editing the textures for the model. To get to those, select some body part (like hip) and go to the texture room. You will then see a whole BUNCH of shaders down the right hand side of the screen... like Torso, nipples, hip, skinFace, skin head, etc... Those are the actual shaders the Genesis uses. If one of these does not exist, such as if you were to delete the hip shader, then it will use the default shader at the top right corner of the screen.
You can open those shaders by doubleclicking on them. So you can doubleclick on skin hands and it will open the shader for the hands. Then you can check the hands displacement and bump maps.
There will very likely be a LOT of redundancy.. for example, the hands, feet, upper arm, lower arm, lower leg, upper leg, all use the same texture map. You will likely see a seperate shader for each of these. To fix that you can choose to Consolodate your shaders from the Edit/Remove Unused Shaders/Consolodate Duplicate Shaders. This will go through and merge all the shaders on the character that are identical to each other. That way when you edit the hands, your also editing the arms, legs, etc.. it saves a lot of time. :D
Boojum the brown bunny
That'll be it then. I guess the ground texture was the default one in the scene. I didn't delete the original hip texture, so maybe it was just set at default all along. Consolidating took the textures list down to about 5!
Thanks Phil - that makes a huge difference. :)
Just as a bit of advice.. any time you delete objects it's a good habit to "Remove Unused Master Objects" and "Remove Unused Master Shaders." This will help you keep your working files trim and light and your interface speedy. Sometimes you will notice that, even though you remove a shader from an object, the Master Shader is still present in your working files until you clear them. :D
To see how many master shaders you have loaded:
1. go to the Assemble room.
2. Left-click on the Shaders tab on the right side of the page.
Everything in that panel is a master shading waiting to be used. Now if you do a Remove Unused Master Shaders you may see some of those vanish. All those that vanish were shaders that were not actually ON an object. :D They were just taking up space in case you decided you wanted them again.
Boojum the brown bunny
I'm seeing a new benefit to starting in DS and then saving the character. Or so I thought.
Trying to duplicate this problem has been unsuccessful. I get smooth skin when bringing Gabi in from the Characters section of my DAZ 3D library. Well, it has bump, but not what is shown above.
Carrara 8.5 comes with a special Gabi Shader under the Shader tab. Shaders > Skin > Genesis
The problem that I was having is that, when I'd try to apply hair to the figure, it would lock up my computer and never finish projecting the morphs. So I went into DAZ Studio to begin there, which was successful, but upon loading the Gabi Character preset, I got a list of missing morphs. Carrara 8.5 came with the V5 Pro bundle, and Gabi V5 is part of that. But she also uses Genesis Evolution Head and Body Morphs, which are unfortunately not included! What gives with that? Either include those or don't include a character that requires them, I would think. Hmnpf!
Anyways, I just went through to get hair onto her, and this time it worked. It still took a lot of time projecting morphs, but it's done now. What I did was to forget about Gabi's shape and just start with V5, so I didn't have a bunch of shapes being called upon that I apparently don't have. I think that might have been causing issues.
I looked at my library under Characters > Gabi, to check out the makeup options, so I could load the one I want from the Carrara Shaders that came with 8.5 Pro. I decided upon Makeup 7. I was also reminded of how well auto-fit works on Genesis 1! Rock On!
Yeah, I got bumps too, but when you increase the render qualities, that goes away... but nothing like that deforming going on in the original posts. Hmmmm. Here's my comparison of the straight character shader that comes in with the DUF and the same settings and lighting but using the shaders that come with Carrara:
EDIT: silly me, it would have been a better comparison if I'd have used the lighting to highlight the eyes a bit more. There is a quite a difference in the two shader sets... but these don't show that off so well, do they? I was just using a quick and simple setup that I have using GI and GC=2.2 and then I bumped up the render quality to .5 for both Object and Shadow accuracies, Good AA... or was it Best? Something like that. Putting in a plane with a shader, and giving it IL makes for some great test renders. It's good to have a nice, basic test scene.
Editing to remove incorrect information I typed. Sorry!
It's starting to come together, but now I've got a big texture problem with the Stonemason set. The walls are supposed to be brick, but they just come out as a smear. They appear to be mapped to the correct texture - I've tried reapplying the shader, reimporting the prop, creating a new scene and adding the prop, but still get the problem.
Any idea what it could be?
This is the link to the Stonemason scene: http://www.daz3d.com/new-releases/abandoned-interiors-warehouse image 4 in the promos shows more or less the same section of the prop.
D'oh! scrub that - it was just a matter of going into the UV editor for the walls and unpicking "Map U values"
Should have twigged - I've had to do that on my own buildings sometimes!
Okay, so here's the final image. This is effectively my first piece of "proper" artwork, done in Carrara... ;)
That's a problem to all daz characters... You get a character, and just then you find out it uses morphs that you have to buy separately. Nice marketing technic... Not very nice for us... I actually have this morph pack, so no problem with Gabi... But it happened to me with a character that was in the christmas freebies...
I had to use Gabi without the morphs, cos I don't have them (didn't even know she needed them till I saw your other thread). I've got them on my wish list now though, ready for the next time there's a sale...