NOW AVAILABLE: Wildenlander HD for Genesis Males
 Luthbel
Posts: 111
Luthbel
Posts: 111
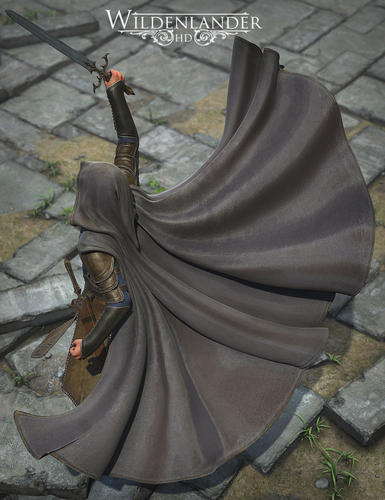
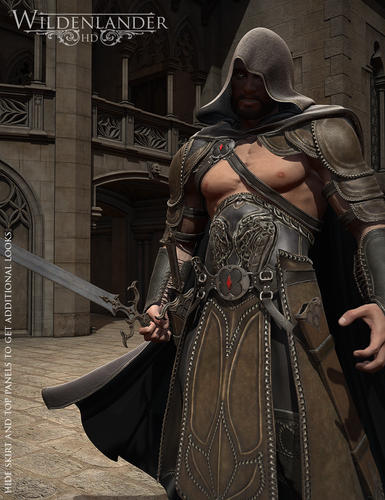
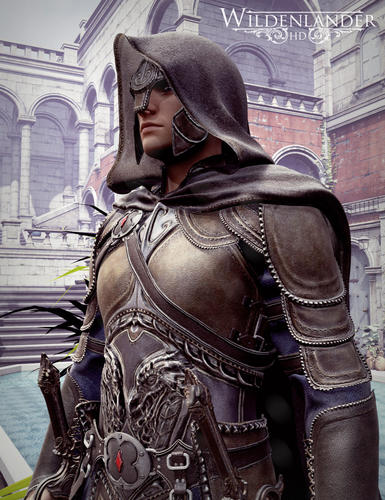
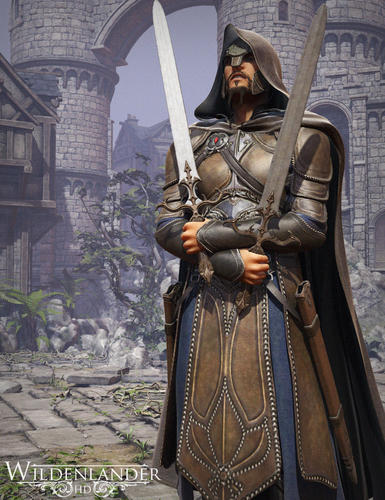
Luthbel Creations is proud to announce Wildenlander HD, the next chapter in the Wildenlander series.
Wildenlander HD takes advantage of the next-gen features built-in in DAZ Studio 4.6, such as HD morphing, to offer you an easy way to render stunning cutting-edge fantasy renders with Genesis 2 Males.
This set includes a complete, fully textured clothing set, with lots of customization options, useful morphs and extra bones to add more movement and dramatism to your scenes.
Additionally, Wildenlander HD is more optimized than you imagine! The total polycount of the set is about 75.000 polygons, just in the line of the latest videogames character polycounts, and the entire clothing set only uses 2 UV sets (plus another one for the sword/sheath)

Daz 3D is part of 
Connect
DAZ Productions, Inc.
7533 S Center View Ct #4664
West Jordan, UT 84084
Licensing Agreement | Terms of Service | Privacy Policy | EULA
© 2025 Daz Productions Inc. All Rights Reserved.
Comments
Ah, good - it feels like a while since we've had a new Wildenlander set and I always enjoy them.
wow.. these look amazing ! *starts to plan and plot*
I want this one :-P. My wishlist is swelling, that is true, but I can always use more hooded cloaks. If you have any ideas on how to mix-and-match this and perhaps other sets to create outfits for thieves, please be so nice and send me an e-mail.
These look fantastic:) Nice one:)
IT'S AWESOME!!! TAKE MY MONEY! GIVE ME!!!!
I love it! This will look awesome on Gianni and Michael in my scenes.
Already have the futuristic version (which is truly excellent) and the Genesis 1 edition. This will certainly be in line for puchasing along with them.
Interesting to know about the polygon count being not too dissimilar to those for modern computer games. Useful information.
Wow, looks great as always Luthbel! A must have for me :cheese:
I certainly loved G1's Wildenlander!
Definitely picking this up.
Thanks guys!
This set was initially thought as some kind of mix/remake of Wildenalnder versions for M3 and M4, and I think it´s a quite balanced mix of both... but looking much better.
I forgot to mention in the description that the skirt panels and the cloak have dedicated and easely selectable bodyparts to make it easier to pose them. The sword sheaths have also dedicated bones.
It was a long time without wildenlanders, because I wanted it to look much better than older versions
Love the cape. I cannot have enough capes. I hope you can make one for g2f but in a feminine style. I love your work.
This is really beautiful, the cape is spectacular;
but I find that on my machine the HD takes forever to render, it turns a 30 minute render into a 2 hour render.
Is this set only going to come in HD is it usable at base resolution.
You also mentioned it having only 2 UV sets how about mat zones does it have many of them.
Thanks
I can fully understand you, these renders have taken an average of 4 hours to render each. Only with the normal/displacement/bump, you can get really cool renders, the HD geometry round it up.
Each piece have several material zones, specially the skirt and top.
Great work on this piece! The detail is amazing, did you say it's only in HD? HD takes a long time to render on my machine, but can't ssay that will stop me from purchasing this item :)
I can fully understand you, these renders have taken an average of 4 hours to render each. Only with the normal/displacement/bump, you can get really cool renders, the HD geometry round it up.
Each piece have several material zones, specially the skirt and top.
Thank you for the answers, 4 hours for the renders on my machine it would probably take longer, but they are wonderfully done images.
This is truly beautiful. This is a trivial point, will we be able to push back the hood of the cape? (I also love capes!). Only reason is if my model can have a cool cape that can fly around, I'd like him to be able to show off his fabulous girl hair that he can fling around also.
I knew you must be up to something Mr. Looks fantastic. Can't wait to throw money and my self at you... ooops! lol
Thanks folks for your nice words! thanks much
The cape have a morph option to put it down, it looks really nice in back renders. In fact, the main pic (still not shown) shows the guy with the hood down morph
The set is designed in HD, but it renders really ince in standard subD at level 1 in near-close up, for general renders, you can use the standard geometry polycount too.
Hi!
Here´s the main picture for this set :)
Cheers!
Looks great. I will have to get this set for sure.
Quick question. In the third picture down on the first page of this thread the character is holding a sword in his right hand and the left hand sheath is empty.
Does anyone know how this was done? I may be missing something really obvious, my knowledge of Studio leads me to believe this may be the case, but I am looking to hide one sword from the sheath set.
Making the sword parts of the sheath transparent in the surfaces tab affects both sides and there doesn't appear to be any morphs to hide them. The sword parts of the sheath don't appear to be separate so I can't hide them in the scene tab either.
Any light that can be shined my way would be gratefully received.
I too am interested in the answer to this question. The promo renders clearly show scenes with the sheaths empty but I see no way of getting the sheaths empty unless I am overlooking something.
If you're feeling adventurous you can do this by creating a new surface on the Sword belt.
1Select the polygon group editor tool under tools.
2 Left click and drag selecting all the surfaces on the sword you want to disappear. You don't need every poly just one on each part. Be careful not to select other components to.
3 Right click and choose polygon selection/select all connected.
4 Now the sword should be a yellow color, showing its selected all the surfaces.
5 Now go to the Tool settings tab and right click on the surfaces section and create surface from selected. Call it something like swordhideLeft
6 Make sure all of the surfaces of the sword are allocated to your new surface. There will be a number next to your new surface under count.
7 Then change to the surface palette and you should see your new surface listed there.
8 Now, Set the opacity to 0% and your done!
Now you should have a single sword in the belt. :)
Wow, Thanks Razor, not only did you give me a solution but you introduced me to a very cool tool that I had never played with before. Although in the newest version of Studio it was the called the Geometry Editor tool but it only took me a few minutes to figure that out. Just one other small question when I create the new surface it looses all of the shader and texture settings and reverts back to an untextured surface with Daz studio Default shader instead of AoA Subsurface Base, this is not a huge deal because it is a simple matter to reapply the texture and the shader but I was wondering if there was a way to do it without disrupting the surface settings. Again thanks a bunch because I can see all kinds of uses for this tool now that I have found it.
Wow, Thanks Razor, not only did you give me a solution but you introduced me to a very cool tool that I had never played with before. Although in the newest version of Studio it was the called the Geometry Editor tool but it only took me a few minutes to figure that out. Just one other small question when I create the new surface it looses all of the shader and texture settings and reverts back to an untextured surface with Daz studio Default shader instead of AoA Subsurface Base, this is not a huge deal because it is a simple matter to reapply the texture and the shader but I was wondering if there was a way to do it without disrupting the surface settings. Again thanks a bunch because I can see all kinds of uses for this tool now that I have found it.
In the Surfaces pane you should be able to switch to the old material zone, copy the settings, and paste them to the new zone.
This is an amazing outfit and exactly what I was looking for thanks so much grin I do have one question - and I must admit I'm very much a novice so please bear with me - In one of the promo pics, the chest piece is hidden, I have tried to hide certain pieces but I don't seem to be doing it right to get it to look exactly like the picture and I'm unable to get it to look that way. If you could please send me some instructions on how to do this I would be most grateful, as I can only seem to hide the left and right pectoral from inside the parameters - which is not where I need to be doing this I take it. Thanks in advance for any help you can give. This is also my first post so sorry if it ends up in the wrong spot!
I suspect there's a material zone for that section -- if you choose the Surface Selection tool in DAZ Studio and click on the chest area it will highlight the material zone. Then go to the Surfaces pane ad set the Opacity Strength to zero.
Awesome thank you! :-)