UltraScenery Experiments and Experiences

1356710

Comments

  • barbultbarbult Posts: 24,359
    edited July 2020

    Experiment: Modify Iray Surface Settings to Get More Color Variety in an UltraScene (Continuation 2)

    5) Save a Hierarchical Materials Preset

    1. After you have made all the surface settings changes to add variety to the color of your tree leaves and ground leaves, it is important to save a materials preset so you can apply the changes again to another UltraScene build of the same ecologies. In order to change the whole ecology at once, without individually applying materials presets to every object in the scene, we will create a Hierarchical Materials Preset. 
    2. Select the composite UltraScene in the Scene pane. I think it is important to leave the name "UltraScene". If it is changed, I'm not sure the preset will apply properly to another UltraScene in the future. I've had problems with things like that in the past.
    3. In the Daz Studio menus, select File>Save As>Hierarchical Material(s) Preset...
    4. Select a location to save your new preset. I chose to create a "Materials BV" subfolder in the Environments/Landscapes/UltraScenery folder so it is easy to find. (BV are my initials, so I know this is something I created and it won't interfere if UltraScenery is updated to include a Materials folder some day.)
    5. Give the new preset a name. I chose "USC Harpwood Beach Mixed Color BV".
    6. Click the Save button.
    7. A Hierarchical Materials(s) Preset Save Options dialog will open. This lets us choose what objects to save materials for. Since we changed only trees and leaves on the ground, that is all we need to select in this dialog. Since we built only trees and leaves when creating out UltraScene, we don't have a lot that we need to filter out. Uncheck the UltraScene itself, so that when the preset is applied to another UltraScene, it doesn't overwrite the materials of the UltraScene itself. We only want to overwrite things we explicitly changed (the trees and leaves). I like to uncheck the proxies, if I didn't change them. To uncheck them, expand the UltraScene and click to remove the checkmark on the proxies. If you changed the material color of the proxies, leave them checked.
    8. Click Accept in the A Hierarchical Materials(s) Preset Save Options dialog.

    6) Test the new Hierarchical Material(s) Preset

    1. Start a new scene.
    2. Run the UltraSceneCreator script.
    3. Select any terrain, any feature, and any one of the Harpwood ecologies.
    4. Check the box for Extend Forest, so we can test the changes to the extended forest materials.
    5. Select all layers in the scene (they will be selected by default).
    6. Click the Build Scene button.
    7. When the scene is built, select UltraScene in the Scene pane.
    8. In the Content Library pane, navigate to the folder where the hierarchical material preset was saved.
    9. Double click the previously saved hierarchical materials preset to apply it to the new UltraScene. If you get an error, double check that you have UltraScene selected in the Scene pane.
    10. Load a render settings preset (I used USC Late Morning).
    11. Select a good camera view and render the scene.

    Here is a scene with my new preset applied

    Continued Below

    Save as HMP.png
    544 x 634 - 64K
    Screenshot 2020-07-14 22.27.17.png
    614 x 699 - 42K
    UltraScenery River Harpwood 4 USC Mixed.jpg
    1920 x 1080 - 3M
    Post edited by barbult on
  • barbultbarbult Posts: 24,359
    edited July 2020

    Experiment: Modify Iray Surface Settings to Get More Color Variety in an UltraScene (Continuation 3)

    Oops - U-Turn

    While testing my new Hierarchical Materials Preset on a Harpwood ecology with Track 1 and Track 2, I discovered that there are additional leaf layers that only show up with certain combinations of feature and ecology. I will need to modify my composite UltraScene if I want to handle all tree and leaf layers for Harpwood ecologies. This is the kind of U-Turn that happens in real time experiments!

    7) Add missing Harpwood leaf layers to the composite UltraScene

    1. In Daz Studio, open the previously saved composite UltraScene file.
    2. Build an UltraScene with Track 01 feature and Harpwood 4 ecology.
    3. Change the parent of these layers to be the composite UltraScene:
      • Leaf Litter (roads 1) layer
      • Leaf Litter (verge) Layer
      • Leaf Litter (roads 2) Layer
      • Leaf Litter (roads 3) Layer
      • (We already have a Leaf Litter (forest) Layer, so we don't have to reparent that one.)
    4. Delete the UltraScene built with Track 01.
    5. Save the scene with the updated composite UltraScene.
    6. Apply the previously saved Hierarchical Materials Preset with your color changes.
    7. Make any additional desired color changes to the newly added leaf layers.
    8. Save the updated UltraScene as a Hierarchical Materials Preset.

    Oops again. I discovered that I somehow lost the Beech (shrub) Layer. I'll have to add it in now following the same steps above.

    Here's an image I made with Track 1 and the new Hierarchical Materials Preset

    And here's one with Track 2

    UltraScenery Track 1 Harpwood 4 USC Mixed.jpg
    1920 x 1080 - 3M
    UltraScenery Track 2 Harpwood 2 USC Mixed.jpg
    1920 x 1080 - 2M
    Post edited by barbult on
  • richardandtracyrichardandtracy Posts: 5,727

    These views both look like late autumn between the start & end of leaf drop. They are stunning. Simply the only words for it.

    Regards,

    Richard

  • barbultbarbult Posts: 24,359

    These views both look like late autumn between the start & end of leaf drop. They are stunning. Simply the only words for it.

    Regards,

    Richard

    Thank you, Richard. It is nice to know someone is looking!

  • DaventakiDaventaki Posts: 1,624

    Oh we are looking!  Just beautiful!!

  • barbultbarbult Posts: 24,359
    edited July 2020
    Daventaki said:

    Oh we are looking!  Just beautiful!!

    Thanks. Give it a try. It's not very hard. No JSON to edit or anything like that. There are infinite possibilities of color change combinations you could make. You don't have to do trees and leaves either. You could make a simple one that changes daisies color or something as a starting experiment. I'm going make some more.
    Post edited by barbult on
  • L'AdairL'Adair Posts: 9,479

    Looking… Lurking…

    With the occasional drive by comment…


    angel

  • barbultbarbult Posts: 24,359
    L'Adair said:

    Looking… Lurking…

    With the occasional drive by comment…


    angel

    Glad to have you here!
  • JerifeJerife Posts: 272
    edited July 2020

    Great work Barbult, thanks

    I won't be playing with JSON as he might become Adam, lol (I just saw Dark wink)

    But will try all the rest, rendering now my tropical islands after your experiment

    Post edited by Jerife on
  • KA1KA1 Posts: 1,012
    Jerife said:

    Great work Barbult, thanks

    I won't be playing with JSON as he might become Adam, lol (I just saw Dark wink)

    But will try all the rest, rendering now my tropical islands after your experiment

    Ah but he already has become Adam... Fantastic renders and experiment ideas in this thread!
  • barbultbarbult Posts: 24,359
    edited August 2020

    I am using Daz Studio 4.12.2.6 Public Beta and UltraScenery 1.2

    Experiment: Create a Cobblestone Material for the UltraScenery Dirt Track Features

    Are you tired of all of your UltraScenery renders, that use one of the Dirt Track features, having the same dirt texture? It is pretty easy to modify the texture files used in the UltraScenery Terrain Shader to use different image files. After substituting different images, save a Materials Preset to use again later. The Materials Preset will be applied after building the UltraScene but before rendering the scene. Your runtime/textures folder is probably full of interesting textures to try. You can also download interesting textures online. If you want to download texture files, check the usage license before downloading, so you know whether you can use them for this purpose. One source of free, public domain, CC0 textures is texturehaven.com.

    This is the approach I am going to take:

    • Download cobblestone textures from the internet (making sure the license allows me to use the textures for this purpose)
    • Modify the settings of the UltraScenery Terrain surface to use the downloaded textures
    • Save a materials preset that I can later apply to any UltraScene using a Dirt Track feature.

    1) Download cobblestone texture files from texturehaven.com

    1. Open your web browser (I use Chrome).
    2. Navigate to https://texturehaven.com/tex/?c=floor&t=cobblestone_floor_05
    3. Where it says Download:, click the All Maps button. (We don't really need all of the maps for this exercise, but it is easy to get them all at once and the ones we don't need now may be useful for future projects.)
    4. Select one of the map resolutions (I used 4k PNG).
    5. Depending on how you have your browser configured, either the download will start and go to your previously specified download folder, or a window will pop up asking you where to save the file. In the latter case, select a location and save the file.
    6. Close the web browser; we are done with it now.
    7. Locate the zip file that was downloaded and uncompress it. I use 7Zip to do that. You can also use the features built into Windows or WinZip, etc.
    8. In the File Explorer built into your OS, open the Runtime/Textures folder of your content library.
    9. Create a new Texture Haven subfolder in runtime/textures.
    10. Copy the unzipped cobblestone texture files into Runtime/Textures/Texture Haven. I recommend copying them into a subfolder named the same as the zip file you downloaded. So, I have Runtime/Textures/Texture Haven/cobblestone_floor_05_4k_png with 7 PNG texture files in it when I am done.

    2) Build a simple UltraScene which we can use as a basis for changing textures

    1. In Daz Studio, create a new Scene.
    2. Run the UltraSceneCreator script.
    3. Select the default Terrain settings.
    4. Select Feature Dirt Track 2.
    5. Select Ecology Grassland 1.
    6. On the Build tab, hide (click the eyeball to close it) all of the layers, to make this a quick build. All we need is the UltraScene itself, none of the vegetation.
    7. On the Build tab, click the Build Scene button.

    3) Modify the texture settings of the UltraScene

    1. Select the UltraScene in the Scene pane.
    2. Open the Surfaces pane.
    3. In the Surfaces pane, select the Editor tab.
    4. Change the images and image tiling in the 5 Roadbase Layer
      • Select 5 Roadbase Layer.
      • Click on the small square image icon for the Roadbase Layer Normal.
      • In the pop up window, select Browse... (Browse is at the top.)
      • Navigate to the folder where you saved the cobblestone texture files in your content library (Runtime/Textures/Texture Haven/cobblestone_floor_05_4k_png)
      • Select the cobblestone_floor_05_nor_4k.png file and click the Open button.
      • Click on the small square image icon for the Roadbase Layer Diffuse Color.
      • In the pop up window, select Browse...
      • Navigate to the folder where you saved the cobblestone texture files in your content library.
      • Select the cobblestone_floor_05_diff_4k.png file and click the Open button.
      • The cobblestones in the image texture file are larger than I want, so I am going to tile them more. Change the Roadbase Layer Tile H from 40 to 60.
      • Change the Roadbase Layer Tile V from 40 to 60.
    5. Change the images and image tiling in the 6 Roadsurface Layer
      • Select 6 Roadsurface Layer.
      • Click on the small square image icon for the Roadsurface Layer Normal.
      • In the pop up window, select Browse...
      • Navigate to the folder where you saved the cobblestone texture files in your content library.
      • Select the cobblestone_floor_05_nor_4k.png file and click the Open button.
      • Click on the small square image icon for the Roadsurface Layer Diffuse Color.
      • In the pop up window, select Browse...
      • Navigate to the folder where you saved the cobblestone texture files in your content library.
      • Select the cobblestone_floor_05_diff_4k.png file and click the Open button.
      • The cobblestones in the image texture file are larger than I want, so I am going to tile them more. Change the Roadsurface Layer Tile H from 40 to 60.
      • Change the Roadsurface Layer Tile V from 40 to 60.
    6. Change the diffuse color of the Roadbase and Roadsurface layers to make them different. The UltraScenery Terrain Shader blends these two layers together, so by making them slightly different colors, the surface will have more interesting tonal variation and look less tiled. It is a very clever shader! The cobblestones in these textures are a little brighter than I would like, so changing the diffuse color will also allow me to darken them.
      • Select 5 Roadbase Layer
      • Click on the color value bar, in the Roadbase Layer Diffuse Color.
      • When the Select Color dialog pops up, select a gray color to darken the image. I selected a gray value of 177, which is a mid gray.
      • Click the OK button in the Select Color dialog to apply the color change and close the dialog box.
      • Select 6 Roadsurface Layer
      • Click on the color value bar, in the Roadsurface Layer Diffuse Color.
      • When the Select Color dialog pops up, select a gray color to darken the image. I selected a gray value of 205, which is a light gray.
      • Click the OK button in the Select Color dialog to apply the color change and close the dialog box.
    7. Render the scene to see your new cobblestone track.
      • In the Scene pane, position a camera where it can see the Dirt Track part of the UltraScene.
      • Render the scene. Remember that we hid all the vegetation layers when we built the UltraScene, so we will see only the bare terrain with the bare terrain UltraScenery Terrain shader.
      • In the rendered image, if everything was done correctly, your "Dirt Track" is now a cobblestone track!

    4) Save a Materials preset for future use

    1. In the Scene pane, select the UltraScene.
    2. In the Surfaces pane, select the UltraScene.
    3. In the Daz Studio menu, select File>Save As>Material(s) Preset...
    4. When the save window pops open, select a location in your content library to save your new preset. I chose to create a "Materials BV" subfolder in the Environments/Landscapes/UltraScenery folder so it is easy to find. (BV are my initials, so I know this is something I created and it won't interfere if UltraScenery is updated to include a Materials folder some day.)
    5. Give the new preset a name. I chose "USC Track Cobblestone BV".
    6. Click the Save button.
    7. A Material(s) Preset Save Options dialog box will open. Expand the Default list by clicking on the arrowhead to the left of it.
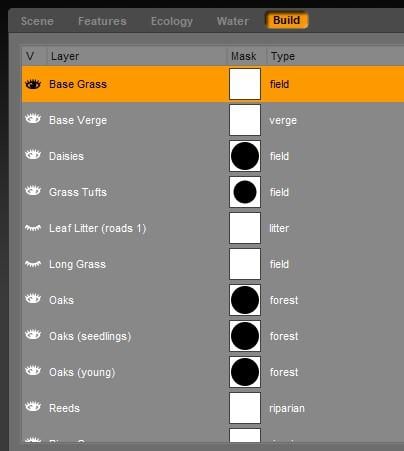
    8. Select only the portions of the material that we want to change. We want to change only parts of the 5 Roadbase Layer and parts of the 6 Roadsurface Layer. See the screenshot below. Here is how we accomplish that:
      • Click the checkbox next to Default to deselect everything.
      • Click the checkbox next to 5 Roadbase Layer to select it and all of its subitems.
      • Click the arrowhead next to 5 Roadbase Layer to expand it to see the subitems.
      • Click the checkbox next to Roadbase Layer Mask to deselect it. This is important. We don't want to include the mask, because we want to be able to use this Materials preset with all UltraScenery features that use Dirt Tracks. Each one may have a different mask.
      • Click the checkbox next to 6 Roadsurface Layer to select it and all of its subitems.
      • Click the arrowhead next to 6 Roadsurface Layer to expand it to see the subitems.
      • Click the checkbox next to Roadsurface Layer Mask to deselect it. This is important. We don't want to include the mask, because we want to be able to use this Materials preset with all UltraScenery features that use Dirt Tracks. Each one may have a different mask.
      • Click the Accept button to accept the changes and close the dialog box.

    5) Apply the cobblestone Materials preset to a different UltraScene.

    1. Build a new UltraScene that used one of the Dirt Track features. Select any terrain and any ecology.
    2. Select the UltraScene in the Scene pane.
    3. Apply the cobblestone Materials preset. This must be done AFTER building the UltraScene and BEFORE rendering the UltraScene, in order for it to apply to the render.
    4. Render the scene.

    Now go download more interesting textures and dig through your Runtime/Textures folder to make more interesting Materials presets. It is fast and easy. 

    Here is a screenshot of the 5 Roadbase Layer surface settings:

    Here is a screenshot of how the Materials Preset Options dialog should be filled out for this experiment:

    Here is the cobblestone path on the bare UltraScene terrain:

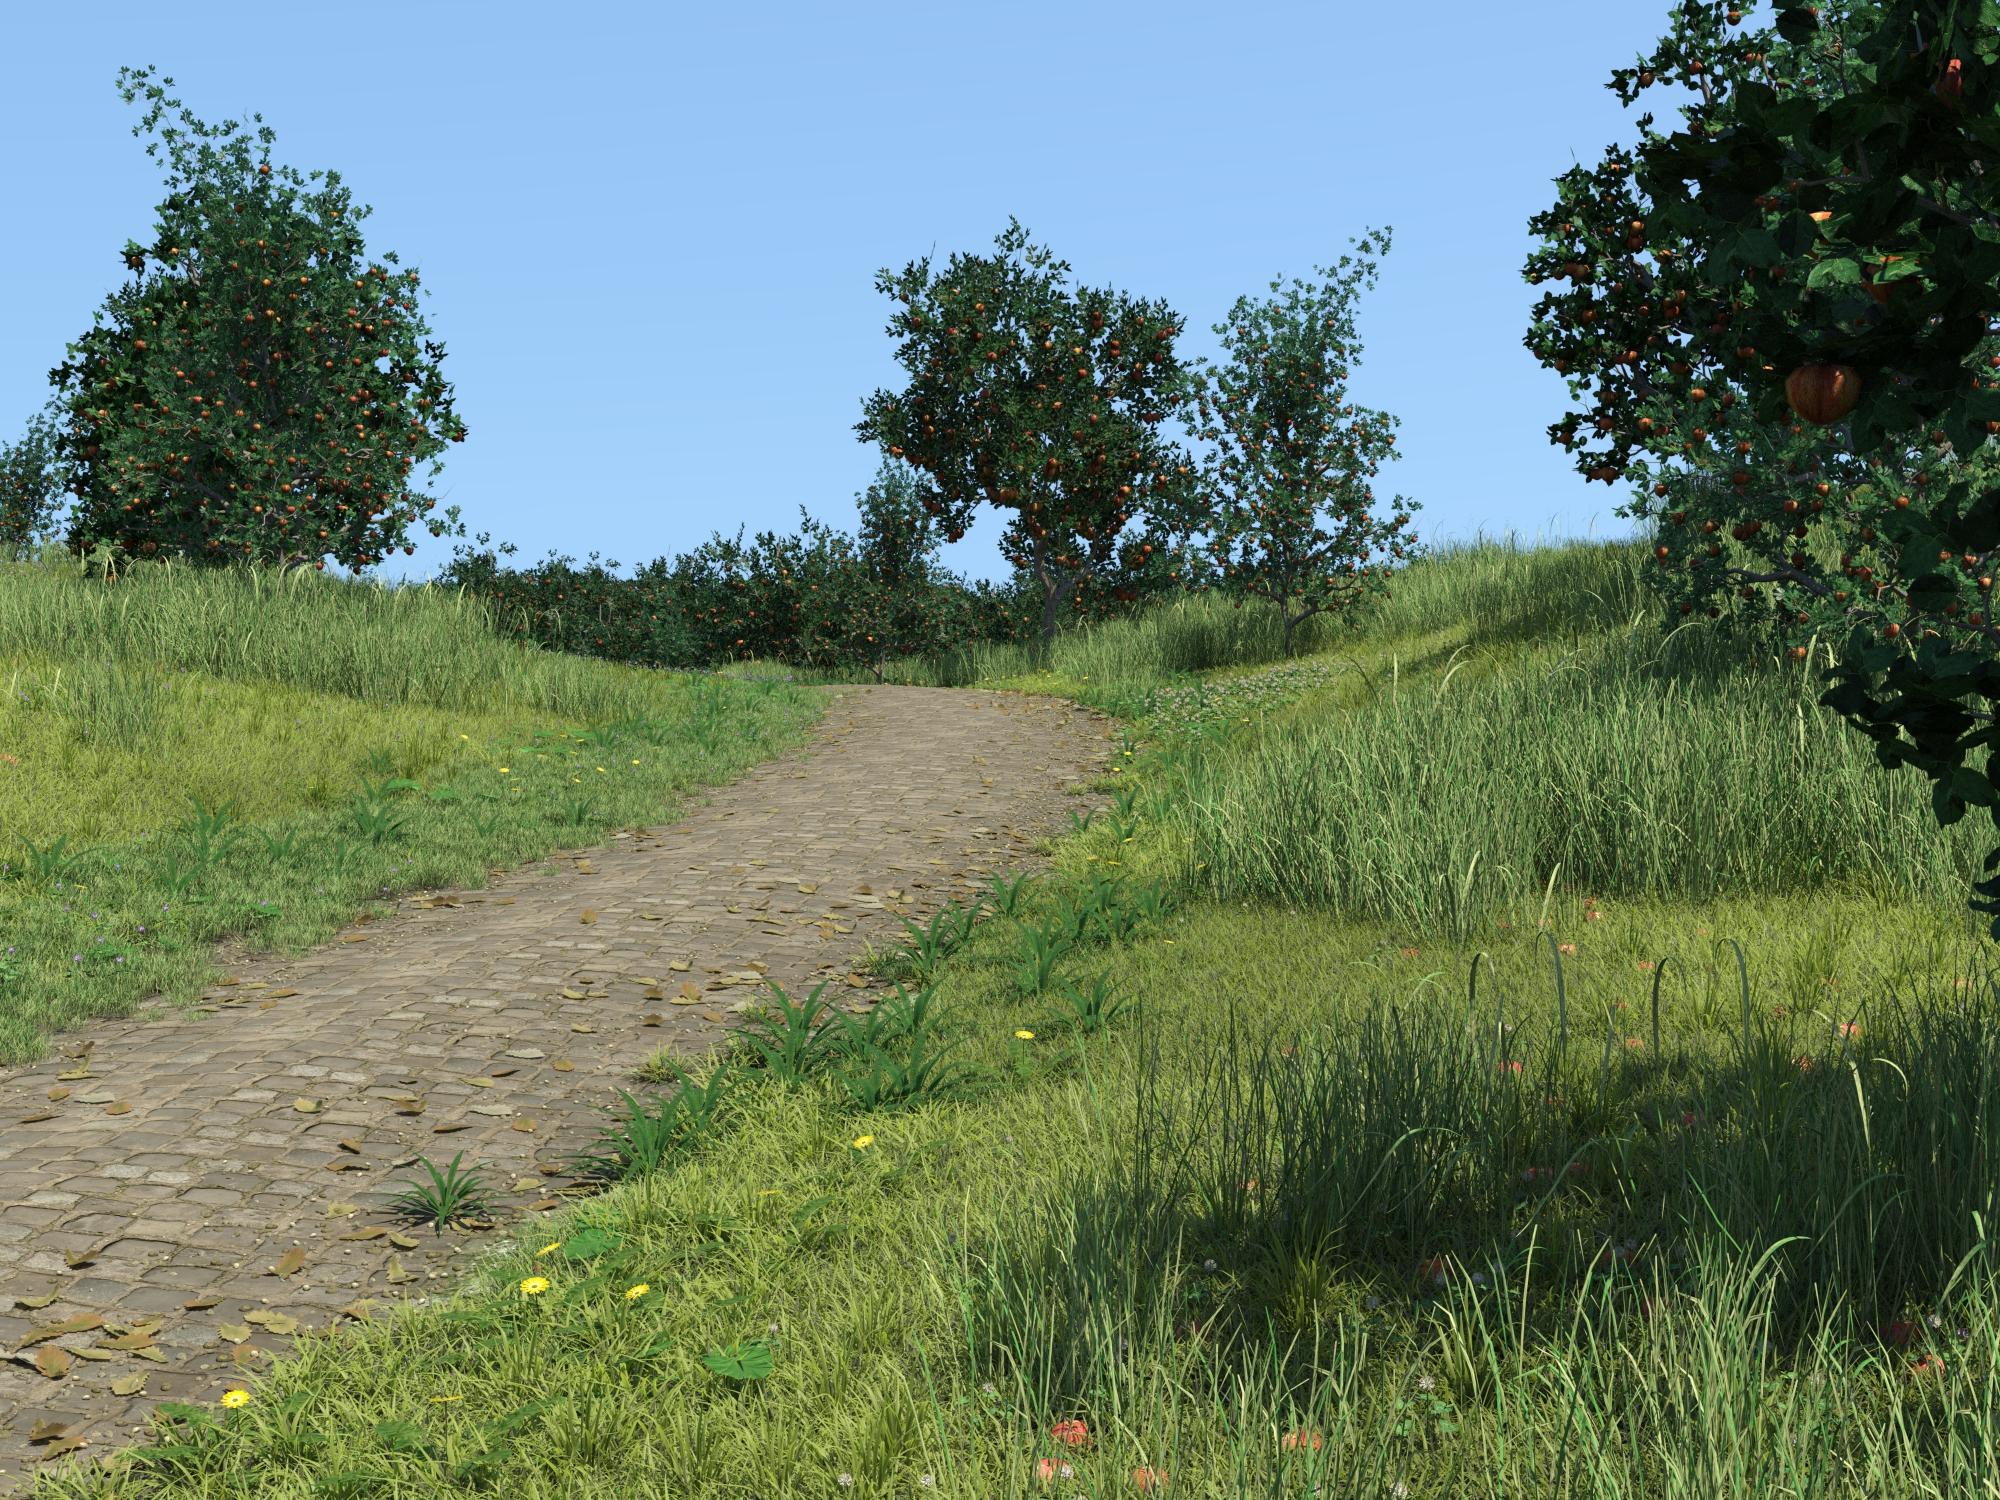
    Here is a final image with the saved cobblestone Materials preset applied to a render of the Tangy Apple Orchard using the Dirt Track 2 Hedgerow feature:
    Screenshot 2020-08-05 19.32.04.png
    490 x 641 - 31K
    Cobblestone path in TAO.jpg
    2000 x 1500 - 3M
    Cobblestone on bare UltraScene Terrain.jpg
    2000 x 1500 - 2M
    cobblestone roadbase surface settings.png
    541 x 686 - 188K
    Post edited by barbult on
  • algovincianalgovincian Posts: 2,621
    edited August 2020

    This is fantastic, Barbult! I'm guilty of purchasing UltraScenery and several add-ons, but have yet to really do anything with it. Thanks for taking the time to post/document your experiments - looking forward to seeing your render ;)

    - Greg

    ETA; Doh! Wasn't there as I was typing, but was there after I posted lol. Great proof of concept.

    Post edited by algovincian on
  • barbultbarbult Posts: 24,359

    This is fantastic, Barbult! I'm guilty of purchasing UltraScenery and several add-ons, but have yet to really do anything with it. Thanks for taking the time to post/document your experiments - looking forward to seeing your render ;)

    - Greg

    ETA; Doh! Wasn't there as I was typing, but was there after I posted lol. Great proof of concept.

    Thanks, Greg. I have to post the message and edit it several times to add images, etc. I am still building a final full image to add to the posting above. You are missing out on HUGE FUN by not playing with UltraScenery! Go make some NPR UltraScenery images. 

  • MelanieLMelanieL Posts: 7,420

    Another interesting experiment! I tried dabbling with the surface but had not worked out the why there was a Roadbase and a Roadsurface and how they interacted. I'll have to try a few experiments of my own now.

  • RGcincyRGcincy Posts: 2,835

    Very useful! I'm glad you are digging into this product as much as you are, very helpful to the rest of us and expands what we can create. 

  • markusmaternmarkusmatern Posts: 559
    edited August 2020
    barbult said:

    [...]

    Experiment: Create a Cobblestone Material for the UltraScenery Dirt Track Features

    [...]

    Thank you very much barbult for all your invaluable experiments and their descriptions!

    In my render I used https://texturehaven.com/tex/?c=terrain&t=forrest_ground_01 for the 5 Roadbase Layer

    and https://texturehaven.com/tex/?c=terrain&t=sand_01 for the 6 Roadsurface Layer

    I think they work together great!

    UltraScenery_DirtTrack2HedgerowAppleOrchard11_SandyRoad_Web.jpg
    2560 x 1440 - 1M
    Post edited by markusmatern on
  • barbultbarbult Posts: 24,359
    barbult said:

    [...]

    Experiment: Create a Cobblestone Material for the UltraScenery Dirt Track Features

    [...]

    Thank you very much barbult for all your invaluable experiments and their descriptions!

    In my render I used https://texturehaven.com/tex/?c=terrain&t=forrest_ground_01 for the 5 Roadbase Layer

    and https://texturehaven.com/tex/?c=terrain&t=sand_01 for the 6 Roadsurface Layer

    I think they work together great!

    Yes, that does look great! Thanks for the tip on a nice new combination.

  • JerifeJerife Posts: 272
    edited August 2020

    Great work Barbult, thanks


    barbult said:

    I am using Daz Studio 4.12.2.6 Public Beta and UltraScenery 1.2

    Experiment: Create a Cobblestone Material for the UltraScenery Dirt Track Features

    Are you tired of all of your UltraScenery renders, that use one of the Dirt Track features, having the same dirt texture? It is pretty easy to modify the texture files used in the UltraScenery Terrain Shader to use different image files. After substituting different images, save a Materials Preset to use again later. The Materials Preset will be applied after building the UltraScene but before rendering the scene. Your runtime/textures folder is probably full of interesting textures to try. You can also download interesting textures online. If you want to download texture files, check the usage license before downloading, so you know whether you can use them for this purpose. One source of free, public domain, CC0 textures is texturehaven.com.

    This is the approach I am going to take:

    • Download cobblestone textures from the internet (making sure the license allows me to use the textures for this purpose)
    • Modify the settings of the UltraScenery Terrain surface to use the downloaded textures
    • Save a materials preset that I can later apply to any UltraScene using a Dirt Track feature.

    1) Download cobblestone texture files from texturehaven.com

    1. Open your web browser (I use Chrome).
    2. Navigate to https://texturehaven.com/tex/?c=floor&t=cobblestone_floor_05
    3. Where it says Download:, click the All Maps button. (We don't really need all of the maps for this exercise, but it is easy to get them all at once and the ones we don't need now may be useful for future projects.)
    4. Select one of the map resolutions (I used 4k PNG).
    5. Depending on how you have your browser configured, either the download will start and go to your previously specified download folder, or a window will pop up asking you where to save the file. In the latter case, select a location and save the file.
    6. Close the web browser; we are done with it now.
    7. Locate the zip file that was downloaded and uncompress it. I use 7Zip to do that. You can also use the features built into Windows or WinZip, etc.
    8. In the File Explorer built into your OS, open the Runtime/Textures folder of your content library.
    9. Create a new Texture Haven subfolder in runtime/textures.
    10. Copy the unzipped cobblestone texture files into Runtime/Textures/Texture Haven. I recommend copying them into a subfolder named the same as the zip file you downloaded. So, I have Runtime/Textures/Texture Haven/cobblestone_floor_05_4k_png with 7 PNG texture files in it when I am done.

    2) Build a simple UltraScene which we can use as a basis for changing textures

    1. In Daz Studio, create a new Scene.
    2. Run the UltraSceneCreator script.
    3. Select the default Terrain settings.
    4. Select Feature Dirt Track 2.
    5. Select Ecology Grassland 1.
    6. On the Build tab, hide (click the eyeball to close it) all of the layers, to make this a quick build. All we need is the UltraScene itself, none of the vegetation.
    7. On the Build tab, click the Build Scene button.

    3) Modify the texture settings of the UltraScene

    1. Select the UltraScene in the Scene pane.
    2. Open the Surfaces pane.
    3. In the Surfaces pane, select the Editor tab.
    4. Change the images and image tiling in the 5 Roadbase Layer
      • Select 5 Roadbase Layer.
      • Click on the small square image icon for the Roadbase Layer Normal.
      • In the pop up window, select Browse... (Browse is at the top.)
      • Navigate to the folder where you saved the cobblestone texture files in your content library (Runtime/Textures/Texture Haven/cobblestone_floor_05_4k_png)
      • Select the cobblestone_floor_05_nor_4k.png file and click the Open button.
      • Click on the small square image icon for the Roadbase Layer Diffuse Color.
      • In the pop up window, select Browse...
      • Navigate to the folder where you saved the cobblestone texture files in your content library.
      • Select the cobblestone_floor_05_diff_4k.png file and click the Open button.
      • The cobblestones in the image texture file are larger than I want, so I am going to tile them more. Change the Roadbase Layer Tile H from 40 to 60.
      • Change the Roadbase Layer Tile V from 40 to 60.
    5. Change the images and image tiling in the 6 Roadsurface Layer
      • Select 6 Roadsurface Layer.
      • Click on the small square image icon for the Roadsurface Layer Normal.
      • In the pop up window, select Browse...
      • Navigate to the folder where you saved the cobblestone texture files in your content library.
      • Select the cobblestone_floor_05_nor_4k.png file and click the Open button.
      • Click on the small square image icon for the Roadsurface Layer Diffuse Color.
      • In the pop up window, select Browse...
      • Navigate to the folder where you saved the cobblestone texture files in your content library.
      • Select the cobblestone_floor_05_diff_4k.png file and click the Open button.
      • The cobblestones in the image texture file are larger than I want, so I am going to tile them more. Change the Roadsurface Layer Tile H from 40 to 60.
      • Change the Roadsurface Layer Tile V from 40 to 60.
    6. Change the diffuse color of the Roadbase and Roadsurface layers to make them different. The UltraScenery Terrain Shader blends these two layers together, so by making them slightly different colors, the surface will have more interesting tonal variation and look less tiled. It is a very clever shader! The cobblestones in these textures are a little brighter than I would like, so changing the diffuse color will also allow me to darken them.
      • Select 5 Roadbase Layer
      • Click on the color value bar, in the Roadbase Layer Diffuse Color.
      • When the Select Color dialog pops up, select a gray color to darken the image. I selected a gray value of 177, which is a mid gray.
      • Click the OK button in the Select Color dialog to apply the color change and close the dialog box.
      • Select 6 Roadsurface Layer
      • Click on the color value bar, in the Roadsurface Layer Diffuse Color.
      • When the Select Color dialog pops up, select a gray color to darken the image. I selected a gray value of 205, which is a light gray.
      • Click the OK button in the Select Color dialog to apply the color change and close the dialog box.
    7. Render the scene to see your new cobblestone track.
      • In the Scene pane, position a camera where it can see the Dirt Track part of the UltraScene.
      • Render the scene. Remember that we hid all the vegetation layers when we built the UltraScene, so we will see only the bare terrain with the bare terrain UltraScenery Terrain shader.
      • In the rendered image, if everything was done correctly, your "Dirt Track" is now a cobblestone track!

    4) Save a Materials preset for future use

    1. In the Scene pane, select the UltraScene.
    2. In the Surfaces pane, select the UltraScene.
    3. In the Daz Studio menu, select File>Save As>Material(s) Preset...
    4. When the save window pops open, select a location in your content library to save your new preset. I chose to create a "Materials BV" subfolder in the Environments/Landscapes/UltraScenery folder so it is easy to find. (BV are my initials, so I know this is something I created and it won't interfere if UltraScenery is updated to include a Materials folder some day.)
    5. Give the new preset a name. I chose "USC Track Cobblestone BV".
    6. Click the Save button.
    7. A Material(s) Preset Save Options dialog box will open. Expand the Default list by clicking on the arrowhead to the left of it.
    8. Select only the portions of the material that we want to change. We want to change only parts of the 5 Roadbase Layer and parts of the 6 Roadsurface Layer. See the screenshot below. Here is how we accomplish that:
      • Click the checkbox next to Default to deselect everything.
      • Click the checkbox next to 5 Roadbase Layer to select it and all of its subitems.
      • Click the arrowhead next to 5 Roadbase Layer to expand it to see the subitems.
      • Click the checkbox next to Roadbase Layer Mask to deselect it. This is important. We don't want to include the mask, because we want to be able to use this Materials preset with all UltraScenery features that use Dirt Tracks. Each one may have a different mask.
      • Click the checkbox next to 6 Roadsurface Layer to select it and all of its subitems.
      • Click the arrowhead next to 6 Roadsurface Layer to expand it to see the subitems.
      • Click the checkbox next to Roadsurface Layer Mask to deselect it. This is important. We don't want to include the mask, because we want to be able to use this Materials preset with all UltraScenery features that use Dirt Tracks. Each one may have a different mask.
      • Click the Accept button to accept the changes and close the dialog box.

    5) Apply the cobblestone Materials preset to a different UltraScene.

    1. Build a new UltraScene that used one of the Dirt Track features. Select any terrain and any ecology.
    2. Select the UltraScene in the Scene pane.
    3. Apply the cobblestone Materials preset. This must be done AFTER building the UltraScene and BEFORE rendering the UltraScene, in order for it to apply to the render.
    4. Render the scene.

    Now go download more interesting textures and dig through your Runtime/Textures folder to make more interesting Materials presets. It is fast and easy. 

    Here is a screenshot of the 5 Roadbase Layer surface settings:

    Here is a screenshot of how the Materials Preset Options dialog should be filled out for this experiment:

    Here is the cobblestone path on the bare UltraScene terrain:

    Here is a final image with the saved cobblestone Materials preset applied to a render of the Tangy Apple Orchard using the Dirt Track 2 Hedgerow feature:

    This is an awesome experiment gone into an excellent tutorial; Many thanks yes

    Post edited by Jerife on
  • JerifeJerife Posts: 272
    edited August 2020

    The negative height tut gave me these islands and image; thanks a lot for that great experiment :)

    The image is called Smuggler and you have it with huge resolution at my DA gallery

    162 09 rdx Insta.jpg
    3000 x 3000 - 3M
    Post edited by Jerife on
  • barbultbarbult Posts: 24,359

    I'm glad people are finding these experiments useful. Nice use of the negative altitude, @Jerife. I like the low camera angle, too.

  • JerifeJerife Posts: 272
    edited August 2020

    And this goes for the textured road lesson

    Morning light in Coast 1 with TD3 Bzone for the long distance and a couple of Xfrog trees

    I tried to obtain the look you achieved in the other thread with cobblestones and dirt. I think I didn't make it

    166a 19 rdx.jpg
    3000 x 1854 - 2M
    Post edited by Jerife on
  • JerifeJerife Posts: 272
    edited August 2020

    Sorry wrong post

    Post edited by Jerife on
  • barbultbarbult Posts: 24,359
    Jerife said:

    And this goes for the textured road lesson

    Morning light in Coast 1 with TD3 Bzone for the long distance and a couple of Xfrog trees

    I tried to obtain the look you achieved in the other thread with cobblestones and dirt. I think I didn't make it

    I can clearly see the cobblestones. The vehicle shadows and grass may be hiding the dirt.

  • barbultbarbult Posts: 24,359
    edited September 2020

    Experiment: Create a Flower Garden (Inspired by Keukenhof)

    Keukenhof is an amazing place full of colorful flowers. I have a lot of flower models for Daz Studio, so I want to make a flower garden like Keukenhof with UltraScenery.

    This is the approach I am going to take:

    • Make an ecology with lots layers of different flower types.
    • Make each layer densely fill the whole terrain.
    • Use layer masks in the UltraSceneCreator build tab to control the final selection of layers and placement of the flowers on the terrain.
    • Create some black and white layer mask files in Photoshop.

    1) Select some flowers to work with

    • I'm going to start with tulips, since that is a large part of Keukenhof, and I have a couple products with tulips. I will use:
      • Lisa's Botanicals - Tulips (old product, formerly available on Daz, now available at Hivewire)
      • Tulip Garden ( additional texture set for Lisa's Botanicals, formerly available on Daz, now available at Hivewire)
      • Garden Flowers Vol 2. Tulip Plants

    2) Create a new ecology (see experiment above for details)

    • Create a separate ecology layer for each tulip model and each color
      • Set the distribution spacing to put the flowers close together. I tried 20 to 40, depending on the size of the flower model.
      • Set a small distribution random value so the flowers aren't too uniformly spaced. I tried 0.3.
      • Set a distribution mask of [], so the flowers are distributed over the entire terrain.
      • Set altitude and slope to allow the flowers to be placed on nearly all surfaces. I set min altitude to 5 to keep them a little off shore of the water features.
      • Set some scale variance and density so all of the flowers are not exactly the same size.
      • In the propsets section, add the flowers you want to use. 
      • To apply the extra tulip textures, modify the materials[] section of each flower.
      • Set noise and affinity to [], so the flowers are distributed over the entire terrain.

    3) Test the new ecology

    1. Run UltraSceneCreator script
    2. Select No Feature
    3. Select your new Flowers ecology
    4. In the Build tab select one of the flowers layers (uncheck all of the other layers)
    5. Build the scene
    6. Render the scene (Top view or 3DOutlaw's SkyCam views are good to evaluate the overall distribution of the flowers. A perspective view is good to evaluate the relative heights of flowers).
      • The flowers from Garden Flowers Vol 2. Tulip Plants worked well.
      • The flowers from Lisa's Botanicals - Tulips are old .DAZ format files and locked up Daz Studio when trying to render the UltraScene while applying some of the additional textures.
        • I really want to use those tulips, though, so I'm taking a boondoggle to convert them to Iray materials and save then in .DUF format. The newly saved tulips render correctly.

    4) Create some layer masks in an image editor, and use them to control placement of the flowers

    • I used Photoshop CS 6, because that is what I have. Any image editor will work.
    • I created a bullseye image (attached) with concentric rings. Using that layer mask on one layer and the invert of that layer mask on another layer will let me create rings of two separate flower types in one image.
    • I took the bullseye image and separated it into a series of individual rings. This lets me have more layers selected, each with a different ring mask.

    One layer of red tulips

    Two layers - pink and yellow tulips with bullseye mask

    Continued Below

    Skycam view of red tulips.jpg
    2000 x 2000 - 3M
    Perspective view of red tulips.jpg
    2000 x 2000 - 2M
    Bullseye.png
    2000 x 2000 - 63K
    Pink and yellow tulip bullseye skycam.jpg
    2000 x 2000 - 3M
    Pink and yellow tulip bullseye.jpg
    2000 x 2000 - 3M
    Layer Masks in use bullseye.jpg
    332 x 429 - 25K
    Post edited by barbult on
  • barbultbarbult Posts: 24,359
    edited September 2020

    Experiment: Create a Flower Garden (Inspired by Keukenhof) Continued

    The flowers look nice and have the dense patterned look of Keukenhof, but the scene needs more plants to add interest and look realistic.

    5) Add other plants

    1. There are two approaches that could be used to add more plants:
      • Add layers to the flowers ecology for grass, trees, river elements, etc.
        • Advantage: Being in the same ecology would allow usage of things like affinity and repel to keep elements from overlapping
        • Advantage: Being in a single ecology makes the whole process simpler.
        • Disadvantage: Either all possible other layers would have to be added, or the choice of layers would be limited (just oaks and not beech, for example).
        • Disadvantage: There would be so many layers in the ecology, it would be difficult to locate the ones you want in the Build tab and know which go together.
      • Add a second UltraScene with additional plants, leaving the flowers ecology as just flowers.
        • Advantage: All possible other layers from all ecologies would be available.
        • Disadvantage: Some layers might overlap and to prevent that would require sophisticated layer masks.
        • Disadvantage: Managing multiple UltraScenes in a single scene can be cumbersome and difficult to manage. Changing one sometimes requires changing the other.
    2. For flexibility or plant choice, I'm going to use the option of adding a second UltraScene to my scene.
      • Run UltraSceneCreator to create the flowers UltraScene. Choose the Terrain and Feature settings you want for your final image.
      • Select the UltraScene in the Scene pane.
      • Use Edit/Duplicate/Duplicate Node(s) to copy the flowers UltraScene and create the second UltraScene. This will ensure that they both use the same terrain and feature.
      • Select the second UltraScene in the Scene pane and run UltraSceneCreator on it to rebuild it.
      • Leave the terrain and Feature unchanged. Select a new ecology to get the grass, trees, and river items you want.
      • In the Build tab, select only the layers you want to add to your scene and add layer masks to control where they will be positioned.
      • Build the second UltraScene.
      • In the second UltraScene, hide the UltraScene terrain and water (we only need one terrain surface and one water).
    3. Render your final scene

    Layer Masks Rings Flowers.jpg
    347 x 428 - 28K
    Layer Masks Rings Oaks.jpg
    404 x 451 - 28K
    Tulips Easter Colors 3840x2160.jpg
    3840 x 2160 - 4M
    Post edited by barbult on
  • Leonides02Leonides02 Posts: 1,379

    Thank you so much for doing these, barbult.

  • barbultbarbult Posts: 24,359

    Thank you so much for doing these, barbult.

    You are welcome. I am happy to share my experiences and hope to inspire others to explore and experiment, too.
  • hacsarthacsart Posts: 2,025

    barbult.. Thnaks for this - Looks like I may just have to get this, based on what you have shown is possible. One question - is there a way to specify the density of the scene objects, or is that baked into the ecologies?

  • barbultbarbult Posts: 24,359
    hacsart said:

    barbult.. Thnaks for this - Looks like I may just have to get this, based on what you have shown is possible. One question - is there a way to specify the density of the scene objects, or is that baked into the ecologies?

    @hacsart, the density of objects is "baked into" the ecologies, but there are at least two ways to modify the density.

    1. The ecologies are just JSON files, that can be opened and edited by users. All you would have to do is change the spacing value in the ecology to change the density. For example. change spacing from 20 to 40 to spread them further apart. Change spacing from 20 to 10 to put them closer together. (10, 20, 40 are not magic numbers, just examples.)
    2. Another option, that doesn't involve JSON editing, is using a mask in the Build tab. Use a solid mid-gray image as the mask to cut the density down to about half. White is full density (as defined by the ecology), mid gray is about half, and black is none. You can create masks that are as exotic as you want, with various patterns to control density in different areas. You can't use a mask to increase the density above what is defined in the ecology, though. You'd have to edit the JSON to do that.

    Besides density (spacing between instances), the ecology defines patterns of where instances are placed on the terrain. For example, some ecoologies use simplex or worley noise patterns to specify what part of the terrain will have instances of a given plant, and what parts will be bare. If an ecology is configured to not place instances in a certain area, no Build tab mask can make the ecology put instances there. The build tab mask can only reduce or prevent ecology instances from being used.

    For my flowers ecology, I created the ecology to space flowers very close together and cover the entire terrain. Then I had the flexibility of using the Build tab mask to control the density and populated/bare areas. By using different Build tab masks in different scenes, I could use the same ecology to get very different results.

  • hacsarthacsart Posts: 2,025
    edited September 2020

    Thanks! - I see its on sale.. so......


    Bought it - time to play!

    Post edited by hacsart on
Sign In or Register to comment.