Metals Rendering : The Physics Behind, The Human Brain, The Rendered Material
 V3Digitimes
Posts: 3,150
V3Digitimes
Posts: 3,150
Hello everybody,
I wanted to share here a few information regarding what are the specificity of light and metal interaction. This might help you understanding why realistic rendered metals are so hard to obtain, and what are the important parameters to obtain realistic metals using rendering softwares.
What will make us believe that the rendered object is a metal? Well...What is important to understand, is that what will make us, and especially our brain, classify any rendered materials as metals is, and is only, the very specific way metals react to light!
And this way to react to light occurs on two levels :
Local Highlights and Global Reflection.
Whereas for general Materials most important parameters are included in their diffuse, ambient, and a bit specular, properties, metals, on the contrary, rely on their specular, highlights, and reflection properties (of course there is a bit of diffuse and ambient for general underlying patterns).
Concerning Local Highlights, there are two different types of them :
- First the microscopic level, which is the way the microscopic defects will "spread" the reflected light around the initial shape. This is not obtainable by direct render or ray tracing only, since the size of the details to render are then be too small.
That is why Physicist have developed models to estimate these effects. This is called BRDF, standing for Bidirectional Reflection Distribution Function, a barbarian name which can be roughly summarized by "what is the angular energy distribution of reflected light out of a surface area".
In most BRDF models, there is a variable which allows you to fake more or less the microscopic roughness of a metal, and, when a BRDF is available, this should be one of the input of metal material property, in the "specular properties" category. Small roughness value will lead to very sharp reflected beams of light, high roughness valies will "spread" these reflection around the initial place of sharp reflected beam. And you brain will interpret that "spread" as : this material is rough.
If you have no BRDF specular, the best thing is to use glossiness as the highlight size driver, the result is not as good because of the way the light spreads, but it is better than nothing.
How to include this in rendering? By adding a BRDF model in the specular component of your material, and by default by adjusting glossiness.
- Then the millimetric "and above" level, which is going to provide to you a "small highlights distribution" which definitely helps our brains to categorize them as metals.
I quote here one of the recent excellent article of "Vision Research, Volume 94, January 2014, Pages 62–75", article titled "Visual perception of materials and their properties", written by Roland W. Fleming, which tries to determine experimentally what are the important features of material recognition by humans :
"Specifically, we suggest that the visual system first uses general-purpose perceptual organization mechanisms to parse the image into salient regions or features, such as the highlights and shadows across the surface.3 This segmentation provides some initial candidate features (e.g., highlights), which could plausibly vary in some measurable way with changes in the material properties. Again, we do not assume the visual system knows anything about the physical laws of reflection, or the properties of surfaces: it is trying to discover which aspects of the image change in lawful ways from material to material. The assumption is that in general, salient features are likely to relate in some systematic way to the underlying properties of the material. Put another way, salient features are likely to be evidence of significant underlying causes—and are therefore likely to vary from sample to sample. Of course, not all salient features turn out to vary in lawful ways, but they at least represent good initial candidates for building an internal model of material appearance."
So that is what the "millimetric and above" highlights are there for. They are there to feed our brain with these specific underlying properties of the material. They are not obligatory. They are yet a really good addon.
How to reach that?
In order to add these highlights, which will be DIRECTLY calculated during the render (not like BRDF which responds to a formula), a surface deformation is required.
How to include this in rendering? By using various displacement, normal and bump maps. In general, Displacement will help for "the roughest" defects, normal for smooth ones, bump being more flexible in term of results.
Some of them will represent millimetric surface defects, independent from the underlying color pattern, and a good thing is to have an independent tile for that in order to be able to access different effects via scaling only these defects.
This is all for the local highlights, now the second important element : the global reflection.
Global Reflection
Global Reflection, really simple in reality, is much more complex in rendering softwares.
By Global Reflection, I mean to say the way the metal will, on it whole surface, reflect its whole environment. And this property is mainly driven by the "surface condition" or "surface finish". The less the surface finish will present microscopic defects and a low density of millimetric defects, the more the metal will be able to make an image of its surrounding environment. The perfect polished state, without any defects at all is called a "mirror polished" state, because the metal then acts like a mirror.... And the contrary is true too.
Now it is not hard to understand that roughness and imaging reflection are closely interlaced, at least in reality (we can override the reality in rendering softwares).
That is why you generally have to remember this : either the metal is rough, and then you will have low "mirror like" properties, or the metal is well microscopic polish, and then you can have high "mirror like" properties. Concerning the millimetric defects of "mirror like" metals, their influence will be purely calculated by the software, and they will tend to "break" the reflected image.
Now the "mirror like" properties are modulated by the material physical properties. Some materials will reflect a strong amount of there environment, some a lower amount. So you will need to be able in your rendering to adjust your reflection strength regarding the whole scene
Now that the principle is there, I want to mention an important problem :
The lack of environment in 3D rendering, or the "poorness" of them.
What does it mean?
When we set up a scene, we generally add objects in front of our camera (it works better this way isn't it?) But what about all the space which is empty (and which represents a huge part of the total space)?
This is the most difficult part of reflection rendering :
If there is nothing to reflect, well, nothing will be reflected.
What are the solutions for reflection ?
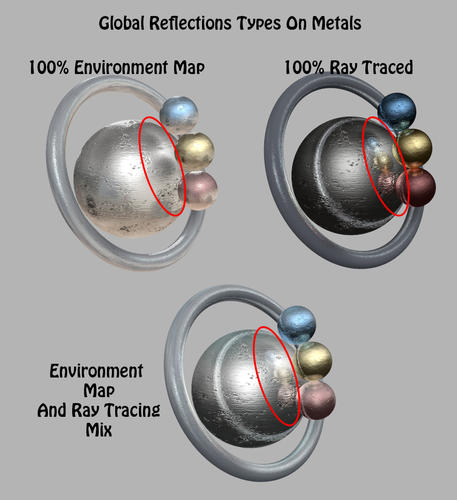
Solution 1 for reflection : environment map
In most rendering softwares, you will find an environment map in reflection image map. This environment map FAKES in the calculus the presence of an environment around your objects, supported by an image map.
This presents advantages and drawbacks :
Advantages : now something is reflecting on your object even if your scene is empty (this is the goal of it!)
Drawbacks :
Drawback 1 : if you are making on your metal a clear enough image of a surrounding environment, so that environment can be recognise, it may just not "fit well" in your scene. For instance : you are in the forest and you are using a urban map type environment on your sword. Now I'm not sure that the building you see on the blade of it will be well adapted. That is why I would advice not to use "crisp" environment maps, but blurred ones. The blurred ones will give you the feeling that there is something around, without creating a "crisp" enough image of it to be able to recognise what it is.
Drawback 2 : by using environment maps, your reflections become totally independent of your real surrounding props / figures / skies / environment. Which means that if you want an element of the scene to be reflected on your metal, this becomes impossible. Because the reflections of these types, the ones which reflect the real props are driven by "ray traced reflections".
Solution 2 for reflection : Ray traced reflections
"Real" rays will be reflected on surrounding objects during the render, and will create an image of these objects on the reflecting metal.
Advantages : Your render corresponds to the reality of your scene.
Drawbacks : Your render corresponds to the reality of your scene! :)
When you don't have elements all around your metal in your scene, you will have plenty of dark areas, corresponding to "nothing to reflect". See for instance : place your camera "facing front" your prop. You have nothing "behind" your camera (in general). So what is happening framing a pretty flat object "front"? You will reflect what is behind the camera, which means : the big empty! It will just render black! I just want to say that with a ray tracing reflection type, you HAVE to include a full environment around your object.
One solution is to add "fantom ray trace" domes, (which I really appreciate), which will trace a fake environment relying on an image map, but this time "sending rays". But the problem is the same as with crisp environment maps, in brief, your "traced" environment may then be too identifiable and not corresponding to your scene. You're in a church and the reflections show a forest... hmhmhm....
The second solution is to add plenty of elements at the right place in your scene so that you have something to reflect on the metal.
The ideal thing is to use a mix of ray traced and environment map reflection, in order to take benefit of the advantages of both of them, and to be able to dial them finely : Increase the ray trace contribution when you want to reflect your surrounding props, but yet keep a "preferentially blurred" environment map in order to compensate the lack of a "totally covered by real props" surrounding environment. Please note this is not included in DS default material.
What about the other parameters ?
Ambient is generally pretty high, one of the reason (there are others) is that it allows to compensate for the lack of ambient lighting. Ambient of your surface gives a basic initial colour component regardless of any kind of present light in your scene. The more ambient lighting you have, the less ambient component you will need (this also depends on the way you set your diffuse).
Diffuse will "add" its colour to this to give you the new colour of the parts receiving lights only, but in a very "diffuse" way, which is not preponderant at all in metals. That is why diffuse component has to be lower than its general 100% value. You have to decrease it also to avoid to have too much light outgoing the parts receiving lights, because now for these parts, much more energy than usually is going out of global reflection and specular highlights.
Bumps, displacement, normals, specular (highlight sizing using glossiness or when possible BRDF), and reflection have already been discussed earlier.
But there is also :
Object SHAPE!!! Shape is not a material parameter, but as soon as highlights are concerned, their calculus will take into account the angle of the light beam with the surface geometrical normal (called angle of incidence).
If you have a flat or a very curvy surface object, the highlight will be totally different.
For the flat one, the incident angle will be constant (for infinite lights which is the most commonly used), then the reflected highlight will be almost constant too (the highlight then depends only on the angular variation of the intensity of your light -slightly on camera angle depending on the BRDF model involved). This will then be hard to make people believe it is a metal.
For very curvy objects, the strong variation in incident angle will strongly help you to obtain "metal like" renders.
Now what can you do for flat object? Introduce yourself the parameters in your scene or material which will allow to product these so significant for our brain highlight distributions. The BRDF highlights being "off influence" for the reason mentioned above (constant angle of incidence), they you have access to two parameters : use lights with intensity variations regarding emission angle (add spots, point likes, any light providing an angular variation of light to vary angle of incidence), but much more efficient and more important, dare to force the surface millimetric deformations which will create the very small highlight and shadows helping human to categorize your material in the "metal" ones (Via Displacement, Normals)
Summary
In summary for this focus on metal rendering, what can be said is that :
Metal perception will depend mainly on the highlights distribution and environment reflections. So don't forget to add lights in your scene! Highlights distribution come from first from a BRDF model to simulate microscopic roughness, and second from the materials surface millimetric or above deformations, this information being included in bump, displacements, and normals parameters. Global reflections can be obtained by using environment maps, or ray tracing, or a mix of them. Keep ambient pretty high and do not add to much diffuse. Then a judicious distribution in term of proportions of all these elements should help you to make your brain believe that the output of the render is... a Metal.
Daz 3D is part of 
Connect
DAZ Productions, Inc.
7533 S Center View Ct #4664
West Jordan, UT 84084
Licensing Agreement | Terms of Service | Privacy Policy | EULA
© 2024 Daz Productions Inc. All Rights Reserved.
Comments
oooh shiney
I was with you right up until "everybody," ... ;)
I'm going down this path myself "physically based render" using Substance Designer where you use Diffuse Roughness Metallic and Normal maps. With the huge filters base they have I want to automate the material generation process, bit of a ways to go yet!
Great info, thanks so much for sharing!
I'm still puzzling over the idea of upping the ambient value for metals, though. This hasn't worked well in many scenes I render....
I'm using substance too, not for a long time! Great preview and makes automatic a lot of repetitive tasks. One of my most satisfying software of the last months. Yet I'm making all my filters entirely manually in order not to have any licence issue (which are not that clear), so this takes a little bit longer at the beginning, but is much flexible at the end.
But I'm very happy with the gain in the workflow... Invaluable!!!
Even more with the "re-export automatically maps when modified" on the substance side and the "automatically refresh images" in DAZ on the other size! I made full textures sets without realoading any new maps in DAZ, not even once!!!
And yes, their physical render is great. Will you also go for substance painter?
I'm still puzzling over the idea of upping the ambient value for metals, though. This hasn't worked well in many scenes I render....
I understand, this is also I find a disturbing idea. Yet there is a reason to do that. A global quantity of energy has to go out your material regarding the "global lighting present in the rest of your scene", otherwise the metal will look weird, (your brain will try to understand where has this energy disappeared).This global energy will be divided and summed between the specular, reflection, ambient and diffuse contributions. Metal generally cannot physically use a very strong diffuse, this is non sense. So the lack of outgoing energy in the diffuse has to be reported elsewhere. Two places available : reflection and ambient. If your reflection is not strong enough, compensate with high ambients, which will give you a base color and "energy" totally independent of lighting conditions. This is the "easy" way to solve the problem.
I understand, this is also I find a disturbing idea. Yet there is a reason to do that. A global quantity of energy has to go out your material regarding the "global lighting present in the rest of your scene", otherwise the metal will look weird, (your brain will try to understand where has this energy disappeared).This global energy will be divided and summed between the specular, reflection, ambient and diffuse contributions. Metal generally cannot physically use a very strong diffuse, this is non sense. So the lack of outgoing energy in the diffuse has to be reported elsewhere. Two places available : reflection and ambient. If your reflection is not strong enough, compensate with high ambients, which will give you a base color and "energy" totally independent of lighting conditions. This is the "easy" way to solve the problem.
Yes, that part makes sense to me, and thank you for explaining it. Probably the examples of shaders that I've seen in the past didn't lower the diffuse value enough, and maybe they also used too much ambient.
This does make sense, though-- in a dark scene, if there is some shiny metal, it will generally be at least somewhat visible, even If nothing else can be seen.
I need to try some experiments! But right now I need to get ready to go to work. :(
What you say is very interesting, I'm happy you caught my idea!
Indeed, normally, if we were always using realistic lighting conditions, there should be almost never be a need for ambient component.
Ambient component it is just seen by the render as something emitting naturally a certain quantity of light (not being yet a real light source) totally disconnected from the surrounding lights. It has no physical reality at all (maybe blackbody emission? but this is pretty rare!).
Now why so many softwares have an ambient component in object's color?
It is because the way we, users, set light our scenes. We generally use a few infinite lights, or spot lights, or equivalent, but pretty rarely a full surrounding environment of ambient light (OK, now things are better with IBLs and fantom rays domes, and Uber... - but they are not the most commonly used lights). Have you ever wondered why Uber environments and equivalent light systems create so much realistic renders - especially for exterior scenes ? It's because the spatial re partition of light upon object is much closer that any other type of light to the one of the reality we live in. Our brain. Everything comes from what our brain is made to recognize.
Well note that I don't criticize the way we set up our scenes. It is a good "quality versus render time" compromise to use DAZ default lights.
Well back to our ambient : in a scene with no ambient light (90% of the users renders?) not all the objects will need ambient. Because in DAZ Studio, for most objects, the reflection induced by the diffuse component is "naturally large enough" (in term of object surface coverage) so that in general this is lack of ambient lighting is "not that perceptible". Yet when you decrease your diffuse (just like you have to in metals), you have to compensate this lack of ambient light incident on, (and so reflected out) your object. No choice....(alas!).
So the most an object is "non diffuse" the most we have to compensate the lack of outgoing energy. And then the tricky part is depending on your lighting conditions, and is to find the good compromise ambient/ real reflections / mapped reflections...
I have to go to work too... ;)
Yes, these days I almost always use UberEnvironment at 20% in my renders, or a set of 6 weak lights (20%) at front, back, left, right, top, bottom, and then an 80% intensity infinite light for the sun (if outdoors or near a window). This usually gives me enough ambient light in my scenes without using the ambient channel on surfaces.
Other than that, I think the ambient channel works for things like ultraviolet effects, glow in the dark substances, some underwater effects, etc. And "magic," of course! ;) I use ambient for light bulbs, candle flames, etc. and add a point light if I want the "glowing" object to actually cast light and I don't want to use the Area Light shader for performance reasons.
But you are right, most users don't use lighting from all sides, so getting a realistic metal effect in a scene with simpler lighting is always a challenge. :)