Question About Hair
Hello Again!
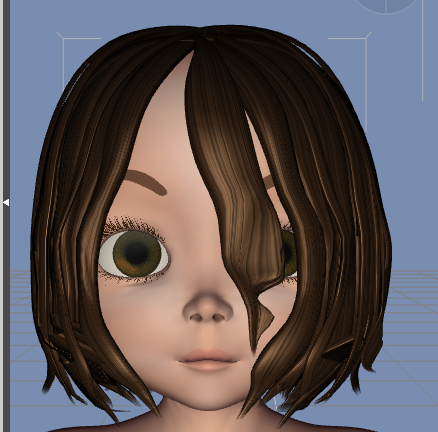
I'm just now working with the hair of my first character, and I don't think I really understand how to do that. I'm using Sadie+Sam Hairstylz For Genesis, and I can't figure out how to change the style of the hairstyle at all. For example, I'd really like to remove the piece of hair hanging in her face, which you can see in the screenshot I've included. I know it must be possible, because the picture included with the product doesn't show the piece of hair in her face http://www.daz3d.com/sadie-and-sam-hairstylz (at least not in the way mine is, it's much more... uniform), am I missing a settings panel someplace?


Daz_Hair_Help.png
438 x 432 - 220K


Comments
This is a different hairstyle from the same set, the side is supposed to be tucked behind her ear by default. Surely there's a simple fix?
Have you checked the Parameters tab while having the hair selected on the scenes tab?
Yes. I've adjusted a million different settings, but it's not cooperating. I'm beyond frustrated.
Surely someone has this hair, and could tell me what I'm doing wrong? I just don't get it....
ANY help would be appreciated.
To test if the hair has morphs, just load the hair into a scene and see if there is a morph list. Don't fit to anything. Sometimes when you autofit to a character, they become hidden, so make sure Daz is set to show hidden morphs.
There might be poses in the folder for the hair. Have you checked that out? The way the page for that item is phrased, it seems that there are 8 different hairs, rather than morphs.
There might be poses in the folder for the hair. Have you checked that out? The way the page for that item is phrased, it seems that there are 8 different hairs, rather than morphs.
Yes, there are a variety of different hairstyles. But surely there's a way to fix each of them, right?
Thanks Zev0! It doesn't look like there are any available morphs, which I can live with. But it also seems like one side of the hair is "missing." I'm attaching a picture, but it's hard to tell, because you can see the hair that's intended for the other side. I don't feel like I'm explaining this very well, but something's definitely not right.
That's just the transmapping that shows in preview, when you render it will come out as intended. On that note, check the surface tab of the hair and materials, EG if there are multiple materials for the hair, you might be able to hide that front piece if it is assigned to its own. Just set opacity to 0.
Awesome! You're exactly right! I just tried my first "spot render," and it looks MUCH better that way. You rock!
Now, there are a few things that need to be tweaked based on the spot render, is there a way to see what I'm changing, or will I need to spot render every time?
Cool:) Glad I could help. You will probably have to do a new spot render everytime to see final tweaks. To speed things up, you can also lower your render quality settings for testing purposes.
Thanks :)
Unfortunately, I'm having a different problem now. I decided to go with 3D Universe's Kimberly hair, because it did have a few morphs available and thought it might prove more useful. It's also already the color I need, which eliminates another hurdle. The problem is, when I add it to my scene it looks like the first image.
I assumed it was just parented incorrectly, so I checked and found that it IS parented to Genesis. I changed it to head, but nothing changed so I changed it back to Genesis again. I've spent a couple hours adjusting the z, y, and z scales and translations, but I've not been able to achieve anywhere near satisfactory results that way.
The second image is the result of a spot render, to show that in this instance that doesn't seem to be the problem.
I'm sorry to keep bugging you, but do you happen to have ay insight?
Try this. Have Genesis selected and then click on hair from library. It should autofit, instead of trying to manually parent. This way it will follow any character shape you dial in. You can check this under parameters of the hair to see if it is fitted to the figure. And add some smoothing so it doesn't appear distorted.
That's how I've been doing it, I only tried manually parenting when it didn't work automatically.
Since it's entirely possible that I goofed, I tried again and this was the result:
Have you tried the smoothing modifier as Zev0 mentioned? Here are a few test renders I did with Sadie Short Hair 2. The character is 50% Mavka, 50% Hitomi. In the renders, you can see how it looks with smoothing off (default), smoothing on, and smoothing on with 10 smoothing iterations.
Do you know how to apply the smoothing modifier? In case you don't (or in case someone else reading this doesn't know), here's how you do it:
1. Go to the Scene pane and make sure the hair is selected
2. Click the Active Pane Options menu button* (it's the little button with four lines and a triangle...see it in the upper left corner of Zev0's screenshot a few posts up). Alternatively you can right-click on the Scene tab itself (right on the word "Scene")
*every pane has this button, but the smoothing modifier only appears if you're in the Scene Pane or Content Library Pane
3. Go to Edit>Apply Smoothing Modifier (if you have an older version of DS4, it might be Edit>Geometry>Apply Smoothing Modifier)
4. Then, you can adjust the iterations on the Parameters pane, under General>Mesh Smoothing
I don't have Kimberly, but given what I'm seeing in your images, you might need to adjust smoothing and collision, and/or increase the scale of the hair (that can be done on the Parameters tab).
As far as the rogue strand is concerned, I don't think it's movable and I think the way it looks in the promo images is just a matter of camera angle. See attached test renders...this time the character is Sadie and I changed nothing except the camera. Smoothing doesn't make much of a difference here.
You, Sir, are AMAZING!!
Thanks a million times over for saving the day!
:-)
No problem...glad it helped. :)