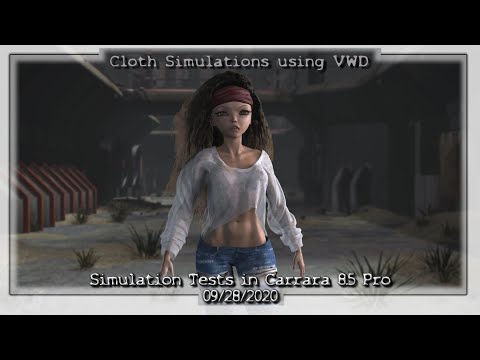
Regarding Simulations....
 Dartanbeck
Posts: 21,623
Dartanbeck
Posts: 21,623
I've been heavy into practicing using various simulation methods in Carrara.
With Rosie 5 came the Dynamic Hair craze and lately I've been doing all manner of tests with VWD Cloth simulations. I'll be revisiting Carrara's Particles and other Physics sims, but I think my next big push for testing has to be Alvin Bemar's Fluidos II - it just makes sense!
I've actually tested many different ways of simulating cloth with what I feel to be a great success. The video I present here is my tests on blousy, flowing tops that can often be difficult to keep from just falling off the character in ways that clothing in the real world simply wouldn't. I've been finding it increasingly simple to get the results you'll see here just by using some simple techniques with the Assistant interface.
I've also used the simulator to solve difficult conforming cloth situation work much better than actually conforming them. I'm not sure what all of you are using out there, but since I use Carrara's native render engine, I've opted for a 6GB GTX 1660 graphics card (I wanted the Cuda cores for DaVinci Resolve and other things) and it calculates my simulations really quite effortlessly. So for clothing that I would normally conside to be fine as conforming cloth, but feel that either the shape could be better or that certain portions of it should behave differently during animation movements, I simply use VWD to glue the clothing to the character and run the sim.
That said, I've also been finding that I prefer to remove the rigging from many of my simulated clothing items. Rosie 5 is very unique, making conformity a bit of a challenge. Things like xenic101's PokeAway (I use PokeAway 2) and SickleYield's Clothing Breast Fixes help immensely to giving Rosie 5 success with conforming clothing. Well just like Carrara's Dynamic Hair, VWD allows us to set the collision distance on the collision character (in this case, Rosie 5) along with friction. The clothing assistant then kicks in with options we want to use for the item that we want to collide with the character - the clothing.
Using the assistant on the cloth (and perhaps without the assistant?) there's an option to "Nail All Vertices", which is a soft attachment of the vertices of the cloth to the vertices of the character, yet there are other factors that play into how much or how little we want to to happen, which is really beneficial, fun and also makes clothing really easy to simulate!
I'll be getting more into actual practices, numbers and such as soon as I can. It's what I've been working toward - showing you all the numbers and methods I've been using to get the results of this video. I've done an awful lot more work that this, but these kind of fit together, and I really wanted to keep this one brief - no talking, just a quick demo video.
Hope you enjoy it ;)
We'll be using this thread for a lot more than just cloth and hair sims though, so feel free to share whatever other simulations you'd like to talk about!
Daz 3D is part of 
Connect
DAZ Productions, Inc.
7533 S Center View Ct #4664
West Jordan, UT 84084
Licensing Agreement | Terms of Service | Privacy Policy | EULA
© 2024 Daz Productions Inc. All Rights Reserved.
Comments
For most of the video, we're seeing the prop version I've made using the Aussie Girl Outfit.
After a few tests with that blouse, I've reshaped it slightly into something that is so easy for me to use that all I have to do is animate the figure, run VWD using some fairly standard numbers and settings depending upon the motion, and it turns out that very first simulation run, which really doesn't take long to calculate. I set the original prop top (the one that VWD makes invisible to hide it) so that it Does Not collide with hairs, but then I set the collision properties of the simulated top to have very little bounce and often quite a bit of friction, sometimes less.
Then I run the hair simulations, colliding the hair against that simulated cloth. Pretty cool stuff.
I can carry on simulating things in this same scene. I just keep remembering to delete unneeded elements, like the hidden original cloth, for example.
Since I'm using forces for the hair - and each of my characters using Dynamic Hair have their own forces set for their own hair needs, after I simulate the hair successfully for one character, I delete their forces - or set them to 0.00, if I think I might need them again.
Before long, the whole workflow becomes quick and easy. It has to be for me because I can barely get to my computer these days. Run in, set up and animation, run the cloth sims, run the hair sims, set the file name and location for my image sequences, save the scene, repeat as many times as I can before time runs out. Then load them all into Batch Queue and go to sleep, work, or wherever else I have to go that drags me away from just doing this stuff forever!
Love it!
Thanks All!
Very nice Dart - you do realise that a Tutorial is now required !!!!
+1 (understand time issues for a tute)
Very impressive.
Yep. That demo was to help support some upcoming tutorials.
Thanks Steve K, Wendy, BrianP21361, Bunyip02 and Diomede! I appreciate the kind remarks! :)
I decided to work on more simulation experiments and leave the animations I had set up in the batch queue for later (later being now).
I've performed a Lot of various simulation of different types of clothes, and tried many different techniques on some of those individual clothing items, just to see what works best.
Here's the thing: I truly doubt that there is one tried-and-true method to use for everything. Of course this will seem obvious to you if you've done much work with cloth simulations. But I was really looking for a great, basic set of rules that kinda works for everything to help folks get started for the first time - and I think I have it. That basic method is the down-and-dirty on how to work out where to begin, and what to do if that isn't working out. There really isn't a single method for all or even most things.
For example, take a similar shirt model and work out the best way to make it dynamic for your animation. Now run a completely different animation and you may just need to retool how you run the sim.
Also, take another shirt model of nearly the same type, but by a different artist, and you'll find a better way to get that one working. If this all sounds complicated, it really isn't when you have a nice tool that does the heavy lifting (coding) for you!
I just posted this image in the "Post Your Renders" thread, which fills me with glee! I always liked "The J-Suit for V4". Perhaps it's that Rosie 5 is such a vast difference from normal generation 5 characters and their offspring, but I could only get it to work on a limited level. The shaping differences really screwed with the shape of the zipper teeth for one, but there were other anomalies as well - and J-Suit isn't alone in that. Not to disrespect what goes on with Auto-Fit... heavens no! I find it amazing how well that incredible technology works - and it's part of why I love using Genesis 1 so much.
However, having VWD at my fingertips gets me to want to try things. Things I wouldn't have thought to do - like perform dynamic simulation on a tight-fitting suit that might as well just be conforming, right? Well here's what I did:
So now I have a static model. A prop. So I use the Universal Manipulator to roughly scale the thing to fit Rosie 5 (or whichever character I'm working on) before clicking the wrench icon in the upper left to launch the Vertex Modeler within the Assemble Room (Thanks Daz!!!).
With something like The J-Suit, we have to be careful. It has a lot of individual mesh items that are all on their own - so Soft-Select doesn't work. With Rosie 4, I went ahead and made my own morphs anyway - first the basic shape with the zipper cloth, teeth and tongue hidden, then painstakingly maneuver first the cloth, the then teeth, then the tongue into place, being careful to match their angles and position as they should be. I didn't mind, but back then I had entire winter seasons to be able to work on Carrara!
I got some fairly decent results my first few tries with The J-Suit in VWD, but I had a bit of a brainstorm while working on another simulation - and The J-Suit was the perfect candidate to try it out on! Inverse (or negative) Inflation! Although unchecked by default, Inflate pumps virtual volume into the mesh being simulated. The default value when turned on is 10, I think - maybe 20? No matter, VWD has a handy Reset function to put all default values in place, which is great after a lot of trial-and-error sessions.
Hovering over the Inflate value field reveals that the range it accepts is -200 through 200.
I brought in a fresh copy of The J-Suit and performed the rest of the eight steps mentioned above. Afterward, instead of getting too persnickety with shaping the mesh to Rosie 5, I simply scaled it down (waaay down - she's really tiny!) so that I could only see parts of it, while the rest was buried inside of her.
Now it's an easy process of "Nailing" the back and sides with soft extension and set the zipper cloth, teeth and tongue to Rigid (it's all simple buttons on the interface) and choosing the stiffness I need. I went with Stiff, which is like leather.
Off into the simulation room, I make sure to uncheck "Start" by the Simulate button, because I first need to check the Inflate box and set the value to -200 to vacuum the suit to Rosie's physique.
Works like a Charm!!!
Remember what I said back there about having to perform different settings and such for different situations? Same applies here. Sometimes I find that it works best as Stiff (Leather), while other situations call for something like cotton. Or I might still choose Leather but set the softness and stretch differently than I had before - where many times I can just leave that stuff as default.
Anyway, when the simulation os complete it gives us a really nice real-time loop of the simulation on our character. In fact, a good way to quickly test the timing of an animation (in Carrara) is to launch VWD and load in the figure and hit the Play button!
Play with different levels of gravity, inflation and other settings.
Very soon I'll have an instructional video handy that will walk through a few different types of sim, as well as some of the ways I troubleshoot them to work if it didn't go as planned the first time.
Ciao all!
...and testing the Stormwinds Cape collection. Only this one so far because it inspired an animation that's rendering right now.
Earlier Rosie wanted to cosplay Vampirella - bless her heart! ;) (second image)
this is super Dart, really looking forward to your elucidations on v w d.
I must say whenever we try to talk about it then there is a Winston Smith effect.
LOL!!! I hear that!!!
It's such a boon to both DS and Carrara (and....) so I'm just keeping my fingers crossed!
Playing with this stuff some more, it's truly amazing the costume (etc.,) possibilities are open to any figure! So Cool!
By the way, the whole process of turning the cloth into a prop is likely unnecessary in many cases. I do it because the process of 'conforming' shapes the item - shapes which I don't really want to be maintained during the simulation because it makes it look funny. Also, turning it into a prop (static obj) allows us to add or remove vertices and all manner of other things that we just cannot do with conforming items.
Just wanted to clear that up. The simulator works marvelous with conformed items!
Gotta go play my drums for people now. Later.
the newer one the trial ran out but on the bright side after my Windows 10 update I got my original one to send it back to Carrara on this machine without crashing
so I am back in business on both computers
I honestly don't find it hard sharing car files between PC's though as long as I don't add Octane stuff!