Alpha Maps not liking me today
 arcady
Posts: 340
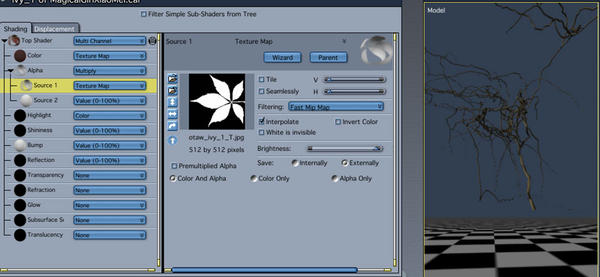
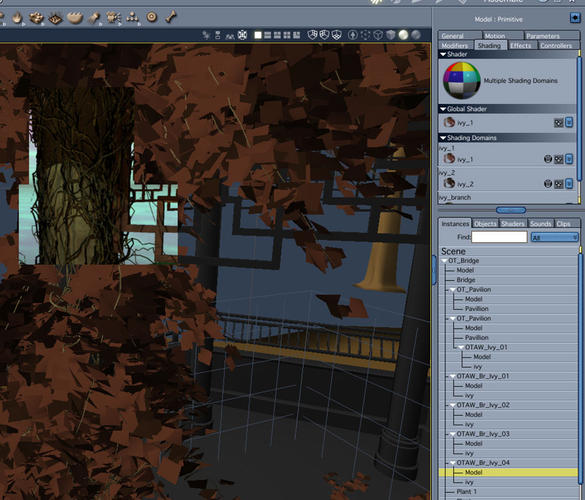
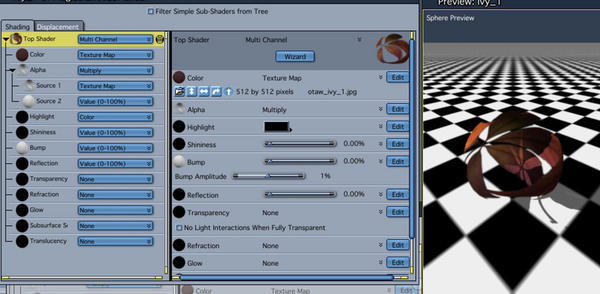
See the attachments for what I'm doing.
The alpha maps look good, and render good in DazStudio, and in the Carrara Alpha preview, but in the image render they just set the object fully transparent...
This is the new Platinum Club item:
http://www.daz3d.com/platinum-club-items/oriental-tranquility-awakening
Any ideas on how I can fix this?

AlphaMap2.jpg
963 x 445 - 78K

AlphaResult.jpg
972 x 831 - 159K

AlphaMap.jpg
926 x 454 - 90K
Post edited by arcady on


Comments
To begin with, try dragging Source 1 of the Alpha channel (left side of the shader window) directly onto the Alpha channel.
When you're done, the Alpha channel should be set to "Texture Map"
See what that does for it.
My thought that it is the multiply function in the Alpha channel. Try dragging the image map channel in the multiplier up, and dropping it on the multiplier. This will remove the multiplier and leave the image map as the only thing in the Alpha channel.
D/S, Poser and Carrara each use different shader systems and render engines, so even though they're generally compatible, there are sometimes little hiccups or mis-translations between them. My guess is that this is an example of that.
Tried that, but it doesn't seem to improve things.
The alpha map is a jpg - could that be it? Should I edit it in photoshop into some other image format?
You fargin' bastich (look up Johnny Dangerously)! You beat me to it! And with less of word count for once! Either I'm rubbing off on you, or you're rubbing off on me. ;-P
A long shot, but what if you click the Invert Color checkbox? It may have been why the multiplier was in there. The PA may have made his map differently than normal, and corrected for it in D/S, but it may translate wrong to Carrara. It's just a theory though.
When I click invert it renders the whole thing as solid squares.
- Curiously, the texture also vanishes. Only the color shows:
The alpha map is a jpg - could that be it? Should I edit it in photoshop into some other image format?
Somehow you clicked the Filter Simple Sub-Shaders from Tree checkbox at the top of the shader window.
My next suggestion is to un-check the invert box, and maybe do a test render. If you're using GI, then turn it off temporarily. Make sure that Light through Transparency is enabled. When you're ready for the final render, if you're using GI make sure the Light through Transparency option is turned on in both the standard renderer settings at the top of the screen and in the GI section.
What's GI stand for?
I clicked to hide those for easier screenshots here. :)
Going out for a few hours, so I'll have to pick this up in a bit.
The alpha map is a black and white image, so it shouldn't matter what the format is. There may be another way to get the alpha if the alpha channel continues to cause problems. You could edit the image map in the color channel in PS. Basically make it layer and delete or erase everything except the leaf. You should be left with only the leaf. Save As in a format that supports alphas, such as .tiff, .png or Photoshop. Load the edited map into the color channel. The alpha will be respected. You can leave the actual alpha channel in the shader empty.
Sorry. GI stands for Global Illumination. Skylight, Indirect Light and Ambient Inclusion fall under that heading. You access those settings in the render room.
The reason I suggest turning it of for the test renders, is that it is very processor intensive with lots of light calculations. Especially for the set you're using because of all the alpha maps it uses for the leaves on the vines, based on the Promo images. I don't have the set so I can't test it personally.
The reason I wanted to see an actual test render is because the Texture Room is sort of an OpenGL thumbnail view. It would maybe be a long shot, but perhaps the complexity of the model along with the alphas is causing it to not display properly. There is also one more possibility and that is perhaps the Normals are reversed on the leaves. I've had the issue before in the Texture Room preview. They rendered fine in the render room. My suspicion at the time was that Carrara only displayed the front facing facets in the OpenGL preview to save on resources. Again, it's just a theory. I nothing else works, then I can tell you how to check the Normals. It's a simple process.
Do you have a light in that scene? All I'm seeing in the scene tab is the ivy stuff. It'll show up in working view, but not in a render.
I was actually just going to recommend checking that the lights in the scene are not excluding the ivy. Also check render settings, though I cannot think, off hand, how any of that would make your objects invisible.
Go back to the Multi-Channel shader that you had in the first screenshot, but drag the texture map (source 1) directly onto the alpha channel.
Keep the transparency channel at "None" as in the screenshot. Same shader as screenshot, but without the Source 2 in the alpha.
Here's a test render. I had global illumination off.
Just a thought...how are you loading the ivy into the scene?
Some apps that make leaves - Xfrog and IvyGen, for instance, need you to import using facet meshes instead of the default vertex primatives, otherwise the leaves are invisible. This may be the case here.
Try a little to apply this shader to that of the branch, sometimes domain names are not correct.
Wow! This one is making may puzzler sore!
Maybe DUDU is right in that it could be the shader domains, but maybe there's something with how the leaf billboards are UV mapped?
I know there was an issue with Ivy Generator on Macs reversing the Normals. If the person that made this set was on a Mac and used Ivy Generator to get the ivy, then perhaps the Normals are reversed? I have just used Fenric's plugin and the Normals were indeed reversed for me. I had to convert the ivy from a primitive to a vertex model to reverse the Normals.
Continued from above...
If the Normals are going in the correct direction on one part of the model, but the wrong way on another part, reversing them will make them all go in the same direction over the entire model. If it ends up they're all going the wrong way, then use the Reverse Normal command again. Generally speaking, when the Normals are going the correct way, the little lines will be displayed as pointing out.
Regarding the screen shots: The Ivy has clearly been converted to a vertex object in the finished product. I only included the screen shot of the conversion dialogue to show the steps I took to get to the vertex model point and to show that the Normals were reversed upon conversion.
The Ivy is a part of this prop:
http://www.daz3d.com/platinum-club-items/oriental-tranquility-awakening
NOT a Carrara plant.
I tried replacing the texture map and alpha with a tiff image - no go.
I tried using a different transmap, from several different items in library - no go.
I loaded a random PNG image that had some transparency as the texture map - no go.
I moved a shader from another part of my scene onto the ivy - a shader that worked on the item it was on - no go.
I tried making a new shader from the ground up, using the tiff image I'd made with an alpha map - no go.
I tried a carrara shader of random things (my carrara library is small right now as I just installed and it looks like my Carrara 5 library files are on a dead CD, unless I get lucky and find a second backup later) - THESE WORKED.
What I didn't do was stop in to read this thread again after last night, so I have not yet tried the normals suggestion.
In the end for the project I was doing the ivy was not critical to the scene so I just removed it:
http://www.daz3d.com/gallery/#images/34641
- That's my final render.
I'm going to go back now, with just that one prop of the gazebo and ivy, and see if any other suggestions will get it going.
(There's not ability to show images in the forum without attaching them? no IMG tag?)
I rendered at 2880x1800 in tag format, so I could use it as wallpaper on my Retina-display Mac - and oddly, Photoshop CS5.5 couldn't open the image... but I got lucky and used Mac Preview to duplicate it as a PNG and get that into Photoshop.)
You can attach images to forum posts, but not embed them. The maximum dimensions are 2000 X 2000 pixels and the forum will accept .gif. jpg and .png. The maximum file size per attached items is pretty generous as well. It will be split between your attachments. I think it's around 9 or 10 MB. To attach more than one image, after you have selected your first image, press the Preview Post button. If the file is large, it may take a moment to refresh. Use the Choose File button to browse to another image, and hit the Preview Post button again. You can attach five images per post.