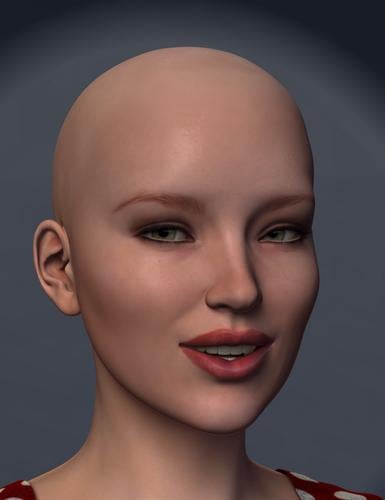
Victoria 6 Lips and Teeth Render test
 ringo monfort
Posts: 945
This is Victoria 6 render in Carrara.
I will come back in a short time and will explain the render setting.
I also added shaders to the teeth and the lips.


Victoria6_Elite_Shaders3.jpg
800 x 1040 - 248K
Post edited by ringo monfort on


Comments
Looks great Ringo!
If you have the time, could you pop into this thread and help the OP out. They're new to Carrara from Poser and are feeling overwhelmed and discouraged with Genesis. I don't have it so you may have some useful advice that I can't give. Thanks.
http://www.daz3d.com/forums/discussion/44616/
Lips Shading Settings. I tried this for an upcoming product that uses lipstick colors and so I wanted to try the same setting on Victoria.
1) Top Shader Lighting Model set to: Anisotropic Model
2) Color set to: Texture map. In this sample it is: RyBelle_faceMU05.jpg
3) The Bump setting: 20%
4) Reflection set at 4.35% with 25% Fresnel term
5) Index of Refraction: Water
6) SSS setting see the screen capture.
7) Highlight set: Multiply Source 1: Texture and Source 2: Value set at 40.22%
8) Shininess: 6%
9) Glow color set to: BLACK
Naturally feel free to play with the settings see what you get.
More information in the next post.
Closeup of the Lips and Teeth. Include Render settings screen capture.
So did you use the anisotropic lighting model for just the lips?
You are correct it is only on the lips.
It is a very nice effect. I will have to give it a shot. Thanks for the tip.
Now try the same settings on the Gums but minus the anisotropic light model.
Next come the Teeth shader settings.
I spent a few hours trying to come up with teeth shaders and here is what I did. Feel free to adjust settings to your liking.
Key ingredients: Sub-Surface-Scattering with high translucency value. Next, Using a multiplier in the Translucency channel with a texture map and value settings. See the screen captures.
Channel Settings:
1) Color: Texture Map
2) Alpha: 100%
3) Highlight: 45.65%
4) Shininess: 7.61%
5) Bump: Texture Map
6)Reflection: 5% value with Fresnel Term: 19%
7) Transparency: NONE
8) Refraction: Index of Refraction, ICE
9) Glow: Color Black
10) Sub-Surface-Scattering See Screen Capture.
11) Translucency: See Screen Capture. I used the bump map texture map in the multiplier.
High Dynamic Range Source files.
Here is a link some of the very best HDRI files.
http://www.hdrlabs.com/sibl/archive.html
Wow, thank you Ringo, an extremely interesting approach to both lips and teeth. I would never have thought to use an anistropic shader for the lips, you can bet I'll be playing around and experimenting with this! I'm assuming the reflections are not checked for blurry reflections for the lips either? Also how did you decide what the Fresnel term should be? I've been wondering what the correct Fresnel term should be for human skin for quite a while, and experimenting with different settings.
Also thank you very much for the wonderful hdri resource. A lot of cool hdris on that site.
Have you experimented with having the 2.2 gamma setting checked? Because of Carrara's linear workflow, this setting isn't just some random autocorrect of gamma that could be applied in postwork, but instead changes the way the renderer reads the hdri light, correcting it and making the lighting much closer to physically correct in terms of the way it behaves, etc. You probably are already aware of this, but thought I would mention it, as I can see you do a lot of work texturing for realism and having the most physically correct lighting may be of great use.
Thank you again for sharing your settings and approach, this is a goldmine of info!
The next big frontier to be conquered in carrara is SSS, this channel has given me many sleepless nights trying to understand and tune it...
I know Phil loves it, and I need to go back and re-read the chapter about it in Jeremy Birn's book, Digital Lighting and Rendering, but I seem to recall that if you followed good linear workflow practices then, Jeremy suggested not applying the gamma as it is applied internally in most programs, and then applied again automatically in your image editor or video editor. I won't even pretend to deny that Phil gets some impressive results, but I'm on the fence about the gamma correction. The rest of the linear workflow makes a lot of sense.
Greetings Jonstark!!!
Oh lots of trial and error while creating shaders, it is part of the fun. :)
Like many of us here I have seen other images render by other artists that show these gorgeous looking lips and so I wanted to create similar results in Carrara.
The anisotropic shader came about as a last setting in the shader when I wasn't happy with the render and after setting up the render just came out better. Minor adjustments were made to the reflection channel and you are correct no blurry reflection or it would take forever to render. :) Next time I will try a blurry reflection map in the channel see if that improves anything.
The Fresnel setting like you mention it is just a experimenting and see how the render turns out.
Gamma Correction render setting 2.2 does make a big difference and I am just now using it in my renders. I do use the Multi-pass render setting and render the files to Photoshop format this is a great tool. It allows me to see how each channel affects the image and if any adjustments needs to be made for the channels. For example if I want to take a look at the render image with or without SSS I just turn off that layer in Photoshop and I can see how much of a difference SSS really makes on the skin. Same with reflections, Indirect lighting / Global Illumination. Just about everything is a Photoshop layer. I recommend using this feature..
Oh the SSS channel you are correct it is the big frontier but I would dare to say don't render skin with out it. It just doesn't look as real without SSS.
Happy Rendering everyone.
PS. More information coming tomorrow.
I remember when Phil first posted about learning about this little trick, and mostly the reasoning was 'I'm not sure why, but it seems to have something to do with linear workflow, also we've noticed that all those unbiased render engines seem to have this setting as a default, and it seems to give better lighting, maybe it's not a coincidence?'. And there was a lot of us speculating that while it was interesting, there was no clear reason why it was so important. But since then Phil's done some delving into the science behind how linear workflow works in renderers that use it, and part of his new realism training explains in graphical detail how the process depends on correct gamma settings during rendering to make light behave in a physically correct way (if you want to check it out, it's one of the free preview videos over at infinite skills (dot com, not sure if I'm allowed to link so I'll just say it that way) titled Gamma and Linear Workflow in Carrara, which is only about 8 min long and well worth a peek. Takes it from the realm of 'hey this seems to give a nice effect' to 'here's why it's important to Carrara's renderer', and it has much less to do with brightening/darkening/evening out the tones of the lighting (which should be dependent on how we set up our lighting anyway, and not some checkbox in the render room) and much more to do with how the linear workflow depends on 2.2 gamma to work more precisely, so that it really isn't equivalent to doing a post render gamma effect we could do in photoshop afterwards if we wanted the pic to have a more even tone.
I already really liked the 2.2 setting myself, but seeing an explanation of why it matters swung my opinion firmly towards the setting :)
Something that may help if you go to blurry reflections (which lately I've been moving to only lighting the scene with meshlights - objects with the glow channel set to illuminate and indirect lighting, no other lighting, so it doesn't detect highlight and shininess at all, so all specular has to come from the reflection channel, so I've been using blurry reflection a lot lately) is to first set the Ray depth all the way down to 1 and the max attenuation down as low as it will go (70%, though I wish it would go lower) that way you get a lot less of blurry reflections reflecting other blurry reflections, which can slow the render incredibly. If you kick it down to the lowest ray settings possibles, you can still get the nice blurry reflection effect without the render time being destroyed (it still slows it some, but it is workable). This was something else that Phil found (if I'm remembering correctly?). It's the only thing that puts blurry reflections in reach for my machine :)
Oh I agree completely. The problem is Carrara's sss channel's settings don't seem to conform to any real-world rhyme or reason, and the results of experimenting vary so widely. This is the one channel that has caused me to the most grief over the years, and I still only get rudimentary results... Gotta keep at it though, someday the code will be cracked and we'll have perfect sss skin settings :)