Seams Broken
 CTippetts
Posts: 162
CTippetts
Posts: 162
Working with glass:
My wonderful fellow Bryce users, I have a problem that's been driving me mad. Actually this is Bryce 5.5 I'm using, but I'm hoping someone still remembers the answer. Sorry this is so wordy, but I wanted to explain right up front how the problem came to be, and what I've tried to solve it. Also, so it can be recreated to try for yourself, if you so choose. Read the next two paragraphs, then skip down to the paragraph that starts, "Upon rendering ..." if you want to skip the building and go right to the troubleshooting.
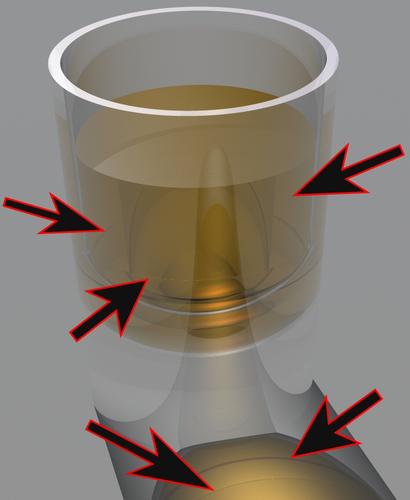
What you see is supposed to be a shot glass with whiskey. It's true, I don't have the whiskey color right, yet, but, that's not the problem. It would have been easier to see it's a shot glass if I would have changed the Plane 1 to some other color than Bryce grey, but with a 20 minute render time, (glass ... you know), I didn't want to redo it just for this inquiry. Also, as you see it, the shot glasses glass is thicker on the sides than I intend, but what you see is due to trying to troubleshoot the problem.
However, none of the above is the problem. The problem is these annoying lines I drew arrows to. They are seams between some parts that I can not get rid of ... only make worse. If I make an adjustment to the two pairs of parts just .01 one way or the other, the seam is far more noticeable.
What I did to make this was took a positive cone, flipped it, then stretched it a great deal up and down. I duplicated that, made the copy a negative, and moved it down so the top of it is where the bottom of the shot glass was to be. I grouped these two cones, and made the group a positive. I now have the shape of a shot glass, but it's solid glass. So far, so good.
By the way, to ease calculations, I almost always leave everything at X=0, Y=n, Z=0, so assume that in everything here. Nothing is shifted the least bit east, west, north, or south ... just up and down.
I then duplicated the positive group. I raised this group just a bit to create a gap between the outside of the two cones about the desired thickness of the glass. Probably would have worked fine just like that, but I wanted the base of the shot glass to be thick glass, as most real shot glasses are. I also wanted the inside to be rounded at the bottom, once again, the way most real shot glasses are. So, when I raised the group, I made sure the base of the glass would be thick. I kept this group as a positive, because of wanting the rounded inside. It wasn't yet ready to carve out the inside of the shot glass.
At this point I only have four cones on the screen ... two positive, and two negative ... one group inside the other slightly higher, but both groups positive. So it's sort of like two stacked shot glasses, where the top one is solid glass. (Both are, really, but you know...)
Next I took a positive sphere, and sized it down to the approximate diameter of the new positive cone, at an area adequately above the bottom of the shot glass. I then brought in a negative cylinder, and placed it so the bottom of it was exactly at the center of the sphere. I then grouped the sphere and the cylinder, and made the group a positive. That group now looks like the bottom half of a sphere.
Here's where the problem comes in. I then raised the half sphere mathematically to the exact top of the negative cone that acts to chop off the point of the cone. In wireframe, it looked absolutely perfect as the math should have had it to be. I then grouped the half sphere with the second cone group it was up against the bottom of. I made this group a negative. I then grouped that group with the first cone group to carve out the inside of the shot glass. Should work, right? Yet, there's this seam. If I move the half sphere group up or down .01 either direction, the seam is more obvious.
At first I didn't realize how bad it was, until I filled the shot glass with whiskey. Then it really glared at me. To make the whiskey, I simply duplicated the inside group, (which consists of the two cones grouped, and the sphere and cylinder grouped). I changed the group to be neutral, changed the glass texture, (um, yes ... I often use glass instead of liquid when the liquid is supposed to be still), and added another negative cylinder to that group, to chop of the whiskey group below the top of the shot glass. (There was whiskey well up above the top of the shot glass before that. Lucky it stayed put and didn't spill over the side. That would be alcohol abuse.)
Upon rendering, it was awful. I poked and prodded, and stretched and shrunk, and whatever else I could think of to get the seams gone, but you're seeing them at their very best.
I thought perhaps I didn't quite get the spheres to the exact diameter of the cones where the spheres' centers meet them. Nudging those .01 at a time back and forth in size did not affect the problem. Shrinking the whiskey group to be slightly smaller than the inside of the shot glass did not help. (That's where it is in the render you see here.) Making the whiskey group slightly larger than the inside of the shot glass caused other texture problems I'm sure you've all come across before. ( I knew better, but thought I'd try it.)
I also tried turning off the transfer of material from the Boolean negatives, thinking I was seeing the two groups placed smack up against each other were somehow reflecting back and forth at each other. That only made the seams more pronounced, introducing grey lines at these seams.
What can I do?
Daz 3D is part of 
Connect
DAZ Productions, Inc.
7533 S Center View Ct #4664
West Jordan, UT 84084
Licensing Agreement | Terms of Service | Privacy Policy | EULA
© 2025 Daz Productions Inc. All Rights Reserved.
Comments
Sounds to me as though you've pretty much done everything correctly. A few considerations.
One of the less talked about changes in Bryce 7 is that numeric inputs now extend to the thousandth. The minimum increment is now .001, which would remove the seam you are observing. What I suspect is happening in your scene currently is that .01in either direction is just far too much so you cannot get rid of the seam.
In general, nested booleans are a real problem. Models with generations upon generation of boolean steps are quite unstable sometimes. The mesh collapse feature in Bryce 7 helps a bit with that, but as David noted, it has some quirks. For one normals are inverted as well as some other issues that probably will be fixed during the next development cycle,.
But since we are in Bryce 5.5 world we need to consider this differently. Instead of constructing your boolean model glassware first, you should start with the liquid first. Because as we know, resizing later doesnt really work.
I would do the following.
1. Create a sphere. Flatten the sphere so that it is only half as tall as it is wide. I would then copy the matrix of that sphere and I would then add a cylinder in the same position but raised up to the where the bottom half of the cylinder meets the exact middle of the sphere.
2. Now you should have a tubular shaped object with a somewhat rounded bottom. Make both of these primitive objects positive and group them and name this new object "Liquid Cut-Out." Make this a Negative.
3. Duplicate Liquid Cut-out so there are now two. But naturally, you want to give the second one a unique name, maybe "Liquid REAL." Make this group a neutral, and for now, make it Hidden.
4. It is essential that the Liquid Cut-out and Liquid REAL always maintain the exact same position and scale settings.
5. Now I would begin to construct my glassware around the liquid. I would place a cylinder that would behave as the glassware itself. I would make this new cylinder a positive. I would then group This positive cylinder to the negative "Liquid Cut Out. The result should be what looks like an empty high ball glass.
6. At this point all you need to do is to make the Liquid REAL visible. It should render accurately now because technically there should be no gap or overlap at the point where the inner glass ends and the inner liquid begins.
7. To avoid visible seams the edges must match perfectly, absolutely perfectly. I once modeled some wine glasses in an external application and had to figure out how to do the liquid. Below is the result. While there is a lot to see here, the wine glasses over on the left demonstrate how well it can work. Best of luck.
http://www.daz3d.com/gallery/#images/14993
Rashad, you gave me the answer I needed to hear. I already assumed the .01 resolution was not fine enough to get it right, and that I'd have to start over. You confirmed that, and that's what I needed. Thank you!
My problem with your solution is; I need the shot glass to be tapered. I'm going to duplicate part of the bar at a restaurant I work at, and wanted to use glassware they use. (It's a beautiful bar.) So I have to use chopped off cones instead of cylinders. Your solution is correct, and has no problems as you said it. I just mean I have to do it different than how you described. Lining up a cone and a sphere at an arbitrary point along the cone, where the exact diameter is not revealed by Bryce, is probably a big part of my problem. Yet, of course, the exact diameter could be derived old school, doing the math myself. (Oh, I hate algebraic geometry. PI r²? No, cake are square ... pie are round. I prefer eating PI to calculating with it.)
HOWEVER, I will take your suggestion of starting from the inside and working outward. That suggestion alone may save me tons of headaches on future projects. (Is everyone reading this? If you take nothing else from it, take at least that advice.)
BTW, Rashad, NICE GALLERY! I'm going back there.
Sounds like you've got it going now. I also suggest that instead of a cylinder to cut the glassware shape from you might consider using the Egg shape in the primitives. I think there is an egg sort of shape included with Bryce 5. Cut it off at thou should have ashape resembling the Collins glass. One more cool thing about Bryce 7 is that it comes with several mesh objects such as tapered cylinders which save a ton of time for subjects such as yours. I really hope you get to play with B7 soon.