Tutorial - creating a low-poly badge (Carrara and Hexagon)
 Varsel
Posts: 574
How to create a low-poly badge.
-
This will be a two part tutorial
-
It also covers only the basics, so you need a working knowledge in how to use Carrara and Hexagon.
-
To create a texture-map and bump-map with Carrara.
-
You have created your model in Hexagon. This one is 36 000 poly's. Way to high for Poser or DAZ Studio. So you want to make a low-poly version.
-
Export the model to a .obj file. Export-scale doesn't matter. 1 is fine. This model is just for creating texture-maps.
-
Import the model into Carrara. Posision it in the assembly-room.
Setup shaders.
If you are using metalic shaders, it is also important to give them something to reflect in the background. The choise of background will also affect the resulting reflected color of the shader.
Setup the lights.
-
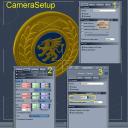
Camera Setup.
Select the camera in the assembly room.
1. Change it to Isometric
2. Posision the camera. If you turn on "ShowProductionFrame" in the vieW meny it is much easier. Also remember to set the image size (in the render room) to something like 1024x1024 (or bigger)
3. Use the Zoom to fill out the productionframe. The scroll wheel wouldn't work when using a Isometric Camera.
-
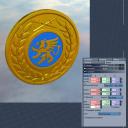
Render setup
In the rendering tab- make it as high quality as posible, but you shouldn't need any Global Ilumination.
In the Output tab - Your image size should already been set to something square(see camera setup).
Under Multi-Pass press add- then in the pop-up window- select depth.
This will give you a greyscale image of the depht of your image.
To use this as a bump- or displacment-map, you have to take it into a photoeditor and invert the colors, so that what's black will be white and the higest points and what's white will be black and the lowest point.





Comments
To model a low-poly badge in Hexagon.
-
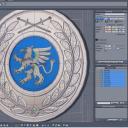
Setup the workspace.
Under the properties tab, select the texturemap, and use this as a background picture.
-
---- In this modeling tutorial I used another texture, just to show something else with more shape to it....
Start to model.
I often start with a grid, from the "3D primitives" tab. And then use this as a base and extrude and shape and do all the modeling from.
One importante thing when using a grid to start from. When finishing the modeling always use the "Orient normals" under the Utilities tab.
-
After the flat shape is made, I extrude a litle thicknes to the model. Just a flat shape will often look... flat.
-
Then create a materiel for the model. And select texture image and pick your texture-map. Hexagon has something weird with texture images, so you have to check the "Flip verticaly" or the texture will come in upside down.
The result on the model will probably look strange, but we will fix that next.
UV-mapping
Since you made a material with a texture-map, the texture-map will show up in the UV-view.
I also use a lot of pins, since this is basicly a flat shape.
Then it is to posision the UV of the model in the UV-view, so it will match up with the texture map.
-
And the result is a model with a texture..
-
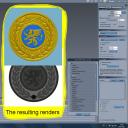
And at the end : the low-poly model from the first part of this tutorial, using the depht render as a bump-map, and the model from this tutorial, both rendered in Carrara.
Thanks so much for the tut, Varsel - I'm going to give that a go first thing tomorrow .
One part of the explanation I find very interesting is that you UV map after setting the texture - any particular reason for that?
Something else - I really never could understand how pinning works in Hex - I use UU3D and have no problem there, but Hex seems to have some strange ideas on pinning - for instance, where would you place pins on that cross?
hei Roygee..
I did make the materiel first, cause then the texture-map will show in the UV-view.
It`s easier then to place the UV, so it will match the texture.
-
The pinning for UV in Hex can be tricky... For this, since it`s so flat I did put pins on more or less on all of it, except on the edges. For a more complex shape (flat shape) it will preserv the shape when UV-mapping.
.
When I UV-map something with more "volume" I use only two pins, and a lot of trial and errors...
Nice tutorial, interesting technique. I'll try that.
By the way, if you are only after a depth map in Carrara then you won't need any lights or shaders at all. Renders very quickly even with object accuracy and antialiasing maxed out (you don't need to worry about shadows without any lights).
The 'Normal Vector' pass should give a usable normal map too.
Great Tutorial! Definitely adding this one to my to-do list!
Thanks!
@Varsel
Thanks, I will start to study this.
Thanks, Varsel - and Rogue Pilot - lots of food for thought there. Yep, pinning in Hex can be a real trial and error businss - I have figured out how to do a torus, but that's about all.
I see we have a third Roy on board - welcome
Glad you liked it :-)
-
I wasn't aware of the "Normal Vector" pass. Had to try it...
It gives a usably Normal Map.
-
I will still recommend to render out a texture-map. This way you will get those imperfections and details that highlights and reflections will give you. Just using a bump/normal map and a metallic shader gives a flattish look..
Thanks! Mostly lurking for now. But I'm sure I'll have a question or 2 as I get more into hexagon. I've been learning a lot from you guys.
Welcome to Hex and I'm Roy number three. :lol:
Three cheers for the three Roy's - bet none of you are under 65 - never come across a Roy born after WW2.
Varsel - I've had a bit of a play and am very impressed with your method - I'll certainly be using it in future.
What has made me really excited - I don't have PS and use Gimp. Gimp opens .psd files, but doesn't keep the layers, so I thought that layer passes in Carrara were not for me and never paid them any attention. Today after messing around I found a method of doing individual passes and bringing them into Gimp as layers - that opens up a whole new scene for me.
Thanks for opening mine eyes
I'm 41. Born in 1971. So now you've met a Roy born after WW2!
It's good that you find this usefully.
.
And bye the way... I'm not Roy: :coolsmile:
.
.
:lol:
.
Good one there, Varsel. All the Roy's I've met were born during WW2 - don't know what happened for the name to become so popular then and I thought it was dying out - nice to see a youngster keeping up the tradition. LOL