[Released] Dotify [Commercial]
 Silas3D
Posts: 565
Hi everyone!
Want to create stylized, toonish, pop, or non-photorealistic (NPR) art but still use Iray for rendering?
Following the release of Dotify for Genesis 8 Female, there was demand for applying this shader system to clothing, hair and props.
In collaboration with @RiverSoftArt, we've created an easy-to-use script that uses Iray decal technology with a variety of pattern choices. Other awesome features include:
- Expand your texturing options for any 3D item - can easily scale and rotate patterns without changing image tiling
- Not limited to UV mapping of 3D item
- Selective control - choose which surfaces to dotify and which to exclude
- It's the perfect companion to Dotify for Genesis 8 Female (discounted for a limited time!)
Get Dotify and level-up your renders today!
⇒ Link to Dotify product page
What's Included and Features
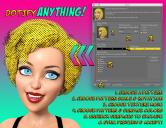
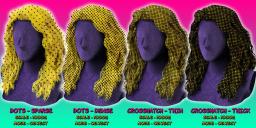
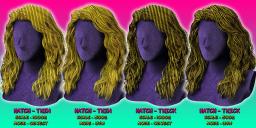
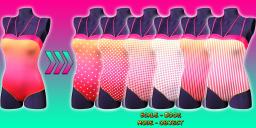
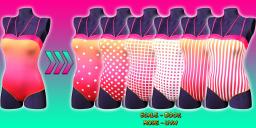
- Choose from six pattern types - Crosshatch - Thick, Crosshatch - Thin, Dots - Dense, Dots - Sparse, Hatch - Thick, Hatch - Thin
- Define pattern scale and rotation
- Choose texture mode - can project using UV map coordinates or UV-independent object/world coordinates
- Choose pattern and surface colors - you can even choose to remove base textures altogether (Options tab)
- Check/uncheck surfaces to apply/exclude Dotify to
- Sync button to optimise decal projection angle with active camera
- Checkbox to enable/disable Iray Preview
- Remove Base Color Textures
Tutorial video
FAQ
How does it work?
Dotify uses Iray decal technology to project patterns onto items in your scene.
A powerful, easy-to-use script applies a wearable preset that includes the decal node (Dotify - Decal) and geometry shell (Dotify - Decal Blocker).
The script allows surfaces to be excluded from the decal projection. The surface geometry has to be hidden, as setting Cutout Opacity to 0 doesn’t work.
This is done through the Geometry Editor, but then the surfaces hidden need to be replaced. This is where the geometry shell comes in.
The script takes care of all of this automatically - any surfaces that are unchecked in the dialog will be switched off in the geometry editor and switched on in the parented geometry shell.
The script also copies surfaces from the item to the geometry shell automatically.
How do I use Dotify?
It’s really simple! Just follow these steps:
- Select the item you would like to Dotify
- Launch the Dotify script
- Use the dialog to change various pattern and surface settings
- Press Accept
- Render away!
Can I use this on figures?
Yes you can, however there is a separate product for Genesis 8 Female that provides more features, including base skin shaders and complementary face, eye and mouth textures. A Genesis 8 Male product is in the works.
Can I rotate the patterns?
Yes, just move the Rotate slider in the Pattern Projection section of the Dotify dialog.
I’ve applied Dotify to an item and its base textures are being removed.
When running the script, there is an Options tab down the left-hand side of the dialog.
In this section you will find a checkbox labelled Remove Base Color Textures, which will remove images from the Base Color channel of all surfaces that Dotify is applied to.
You can change this option repeatedly for each item you apply Dotify to.
I’ve applied Dotify, but the pattern looks broken as it’s all stretched and warped.
Dotify uses Iray decal projection technology and looks best when the projection is facing the active camera.
When you first apply Dotify the projected pattern may look broken because it won't be synced with your camera, so we’ve include a handy Sync button at the bottom of the script dialog that you can use each time you change the camera position.
Please note: Depending on the camera position and curvature of surfaces being projected at, there will always be some minor stretching - much like if you were to stand in front of an image being projected on a wall. Depending on the extremity of stretching, you can minimise this by making minor adjustments to figure poses and/or prop rotations.
I’ve re-opened a Dotify scene but the surfaces I unchecked now have Dotify applied.
This is most likely to occur with hair models, where the scalp/cap surface was hidden.
Unfortunately DAZ Studio doesn’t currently save geometry visibility settings, so you will need to run the script again when opening existing scene.
I’ve applied Dotify to a hair/fur item but I can’t see the pattern.
Dotify is compatible with the vast majority of hairs, which are transmapped.
These hairs have ribbons of mesh, to which opacity maps are applied to simulate hair strands. This mesh is required for an Iray decal pattern to be visible.
Strand-based hair will not work with Dotify by default but can be modified to work:
- Make sure Preview PR Hairs is switched on (Parameters tab > Simulation)
- Increase the Line Start Width and Line End Width values to thicken the hair (Surfaces tab)
- Export the hair as an obj, using the DAZ Studio preset
- Import hair back into the scene.
Can I use my own patterns?
Absolutely! Whilst this isn’t formally supported by the product, you can manually change the image used in the Cutout Opacity channel for the relevant Dotify - Decal node in your scene, after Dotify is applied.
Please note: If you run the script again after changing the opacity map, it will be replaced with the default pattern that is set by the script, so best to only change this prior to render. Alternatively, you can experiment with the decal settings manually rather than use the script a subsequent time.
Can I apply multiple instances of Dotify to the same item?
No, unfortunately this isn’t possible. When the script is run on an item that has Dotify applied, it loads the previous settings.
If multiple instances were applied, the script wouldn’t know which instance to load settings for.
You can do this manually by creating a new Iray decal Node with the item selected, then copy the settings of the existing decal node across as a starting point, then changing the settings manually.
Please note: If you do add multiple Iray decal nodes to the same item, you won't be able to use the script dialog to change settings for the decal created by the script.









Comments
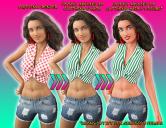
Here's a holiday theme render I did this afternoon (using both Dotify and Dotify for Genesis 8 Female):
That's great news. The only reason I never purchased dotify was that it was limited to the character. I'll grab it when this "unifying" product comes out. Does dotify work on G8M too?
Hi @Worlds_Edge, thank you for your support!
This new product is designed for hair, clothing, props etc - whilst it could be used on Genesis 8 Male (or any figure for that matter), it doesn't include the skin, eye or face presets the original product has. As such, you will need both products to achieve the full effect.
If there is enough demand for a Genesis 8 Male version, I'd be happy to create that early in the new year
I'm soooo looking forward to this!
I love your Holiday themed render.
Immediately got the original product, but the only matter preventing me from not experimenting more with it was how even cartoon-styled hair and clothing weren't giving me as much of a match as hoped for. This allows for that, along with props and, most unexpectedly, whole environments!
Just the artististic alterations to hair, alone, are just incredibly impressive. This could allow for entire scenes to look like they have had hand-drawn filters applied.
Thank you!
Thank you, this means a lot as I knew that a lot of people were reluctant to buy the original product because it was limited to Genesis 8 Female.
Whilst I had a vision for what I wanted to achieve with this sister product, I could never have made it happen without @RiverSoftArt so I'm extremely grateful for his assistance and it was a pleasure collaborating with him!
Ahhhh I'm so excited for this - It looks like a really fun product! I'm looking forward to it's release! :)
Great news - it will make a great companion to the earlier Dotify product.
It will be even better, if you could release a different NPR looks for iray, as well.
Maybe just an idea for the another product.
Hmm, have the "original" Dotify on the wishlist for a long time. Never thought I might use it much. Now with this Add-On things might change. Would be cool if with release there would also be kind of a Dotify-Bundle with both products.
Great to hear!
Did you have anything in mind? You can use your own patterns by changing the decal cutout opacity.
Unfortunately it can't be bundled with the original product, but I've requested and DAZ has confirmed that the original product will be discounted when the new product is released.
I appreciate that doesn't help you as you've already bought it and I thank you for your support, but mine and @RiverSoftArt's new product will be on intro sale (30% off) when released.
I have created a tutorial video of Dotify:
No, I do not have idea myself, but will be nice to be surprised, if anyone decide to make more NPR products for iray or Daz Studio.
I do not know about Filament possibilities in NPR area - maybe that would work with some smart solution.
That difference between 'object' and 'UVW' is really useful.
When should 'world' be applied?
In general use of Dotify you won't need to use the `World` option, but it may be useful with specific decal settings that could be changed manually outside of the Dotify dialog. Having it in the dialog allows quick-switching between modes to compare them.
I'm curious to know if anyone has used the Dotify for Genesis 8 Female to do a screentone (B&W specifically) type effect?
I put that product on my wish list, hoping for a Male version and a product like this for hair and props to try and create a Japanese manga effect in Iray.
The original product only has a dot pattern available, but could be updated with additional presets. Obviously where figures/clothing/hair are concerned, both products would be needed for the full effect.
When the original product released there didn't seem to be much demand for a male product, but this time round there does seem to be more so I will create a male-specific version.
Rather than change the coloration of the skin and decal, one could use the lightest skin preset for highest contrast between skin/pattern and then set the render settings saturation to 0. Though the former approach could be taken too.
If you're looking for a gradient-based screentone effect (where the size and density of the patterns change gradually) then I'm afraid neither of these products would help you, as they rely on seamlesss patterns for decal cutout opacity.
Thanks for the thorough answer.
I understand where a gradient would not be possible.
I was wondering at how "dense" you could make the dots (I can't think of another way to describe it except with the manual screentone designations, I'm thinking like a 80-95ppi).
You sold me. I'll give both a go when the latest comes out. If a male version comes, cool. But I want to see what I can do with these two versions in the mean time.
Thank you for your support! The density can be affected by the decal projection scale. The original product doesn't have a dialog but does have a number of one-click presets. You can of course make manual adjustments to the decal as well, including using your own opacity maps for even more versatility
And it is released!
Does it work on fur?
Below is Lera - https://www.daz3d.com/lera-hd-plus-palette-of-emotions-expressions - jumping over 2020.
Oh that is sweet @Artini! Well done.
As per the FAQ posted at the top of this thread, because this product uses Iray Decal technology it won't work with strand based hair out of the box, but with some tweaking on the hair/fur can be made to work - see FAQ above for more info.
Thanks. I have somewhat missed reading the FAQ.
Coming soon...
https://www.daz3d.com/forums/discussion/468656/dotify-for-genesis-8-male-commercial