Multiple Fits
 Atticus Bones
Posts: 364
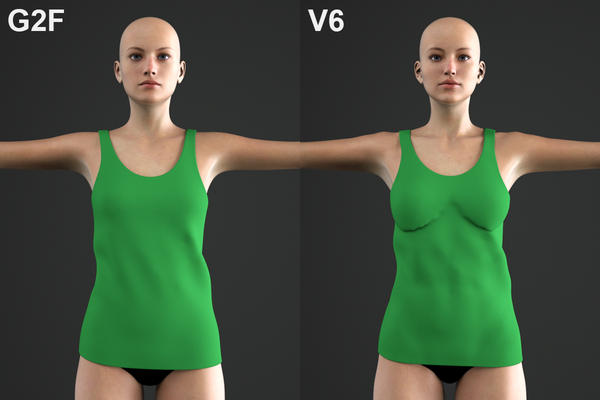
I'm still new to this and have decided it would be useful to learn how to make my own content for Daz Studio. Up to this point I've just made the odd prop and this will be my first article of clothing; starting with a basic top modeled over the Genesis 2 Female. So far the process has been pretty self-explanatory, although I've just run into my first problem and could really use a little wisdom to point me in the right direction.
The clothing conforms nicely to the base shape, but when I dial in V6... well, as you can see in the comparison below:


help.jpg
1200 x 800 - 368K
Post edited by Atticus Bones on


Comments
What you see here is the result of auto-fitting to the V6 shape. You need to create a separate shape for V6 by altering the mesh in your modelling program and then importing that shape as a Full Body Morph (FBM) onto your clothing in DAZ using Morph Loader Pro.
Dogz has written a brief tutorial on this procedure for Genesis, but the principles are the same for Genesis 2.
Gosh, I didn't realize how much work goes into this side of things. Thanks, Cayman.
Well, some morphs will be more straight forward than others. You will also have to look at the Genesis 2 FBMs like Bodybuilder, Emaciated etc., and also the Partial Body Morphs (PBMs) like Glutes Size, Hip Size etc., though many will not be applicable for your top (like Forearms Size).
You should show the model in Wire Shaded. The problem could be you didn't model it in a way that can accommodate changes in the breast size.
Yeh, this too. That's an awfully sharp divide under the breast area for an autoconform. Does this shirt have tons and tons of polys?
Hi, does this help? The poly count is 10k.
I just tried a the same mesh without thickness (the original was a ZBrush extraction) and it conforms much better.
So I guess that problem was something to do with the thickness of the mesh?
The composition is a bit odd, but it makes sense if it's there to support your wrinkle sculpt.
It's a problem with loose shirts on females in general. If I delete the custom morphs from Afternoon Heat's tank top it does the same shelfing effect on V6 (undoubtedly why the maker added a custom FBM).
The further from the body the mesh is right under the breasts, the more likely it is to shelf in the testing I've been doing just now.
I've always been told that it's best to add folds and wrinkles with morphs (or displacement) rather than in the base shape. That was also true, certainly, for the older figures and loose fitting clothing - model it tight, add a morph for the puffing (that's why some things auto-fit badly before morphs were preserved, only the right-fitting base shape and not the morph normally locked to 1 came across).
I tried again with a simpler mesh but i'm still getting the sharp "shrink wrapping" effect.
Similar clothing for V4/Gen works on G2F with Auto-Fit without this effect, so it must be something i'm doing wrong...
How did it fit on the base figure - was it loose under the breasts? You really need to have the polygon flow follow the shape of the breasts toa void the jaggedness, though that has nothing to do with avoiding the abrupt change.
This is how it looks on the base figure. So the problem is with the topology then? (this is still my first week with ZBrush).
Interestingly, when I triangulate the geometry it works flawless on most shapes "out of the box".
Though I can't see how it differs from something like other clothing like the t-shirt from "Short Order Cook for Genesis"
Shown below auto-fitted to G2F with V6 at 100%:
Trying to get a squarish grid like topology to follow a curved topology will always be a problem without correction morphs. But in this case I think you had the solution, stop adding thickness. Roll the edges over and under a bit to give the cloth the illusion of thickness.