Desolate lair of the sullen Fox // WIPs, reviews, escapism //
 Mustakettu85
Posts: 2,933
Mustakettu85
Posts: 2,933
Now that the forums have seen the return of their resident killjoy, that is, myself - it's probably time to do what most people usually do within a few months of registering here. In my case, it's taken me well over ten years.
Over these years, I've accumulated tons of 3D content from this store and elsewhere that I felt might be useful for my storytelling. It's probably time to get down to classifying, reviewing and fixing. For real.
So, this is going to be a Chronicle of Complaints, as Kettu will be trying to kick existing content into a sufficiently fox-approved shape.
...all my renders - unless otherwise stated - are done in 3Delight using my own custom shader system and (duh) scripted rendering.
Daz 3D is part of 
Connect
DAZ Productions, Inc.
7533 S Center View Ct #4664
West Jordan, UT 84084
Licensing Agreement | Terms of Service | Privacy Policy | EULA
© 2025 Daz Productions Inc. All Rights Reserved.
Comments
Hahaha fox-approved shape !! Was about time:)) *grabs popcorns & sits back*
So, this DM Folly set is going to need a proper upscale displacement map because the normal map supplied doesn't cut it for me... and we're talking vector displacement here. In theory, it should be possible to eliminate the "fissure" artefacts along the edges.
And this is Stephanie 8, whose makeup textures have rather sloppy alpha channels (( It's not noticeable when you simply look at the file in IrfanView, but once you open GIMP and want to save out the alpha to use in the overlay diffuse of your shader... well, alright, just one more reason to paint my own makeups.
Here I used a Xmas freebie by Cherubit for the eyeliner and blush masks.
What's awesome is that we have SSS maps here that are lightened diffuse maps. I love this. It allows me to turn off this operation in my shader. And if I want a paler Steph, I can just load those SSS maps into diffuse.
The Rocker Choker needs its (iray-optimised) bump map dialed down even further. The Delta Corset default textures also need to be looked at and probably completely swapped for tiled maps - I want it to look like leather. It wasn't probably intended to.
Now, hair. It's dForce Volta hair, and - and it's the sort of hair I've wanted to see in DS since I got into this hobby 3D thing all those years ago. I use the 3Delight hair BRDF, and just how fast it renders, I want to weep for joy... And just how amazing it looks!
I honestly don't know what I'm going to do with my collection of transmapped hair. Maybe they might render in a reasonable time in something like Marmoset. Hopefully. I just know I don't want to use them in DS anymore. ...not even talking about how stiff they look most of the time!
Awwwkay, so that original diffuse map is basically a lost cause when it comes to filters - the values are all over the place due to the way the photos were taken (the bricks are often darker than the mortar, eh). Trying to reconstruct the proper mortar depth using edge detection would take too much time, and I don't even want to get started on painting it manually. It's just not worth it.
Moreover... the artefacts appearing at the edges when displacement is enabled are due to geometry, and they aren't really going anywhere. See how it looks with a texture set from TextureHaven... kinda sad. And of course silly, because brick arches don't work like that IRL.
Replacing bricks with a more uniform material that does not require displacement kinda works, but a) looks boring; b) makes the faceted geometry way more evident.
So I gotta catalogue this Folly set as an item to be used strictly for one-off portraits with heavy DoF or in long shots. Oh well.
So here are them default maps, no vector displacement whatsoever, with ivy - transmapped ivy, which casts GI shadows, eating at rendertime but looking much more realistic than without this one diffuse bounce. 6 min 47 s on an i9-9880H.
Sweet, eh? Shame it doesn't work that way in closeups ((
// click for full-size //
...the grass is this, BTW: https://erock3d.com/download/erock3d-free-grass-system/
and those other images are the same as in the previous post, the forum is wonky still/again, I guess
What do you mean by that? Are you rendering skin with no translucency?
First of all, I am _not_ using Iray, so the term "translucency" in my shaders is reserved for no-thickness meshes, okay?
Then, I'm talking about the operation that consists in dividing the diffuse map by a flesh sort of colour. Which lightens the maps and makes it possible to use physically plausible measured parameters for skin (and other materials) published by Jensen ages ago. I could dig out the paper for you if you wish, but I don't know if these params would make sense in Iray.
So, obviously, when you have a pre-lightened set of maps, it allows you to save on math and turn the division off.
Yup that looks really nice! Eh...Been there done that a couple of times, trying to extract controlmaps from the diffuse textures, more often than not I just have to give up;)
Hey tks for that link...excellent, will try it out ASAP
Enjoy :) There should be a few other cool things at that website, too.
...and now, Delta corset. Talk about weird control maps and weird other things.
// click for full size //
The leather tile is clearly too tile-y, making for that rhomboid pattern, so I'll try another one.
But. There's a neat zipper on the height map of the corset. And there's a mat zone that is located at approx the same position as the zipper. So I thought that despite the zone being named "Top", it should neatly house the zipper.
Well, apparently not. Looks like that in order to get that cute zipper to show up properly, I'd need to either widen the "Top" mat zone or use the provided metallicity map over the remaining corset surface... and this map is kinda wonky actually. Here's a scaled down screenshot:
There's this paper for GPU-based realtime caustics - https://www.researchgate.net/publication/6582416_Caustics_Mapping_An_Image-Space_Technique_for_Real-Time_Caustics -
wonder if it might be feasible to try and recreate it in RSL...
You are referring to the "IRay water caustic lights? Hm...if I were still a DAZ customer and using IRay I would definitely check it out, although the promos aren't overly convincing IMO. What do you mean by two-pass-procedure? You're obviously talking about something else than the SM caustics bricks?
It would be very cool to have reflective materials create caustics when using scripted pathtracing. I think we discussed it with wowie somewhere in the awe thread...atleast then it seemed to be a very complex thing to achieve IIRC.
Interesting article for sure!
Photon mapping in 3Delight is done via a dedicated photon hider, which then stores a photon map on disc. Then, in either the REYES or pathtracer hider, a special shader - like an ambient light - picks up this map and actually casts light based on it.
The mixer bricks do invoke the photon hider actually - that's why you need the camera, it controls switching between hiders first and foremost. I just use scripted rendering to do that. Reliable.
Computing proper pathtraced caustics would need a bidirectional pathtracer, which 3Delight isn't. Not sure the guys are planning to ever go bidir, actually. I'm out of the loop, though - they have moved the community to discord fully, which basically cuts me off for good.
This article deals with an approximation which looks quite good for artistic purposes nevertheless. So if I manage to figure out if it's possible to translate their concepts into what we have in our post-Renderman wasteland, it should be a useful tool.
...Another strictly artistic idea - one of those I'd had for a while but never got around to implementing - is a cheat-y atmosphere shader similar to Carrara smoke material (forgot the exact name of that one unfortunately, will look up later when I'm at the computer). No true volumetrics but a combination of depth-based aerial perspective spiced up by whatever could be done via fractal noise. I can see it being useful for faking loads of effects fast.
I've also been messing around with Parsis, the original Fluidos and UltraScatter (Pro, I guess - the one that scatters over the volume of a mesh). These could also help build volumetrics ("physically", coarser).
https://tapas.io/episode/1383841
I normally couldn't care less for web comics or for comics in general, but there's an exception to every rule. Yeah by the standards of the DAZ/Poserverse, Jasne's work is not "flashy" at all - not "photorealistic" - and yet. The devil is in the details. Jasne's attention to posing and composition (the most important elements of visual narrative) is unprecedented. To think that she uses "unwieldy" and "ugly" MakeHuman meshes in Blender...
And Carrara won't run on my non-dedicated 3D system anymore. Awesome. Wonder if it will run on the 3D machine, otherwise I'll have to intrude into the Carrara forum and bother the good people there.
https://www.daz3d.com/punkravem-outfit-for-genesis-81-male
Nice to see attempts at proper alternative fashion in the store. Though it's not a particularly daring design for the real-world PunkRave brand (which I happen to love and wear often; not cheap but so much worth it).
There was also a female outfit at Rendo that was inspired by a popular PunkRave design: https://www.renderosity.com/rr/mod/bcs/?ViewProduct=142691
the forums are buggy, and my connection is slow, and doubleposting occurs...
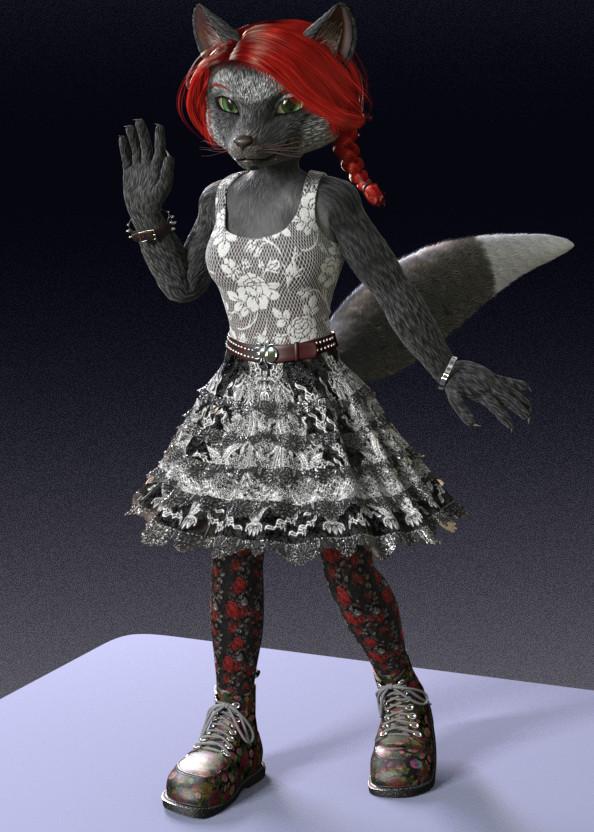
Back to Steph and the outfit I'm trying to kitbash.
I've ultimately decided to go with a paler Steph because this trademark "DAZ orange" skin doesn't really look "natural" to me, given that I come from a different general culture and from a different subculture, to boot.
The zipper of the Delta corset, well, I studied everything closely again and found out that the mat zone is perfectly fine, but the zipper itself is kinda... broken: every other little prong (or whatever it's called) appears to be "divided in half", on both the height and the normal maps. Somehow using the height map for displacement creates these weird darkened zones that made me believe the mat zone is off... so I went with the normal map and vector displacement.
Not really perfect, as you can see, but should in theory work when not a closeup. I hope.
The skirt is again retextured, but the boots are very much as-is. They don't have mat zones, everything is done via maps. Love this New Rock-style sole, modeled authentically and beautifully.
The items haven't yet been fitted to each other, the hair isn't simmed, and I think the colours need work. The green-ish tint of the corset is due to thin film, and I like it a lot, so I guess the other colours will be built around this. Probably a different texture set for the boots should be used for a better match.
Leather tiles for the corset from old Calida3D shader presets (not sure if those are available anywhere after the site went down), tartan colour and bump for the skirt from RedEyeCat's holiday materials freebie (which I can't seem to find...); and here are the links to the store items I'm using:
https://www.daz3d.com/volta-hair-and-beard-for-genesis-8
https://www.daz3d.com/rocker-outfit-for-genesis-3-female-s-and-genesis-8-female-s
https://www.daz3d.com/delta-outfit-for-genesis-8-females
https://www.daz3d.com/dforce-vernea-fae-outfit-for-genesis-8-females
https://www.daz3d.com/sw-boots-for-genesis-8
Today, we commemorate the 76th anniversary of the victory over Hitler here in Russia. What "normal" people would probably do is try to join the hype by posting war-themed renders an'stuff, but to me, this is kind of... cheap. Victory Day isn't really about glory. It's about remembering your grandfathers, who had to fight, despite being very young, and saw horrors they never really spoke about later. Wars are horrible because they inevitably force people on all sides to do horrible things. Even if you kill in defence, you still won't be the same.
I don't feel like working on the Steph kitbash right now either - got reminded recently just how alien (to put it mildly) my subcultural affiliations are to the majority of 3D hobbyist artists, so... need to wait till the emotions die down. High-functioning borderline is still borderline.
So I'll go back to stuff I do best... and what I'm kinda sniffing my way around is how to replicate this (beautiful) OSL shader from 3DelightNSI using RSL: https://documentation.3delightcloud.com/display/SFRP/3Delight+Glass
Might turn out to be less efficient than the OSL original, but still worth trying. I got my basic glass-with-absorption-and-thin-film; adding those plastic-like coloured reflect/refractions shouldn't be that difficult (I never realised this was the difference between coloured plastic and glass! but it makes all the sense), while the "scattering" component... I guess it's a single-scattering sort of thing - the subsurface() shadeop does have it (I think even the 2015 version bundled with DS does already, hope hope hope), and I've long meant to mess around with it but never had an idea what to use it for.
I'm now off to tinker, and I'll leave y'all dear lurkers with this song that is also related to this day. But it's not for the faint-hearted, in more ways than one. Things don't get any more genuine than this.
So I played around with the idea of plastic vs glass first.
Back then in the RSL days, the DNA dudes (3Delight devs, for the uninitiated) used an interior volume shader to produce proper distance attenuation in 3Delight Glass for Maya. I couldn't get this approach to work back then... but today I figured out what was wrong. Somehow interior volumes do not work with subdiv meshes O.o And I always use a subdiv sphere for testing shaders.
So... Either there was some small print sort of thing in the 3Delight docs that I missed... or it's a DS thing and its RIB exporter somehow causes it. No idea.
TL;DR: basically it's 100% possible to use interior volume shaders in DS, but only for poly meshes, no subdivision. So it might be worth it to try interiors for liquid meshes in "properly" modeled glass/liquid interfaces: http://blog.gregzaal.com/2013/10/19/fluid-in-a-glass/
Fluidos user note: should be possible to expand the Fluidos-generated mesh a tiny bit to get this sort of intersection, or it may even occur "naturally", I guess things will depend on seeeetttttttingsssss.
However, I find the non-volume absorption algo easier to control.
Then... multiply or not (which is the math behind the "plastic" model proposed). I tried out various combinations, and I actually decided (maybe erroneously) that it's okay to multiply refraction for glass. Since I'm using absorption computation results and not a constant colour, it looks glass-like enough (to me) - see material ball render. // it looks a bit floating because the glass casts no shadows; it's just a test so I didn't enable shadows and caustics //
And the (silly ugly) tori show the difference between multiplying the reflections or not. Now this is something quite visible.
Okay, so next time I'll tackle scattering. Hopefully next week, but who knows.
Eh... trying to convert your last post to English here:)) Are you saying that absorption does not work on subdivided meshes? I thought it did? A lot of food for thoughts, tks for that! Funnily enogh I'm just now running a test with Wowie's aberration function and it looks quite cool I have to say. Only problem is I'm running it on my dual core 2007 Macbook (2.5h, 60% done) .
.
Depends on what sort of absorption. If it's in a surface shader - a subsurface() shadeop setting, or Beer's law computed using refraction thickness from trace() - it works. If it's basically the same Beer's law, but in a volume shader set to interior and computed using the length of I (the view vector), it works with poly meshes but not with subdivision meshes.
Tks!
I finally got around to testing the https://erock3d.com/download/erock3d-free-grass-system/, and it sure looks nice. However it's a real pain to render so I can't see myself using it much. Too bad it uses opacity masks. I initially set it up with the coat layer but quickly realized that even with only specular enabled, no reflections or coat layer it's not usable on my machine. A testrender 800x450 pixelsize with diffuse- and specular depth reduced to 1 takes 50 min. Hmm maybe I should try the awe hair shader?
If you find it taking too long, you could try excluding the grass from diffuse bounces whatsoever - it will change the look, but depending on the scene, it may not be much. And if it's far away, you could also try taking opacity maps out.
I'd also say that grass doesn't need coat at all, and - unless you're only using an HDRI to light the scene - any reflections as well. Specular should suffice. It's mostly, well, underfoot :)
What grass like this really needs is translucency, but I guess you know it :)
...I'm reading E.R.Burroughs' Barsoom series now - yeah, I know I should've done it way, way earlier but somehow never got around to - and it's pretty damn amazing just how much the mainstream fantasy scene and, by extension, the DAZ/Poser scene, owes to the aesthetics Burroughs introduced there :))
So, back to our shader.
Single scattering is not as bright as the full SSS aka single+multi (duh), so it looks alright when simply added, not mixed. I guess I need to run more tests to figure out the speed gain from using single scatter only - I feel there is some, but, well, haven't yet timed it for real.
It's important that the surface running the subsurface() shadeop be visible to diffuse rays. Otherwise SSS won't work.
// my glass presets aren't, by default, so I wasted quite a lot of time trying to figure out what was wrong with my code and why there was no SSS whatsoever... the answer lay in ray visibility //
Of course the interesting thing would be to see if subsurface() could simulate absorption to create coloured liquids in the case of a "properly" modelled container (aka solve the "nested dielectrics" thing)... and looks like it can, at least to some extent :)
That's an old free model from ShareCG, and it is not "properly" modelled out of the box, but I disabled its vanilla "liquid" surface and used a geometry shell with the default offset, so that the "liquid" overlapped the internal surface of the "glass", et voilà.
I'm actually multiplying the reflection and refraction by (heavily boosted) scatter results, so this all is not quite "physically correct" - what I need is a legit "reflective coat" layer, which should be set to replace basic reflection and specular at a thickness of zero, and work as a generic coating otherwise - but it doesn't _look_ particularly bad. The "liquid" appears to have depth and interest.
I guess I also need to add in "fake absorption" aka a simple refraction colour multiplier for the case when those glasses with liquid are not hero objects.
What else could a reflect/refract shader need? I do have thin film in there already, same as bump/displacement. Vector displacement maybe... Was it Blender's "ocean modifier" that could generate a vector displacement map for turbulent waves?
My next plan is to build a "nature" shader on the basis of my RadiumFabric, which is the kind of shader that supports basically "everything outside SSS". So I will need to add various (mostly noise-based) procedural augmentations to the colours mainly, with switches to use the same patterns to enhance relief when it makes sense.
First, I want to add colour randomising based upon the original texture (or a solid diffuse colour).
On older hardware, transforms between colour spaces used to be costly, but they may not be so much of a factor anymore - and controlling the randomness per hue/saturation/value makes more sense from the artistic PoV than implementing randomness in RGB channels.
Then, I'll need to figure out how to control the "spread" of randomised colours - right now I'm thinking of mixing the original texture with the randomised colour via a noise-driven mask. But there may also be a way to tint, say, every leaf of a tree slightly different, even though they're all the same material. We'll see how the randomiser function can be seeded.
Then, I want a multilayered combo of slope- and altitude-driven tiled textures and procedural colours, which could be used for faraway landscapes, wet stones etc.
So everything boils down to finding good sources on writing noise-based patterns and proper antialiasing of that code. Which I will also use for my atmosphere shader. This is math, and I was trained to be a research engineer not a mathematician... not my favourite part of coding, to put it mildly, because I don't understand much about math as art.
Trying to frankenstein Laura 3's head onto G3F with the V3 UV addon. I removed the geografts to try and see if it can be done by merging their necks... nope, unless you're really going for a Frankenstein's creation look. Guess I'll need to try the head-only way...
Look at the ears. I like Laura 3 ear geometry much more. No "translucency strength" maps here or other tricks, just proper SSS.
...finetuned reflection roughness while I'm at it...
Well, this is probably the best frankenversion I can muster... might work in a limited selection of poses/angles. Can't get over the fact how scarily realistic the seam looks, without any effort.
I was hoping there might be an easy way to transplant my old Gen3 faves onto this V3-enabled G3F; alas. Will have to approximate morphs by dials and finetune in Silo.
Those glass settings look really nice, Kettu.
One of my biggest challenges in 3DL is to get glass to look sharp at the edges. More glass, less soap bubble.
Your frankensteined Laura/G3 is impressive. A lot of work, I imagine. Curious to see what you'll do with it next.
Do you have Laura's morphs? They got vaulted before I could buy them; still a little grumpy about that.
Thank you :)
That's because most vanilla DS shaders don't support Fresnel for specular and have strange refraction algorithms, to boot... and it's also impossible to control reflect/refract bounces per material. Basically, vanilla DS isn't the most 3Delight-friendly environment.
Nope, frankensteining is easy... it's just a matter of positioning. Actually transferring the morph would be much more work. Luke and Laura weren't even among the original Genesis clones for G3, IIRC.
I believe I do have their original morphs. Shame their clothing (and rigging in general) didn't age well at all; there are quite a few possibilities for cute characters.
Ah, well, Gen3 rigging is still better than that of Poser figures like Sydney, Miki etc. But those Poser figures have beautiful facial expressions, much better than most DAZ generations. That's the main prospect for further frankensteining.
Escapism, they say. Having fun, they say.
Like... erm... fun.
So I did buy this Beowulf suit for M3, by Uzilite, since it was among the "PC for a day" selection a few days ago. In theory, M3 (a subdivided M3 RR, in this particular case) is still usable - although not for closeups because of the eyelids, eyelashes and eyebrows; M3 Hi-Res skin is still one of my favourite male skins evah (outside of that hairy chest, of course); I even seemed to find a sweet spot for the smoothing modifier... but then you start dressing the figure, and all hell breaks loose.
Elleque's shoulder magnets are fine for the non-RR M3, but what I never managed to justify buying were M3 and V3 morph packs, so that's why I'm using the RR versions (that came with morphs built-in). RR's have a somewhat different zoning, so the mags are wonky. And we get those infamous round shoulders full-blast as a result.
Then, I always see texture stretching - like above the top lip, or, again, on the shoulders.
And actual poses look laughable - and what's that with the bottom of the pants? I keep seeing that. Always needs re-rigging, taking the bottoms out of the "feet".
The question is, will it survive dForcing? No-one knows.
I'll try next time I have a chance to use DS. Don't know when. Too much work.