Hair behaving badly
 murph101
Posts: 68
murph101
Posts: 68
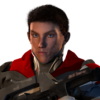
My renders are showing THROUGH my (model's) hair, making it look like one of those little old ladies who barely has hair left but gets it styled anyway (men just shave it).
I'm using the hair model room, and in fact, the same hair that I've been using on the same model in many other .CAR files.
The only difference is that I grew it long, and applied some heavy clumping, and a bit of wave.
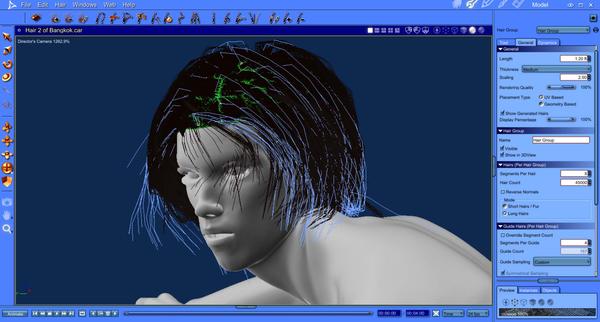
In an effort to figure out this transparent hair issue, I made the root and tip completely black. I also removed Shininess and Highlight.
I have 45000 hairs, 8 segments, medium thickness, scale of 2.0.
This has me very perplexed and I've spent too many hours trying to troubleshoot it.
Any idears?
Daz 3D is part of 
Connect
DAZ Productions, Inc.
7533 S Center View Ct #4664
West Jordan, UT 84084
Licensing Agreement | Terms of Service | Privacy Policy | EULA
© 2024 Daz Productions Inc. All Rights Reserved.
Comments
Hide all generated hairs and then look at your guides... are some too close to the scalp? If so the hair is inside your model. Looking at the lower image, are you using clumping? That feature seems to have a mind of its own so I try to avoid it. Usually I use PUSH to get every guide hair off the scalp and start from there which is how I find guides that are not positioned how I want them.
Good luck... I am not good with hair, I just use it a lot and so have these experiences myself.
If you have done all that... maybe PhilW can help as he's a pro and a tutor.
:) Silene
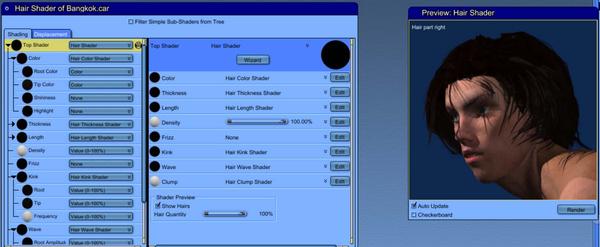
It may also help to give the Shininess and Highlight channels some values to catch some of the light. Instead of "None" try something like:
Shininess = Value 1-100 = "20"
Highlight = Value 1-100 = "10"
for starters.
"10" is fairly low for highlight, for subtlety, but could go much lower, like 1, 2, 5, etc., which are really low grey scale.
Keeping that in mind, you can then tweak some color into that. Realizing how incredibly close to black you are, throw in a color chip and bring it super close to black, and then just as much toward the color (saturation) edge as you want color to bleed in.
I could be on the wrong track here, but highlight/shininess has a lot to do with how our objects deal with light.
Shininess
The lower the value, the more the Highlight channel will flow through (or across) the surface. In this case, the whole strand. So a value of "0" will allow the highlight channel to affect the entire strand of hair. Higher numbers can get so 'tight' (light angle) that it's just like using "None", having virtually no visible effect. I never use values above 50, but very seldom go over 33 for shininess. 33 is even way too high for most of my needs. If I want to make an object look really glossy, a shininess value of 16 to 24 will often look super glossy enough for me, but I render at lower settings for speed.
Anyways, I would recommend not going too high on shininess unless you really want glossy individual strands - and maybe that might give a better look. These two channels seem to behave a bit differently on hair than they do actual geometry. So play around a bit.
I know what you mean. I love the look of the dynamic hair that I've made for my Rosie character, but cannot get it to animate in a way that I can use. Spent a lot of time on it, trying to figure it out.For some reason, it doesn't look like you're getting 48,000 strands. Try going for 60,000 and see if that makes it better?
Shoot... you already messed around with those channels... I see that now in your original thread. Sorry about that... I'm being talked to as I try to read... messes me up! ;)
Hmmm....
On of the things that can affect this is your render settings.
The values in Antialiasing , Object Accuracy and Shadow Accuracy will all affect the outcome.
The better or lower value it is the better the hair will render. But it comes with a cost ... speed.
Looking again at your lower image of the hair room with guide hairs and generated hairs... I think I am definitely seeing your hair bending inward and going inside the forehead then coming out of the eyelid. The guides may look OK, but the other attributes take over.
Perhaps let up on the kink/wave and clumping which direct hair in ways that I find hard to control myself. If the hair pops out of the forehead and falls over his eyes, then you will know if that is it for sure. Just a suggestion to try.
I think your hair is poking inside your model. Your render isn't poking through the hair, it's the other way around!
Silene may b partially correct about the guides and the hair. Try using the push tool and see if that solves the mesh collision. Is it on a hair cap or growing out of the model?
The invisibility issue may be volume effect. Are you using a light cone perhaps? The light cone and the hair are render-time volume effects and they don't play nice together. Depth of Field also doesn't play nice. Volumetric clouds can also be troublesome sometimes, but not always. I tend to avoid the risk by not having hair inside or behind a cloud.
To use the light cone and the hair will require a work-around. You can hide the hair and render a volume effect pass or volume something pass- not sure 100%, and then turn off the light cone and un-hide the hair and render your scene. In an image editor, composite the volume pass with your image.
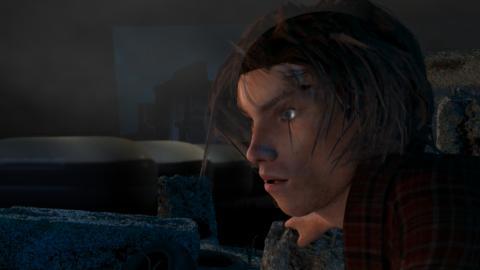
The image I'm uploading uses hair for moss and a light cone along with other effects. I discuss my steps in the following posts from last month's Carrara challenge WIP thread:
http://www.daz3d.com/forums/discussion/47148/P390/#697243
http://www.daz3d.com/forums/discussion/47148/P390/#697248
http://www.daz3d.com/forums/discussion/47148/P390/#697256
The third link shows the render pass with the light cone.
I hope you get this... looks really good! I really like that character! And the hair you have for him looks like it would be awesome, if you can get it to render right. Totally forgot about that volumetric light thing.
I have ingested all the ideas above. Thank you! I am now able to get busy trying them.
On the hair poking into the model. Yes, that is a result of the kink, wave, and clump. That's okay in that it's not overt that is what is happening.
I tried the shininess and highlight quite a bit and put both to none as a last ditch effort.
My suspicion is it's something to do with the light cone and lens flare. I figured out how to do that in post, so I'll try eliminating those.
More where this came from....
Thanks again for all your kind attention.
I've also discovered that, if I keep volumetric lighting problems like light cones, fog, etc., away from the actual geometry carrying the problematic entity, like transparencies in hair, dyn hair, etc., that I can get them to work in the same render.
For example, fog used to make Rosie's hair get all frosty-looking. But if I pull the fog behind the Rosie character, the problem disappeared. So when I got the same sort of issues with cones, I would use a light without the cone where Rosie passes through, so the illumination hits her - while the actual light with the cone was behind her. Worked well for animation purposes.
...and the answer IS!
Light cones. I had a light set up with a light cone in the background and it was the culprit.
Thanks all!
quick correction... it was the lens flare that was the culprit.
correction yet again... the light cone WILL cause the see-through-hair if the cone is angled at the hair subject, or appears behind the hair at all.
Gotcha! Thanks for that!
BTW, Yeah... looks freaking cool! He's an in-action fellow, for sure! Love it!
Ta Daaaaa!
Lens flare courtesy of Photoshop.
Killer-awesome!
I hope he survives his ordeal!
Nice picture,
glad you found the cause