Daz Milcat Vs Carrara, LOL ^_^
 eponica
Posts: 197
So I just got Carrara Pro a couple of days ago and have been having so much fun getting the feel of the program. It actually feels a lot like Bryce in some ways, and I love Bryce :)
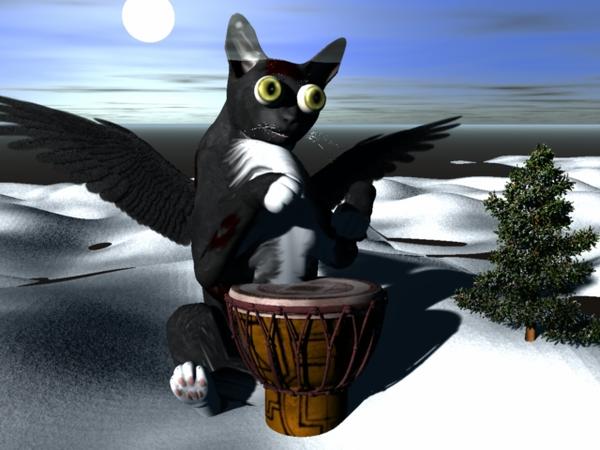
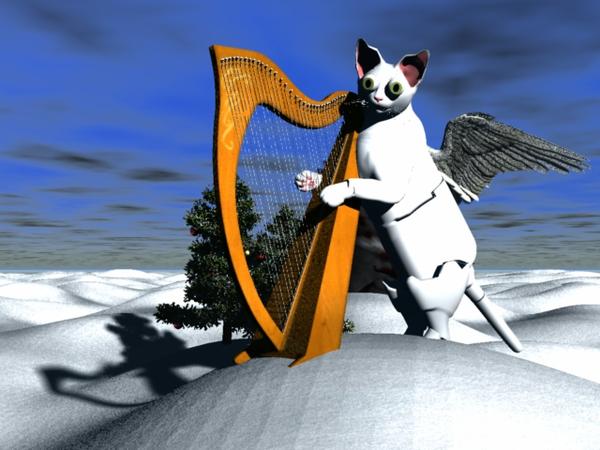
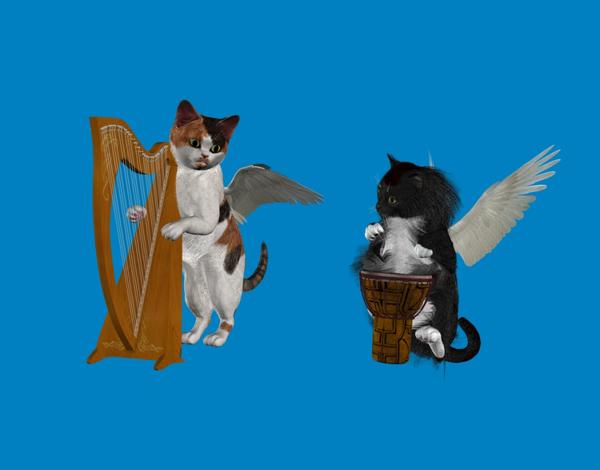
I am currently working on a Christmas card in DS featuring Milcat kittens. I thought I'd try and transfer 'em to Carrara and keep working there. I seem to having no trouble at all getting Carrara to see and load items from my various libraries. However my cats loaded more than a little weirdly (see below!)
After recuperating from a good bout of laughter, I can't help but wonder:
1.) How come the black cat texture transferred, but the calico one did not? It's possible one is a JPEG and the other is a PNG, I can be a little haphazard sometimes ^^; Are there texture map formats Carrara won't read?
2.) How come the calico with the harp is broken up?
3.) What the Heck happened to their eyes?!! *LOL*
Carrara Pros, please kindly bestow your knowledge on this newbie! :)




Comments
I'm also a newbie so I can't help you there but the last two pictures sure make you laugh.
I know :D I actually keep a collection of my funniest 3D disasters! Maybe I should start a LOL thread :)
LOL!
First of all: Welcome to Carrara!!! :ahhh:
Now, allow me to begin with the idea that, while it can be great to bring scenes in from other software, like Poser or DAZ Studio, there is always the possibility that something (and often many things) just doesn't work as expected once it enters Carrara. This is especially true if a plugin was used in its creation. It just looks, to me, like you've used LAMH to add strand hair to your kitties, but I could be wrong.
So with that in mind, even though it might seem like a bummer at first, it is always best to begin from scratch from within Carrara.
Mil Cat is one of those wonderful products that came out before Genesis and the whole "duf" DAZ Studio thing. This is nice for many reasons. The biggest being that double-clicking on material files from the browser will work more like you'd expect than the bizarre stuff that happens with the new duf stuff! LOL
Carrara being compatible with DAZ Studio files is a very new thing, and it's still not right. We can tweak stuff to work, but it it can be a struggle at Carrara 8.5's current state.
Mil Cat, Mil Horse, Mil Dragon II, V4, M4, Kids 4, etc., are all made to work in Poser as well as DAZ Studio. Some of those, and everything earlier than that, were completely made for Poser, and DAZ Studio was made to work with Poser files.
Carrara was made to work with Poser files directly since Carrara 6, and with a plugin with Carrara 5 Pro. So Carrara can really work with Poser 7 and earlier content very, very well. The biggest thing is that the materials need some tweaking. But that becomes a fun and simple process with practice. Well, "Simple" might be true, but we never have to settle for Simple.
Anyways, here's a video I've made for Carrara Cafe, showing the basics of tweaking Poser materials into Carrara shaders - down and dirty, but with good results and some added tips.
Okay, I'm babbling aren't I? That's probably because it's not the shortest, simplest topic to explain with a one-liner. ;)
Here's what I suggest:
- Open a new scene in Carrara
- Bring in a brand new Mil Cat from a Poser Runtime (Poser versions work so much better than DS Library versions right now)
>>> Article regarding Runtimes
- Look through the Pose category of the runtime to find the right material you want for your kitty
- Select the figure and apply the MAT (material pose) file by double-clicking it from the browser
- Use the advice in the video I've mentioned above to tweak the Poser material into a great-looking Carrara shader.
- Use Pose files from the runtime to help pose your kitty!
- Alternately, you could create your own poses and animations!
- Set lights, ground, surrounding scene, and render!
I also have an article at Carrara Cafe which briefly illustrates how I design my animation poses, if you're interested in that stuff.
Now, when you load in the Mil Cat from a Poser runtime, do the eyes still bulge out like that?
Also, did this help at all? If not (even if it did) let me know what you need... we'll get you going! ;)
Off Topic: Whoa... cool avatar!
Thanks so much, Dartanbeck! This is a lot of great information, I will be studying it this evening! :)
I made the original kittens with the Garibaldi Hair system ^_^ Looks like Carrara has its own system, though, so it will be fun to learn that ^_^
Your avatar is pretty cool, too :) Mine is based on the same tuxedo kitty figure I was trying to bring into Carrara... and in real life he is now sleeping on a pillow near the woodstove :)
I will try and load a new Milcat into Carrara and see if that fixes some things. I'll get back to you!
Thanks again :)
I'm fairly new to Carrara as well but I just played around with both the Mil Cat and Mil Cat LE and couldn't' replicate the problem.
I tried posing them in studio and saving the file and whether I open the saved studio file in Carrara or import it I don't get the same issue. I tried just dragging and dropping it straight from my library in Carrara too and don't get the problem that way either. Which is good because I have an image idea on my "to do" list that I need the Mil Cat for.
Sorry. :(
EDIT: Ok, ignore me. I see the experts arrived while I was typing. :)
Thanks, MDO ^_^
OK, I got a new Milcat figure successfully into Carrara and in the process learned that the morphs I'd been using in DS were causing the problem with the figure shape and eyeballs! The MAT file loaded perfectly, but this is just a test, it is not the one I actually need.
Which leads to the next question: In DS I have been using a customized calico texture map and loading it using the Diffuse surface settings. How do I load this custom map onto my cat in Carrara? It is simply a saved JPG or PNG, it is not a Poser MAT file.
Also, I notice the polygons in the snow. There is undoubtedly a way to fix this ^^;
Thanks for all your help ^_^
Hey! I actually know this one! :)
1. Select the "model" line of your cat in the Instances tree on the lower right
2. Click the brush icon on the upper right to go to the texture room
3. Double click on the fur shading domain (or whatever other part you want to change) on the right side
4. In the color channel of the shader change it to Texture Map in the drop-down menu
5. Click the open folder icon and load your custom texture map
Yay! I did it! Thank you, MDO, that was easy! :)
Eventually you may want to take a look at Holly's tutorial for getting fur on the Mill Cat. It's fantastic
Thank you, I will be Very interested in that. Is there a link?
Hmmm, cut and paste didn't work. Hopefully this does it:
http://carraracafe.com/tag/hair/
Thank you, the tutorial's great! ^_^
In that video I've linked to, I'll show you how to add the rest of the maps. But it's as easy as this:
First you need to know where the actual texture maps are located. In a Poser runtime structure, they're in:
Runtime > Textures
Inside that folder is a bunch of folders with artists names, product names, etc.,
I'm not on my Carrara machine right now, but I think that DAZ gives you some with Mil Cat under DAZ 3D > Animals or Mil Cat... it should be in the DAZ textures folder somewhere, but I think I have a few from other artists as well.
So while you're in the Texture room (where you added your custom Diffuse (Color) map), Check to see if there's a Bump Map in the Bump channel. If not, click the little arrows in the side of the Bump channel and change it to "Texture Map" (Like you did for Diffuse), load the BUMP map from the texture folder into that channel.
While you're loading the Bump map, have a look at the other maps in the folder - just their names. Bump maps have a "B" or "BUMP" suffix. So while you're finding that, look for the same named file, but with a "S" or "SPEC" suffix. If you see one, you'll know that you have a Specular map that was made to work with the Bump map to bring out the highlights.
An easy way to quickly load the Specular Map into the Highlight channel is to Cntrl + Drag the Bump channel (with a texture map in it) to the Highlight channel in the Shader window. Then just change the Texture Map in the Highlight channel to the one with the S or Spec suffix.
Some Specular Maps are too bright and make the resulting material too glossy or shiny. Simply go into the Highlight channel and there's a Brightness slider under the map. Slide that down to 33 and test it again. Go up or down until you like the look.
These four channels: Color, Highlight, Shininess, and Bump alone can go a long way towards giving you some very nice materials in Carrara. So I better mention a few more things:
BUMP
To set the intensity of the Bump Map, you actually need to get out of the Bump channel. Click on the Top Shader to reveal the whole list of channels in the main window below. In the Bump section there, you'll see the slider. Notice that you can even slide it into negative values - just in case your bump looks backwards. But you can also simply inverse the map color in the channel too. Anyways, the Bump intensity slider goes all the way up to 250, which adds a LOT of bump! But there's more. You can enter in values in the field up to 500 for a bit of extra kick!
If you have a fairly high resolution, high quality bump map for your fur (without too much noise) you could crank this slider up pretty high for some really textured fur!
Shininess
Shininess controls how light behaves against whatever you have in your Highlight channel. So if you have "None" or a value of 0 (zero) or the color Black in your Highlight channel, Shininess will have no effect at all because there is no highlight to work with. But even the tiniest bit above zero - the tiniest bit brighter than black, can make a big difference, since it allows you to set the Shininess channel. So here's how it works:
Shininess controls how far light spreads across the surface. Higher values tightens the angle to a smaller spread of light, giving a more shiny look. But be mindful that this can be touchy according to your render settings, how close up the camera is, the final render resolution, etc., I guess that what I'm saying is that, for most of my purposes, there is no difference between, say, 50 and 100. It becomes so tight that it's like having no shine (or highlight) at all. I usually start with somewhere around 18 or the low 20's for a really shiny, glossy surface with tight sparkles. Now let's visit the other end of the spectrum:
A Shininess value of 0 (zero) allows the light to spread completely across the surface. As long as light can touch the surface, the highlight will become apparent. This works fantastic for many things. With a fairly (or even Very) dark Highlight value or color, a zero shininess can make a very smooth, velvety appearance. Human skin can have a very low shininess to look soft and smooth with a lower or darker Highlight, or smooth and wet with higher or brighter highlight. In the latter, turning the shininess higher will further add to the wet look by tightening up the shine.
For really quick and simple fixes, if a material looks plastic-like and you don't want it to, just go to the Highlight channel and make it black or zero.
This is where Specular maps come in handy.
They plot out where things should be bright and shiny, and where they should be smooth and soft, and everywhere in between. A wet shin Spec map will have brightness on the water droplets and the portions of the skin where water likes to hang out, darker parts that dry off quicker and so on.
In some situations, where a Specular map was not included, I'll use the Bump map and darken it up, perhaps mix it with a color or a color gradient, etc., and sometimes I even use maps in the Shininess channel to change how the highlights behave against the lighting.
Wow. All this information is priceless, and so clearly explained. Seriously, you should publish a book!
I'm all 3D'd out for today ^_^ Looking forward to my next session tomorrow evening! Thanks everyone for all the wonderful advice! :)
Sleep well, and...
Welcome to Carrara!!!
When you decide to work with Carrara's hair, you can get the Calico color to the hair by copying the color map from the cat's shader and pasting it into the root and tip color channels in the hair shader.
Back from real life this morning for another session ^_^
Thank you for that tip, Evil ^_^ When first using DS Garibaldi, I had a Whole lot of trouble getting the hair to follow my texture map, so this is much appreciated as it forestalls any anxiety about having a repeat experience.
Dartanbeck, I see you already Have 'written the book' :D The beginning shader tutorial is great! I joined the Carrara Cafe so I am sure I will pick up all kinds of great tips there!
I think due to the morphs/deformers transfer issue I had with my cats, I will be making my current project background in Carrara, then using DS with PWCatch to put the kittens into the picture ^_^
I am so impressed watching some of these Carrara animations. I am currently writing a sci fi book series and there are some scenes, mainly canyon landscapes with grazing animals, I would sure love to animate. I would very much like to eventually do an animated book trailer with landscape flyovers, people and animals, and animated cave paintings. The only animating I have done so far has been a couple of tests in Bryce, but I am getting the feeling, looking at others' Carrara work, that the scenes I want to do may eventually be within my grasp! :D
Anyway, thanks so much for all the help! :) (Going back to Carrara to try out those shader tweaks)
What is PW Catch? Is it a shadow catcher? If it is, Carrara has had that functionality for years. To use it, create a new master shader by going to the Texture room, then Edit--> New Master Shader. Then, when the shader window opens, choose Lighting Models and then Shadow Catcher. You can set all the other functions to None, as the shadow catcher doesn't catch reflections or any of that. The only setting that may influence it slightly is the Color Channel. That can sometimes cause a slight color to the shadow.
Regarding the question before about the blocky landscape, (I must have missed it somehow), that could be because the terrain they're on is a vertex object and may need some smoothing. It is super easy to do. Select the model that needs smoothing and click the wrench icon at the top of the screen to enter the vertex modeler (if it's a vertex model) and then click anywhere on the mesh to select a point line or polygon. It doesn't matter, then on the right side of the screen you should information abut the model, and at the top of the information the smoothing option is now available. Leave it at one level for now, and then go back to the Assembly room and the model should look much better.
An example of using a shadow catcher. It also acts as a mask to hide geometry behind it, so I applied it to my animated weeds to reveal the color of the background grass. It may no work so great in HD, but in standard def it looks pretty passable. The movement of the animated weeds helps hid it also.
http://www.youtube.com/watch?v=_8puXTRXt7Y