applying a master pose at frame 0?
 Mistara
Posts: 38,675
Mistara
Posts: 38,675
dont really know what to expect.
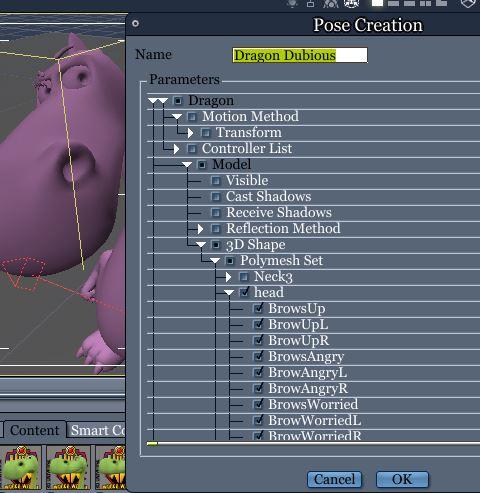
i saved a master pose, selected some expression morphs. the tiles is sitting in the clips mini tab.
i selected the figure (toon dragon) double clicked the tile tab. his expression didnt change.
double clicked the thumbnail in the browser tray clips tab. it opened a new document window.
next i dragged the tiles to the sequencer, hit play. his expressions didn't change.
i didnt want to make a nla clip, just wanted to apply a single pose at frame 0.
help!!

Daz 3D is part of 
Connect
DAZ Productions, Inc.
7533 S Center View Ct #4664
West Jordan, UT 84084
Licensing Agreement | Terms of Service | Privacy Policy | EULA
© 2024 Daz Productions Inc. All Rights Reserved.
Comments
drag and drop over the figure doesnt work, it just shows the circle with the line thru it.
found the morphs list in the timeline. its under misc data.
trying to drop on a track, but its scrolling wildly
woes. those pesky poser poses that move the figure back to origin after carefully placing figure. no end to the posing woes today.
I've always found it easiest to create the entire pose I want, then make a clip. I've always struggled doing it the other way around - building the pose within an editable clip, but I've seen others do it just fine.
I've never worked with those Toon figures. Sorry I'm not any more help.
thanks. i'm a total spazz trying to drop stuff on the timeline. scrolls all over the place.
found a few old threads about master poses. something about dropping names when it comes to saving expression morphs pose
trying to learn this sutff on the simpler figures before taking the fight to genesis 8
i think the power pixie is a 3du figure.
so versatile. power pixie should have its own thread lol
I'm not entirely sure what you're trying to do, or what is jumping around, so instead of trying to figure that out, here's my workflow for creating NLA Poses and Clips to save to my Browser for future use:
Pose files are done the same way except that I don't need to check for scene range, as it's only one frame being saved. Being an NLA pose, if I want it at frame 0, I load the NLA Pose to the timeline at frame zero.
Sometimes I save entire, complete animations to NLA, but most often I'm only saving portions of an animation - like the legs, feet and hips, for example - often also the rest of the torso, but not the arms and head.
If I'm just going to use a full animation, it's often just a one-shot for that particular job, so I just save the animation in the scene, but not NLA.
So this way I can load in the clip and animate the rest of the figure by hand.
Other times I'll look for animations with the arm movements I want - sometimes even just one arm. Apply those and make a separate clips of just that arm, for another example.
Now instead of animating that limb by hand, I can add another NLA track and drop this one in to add those animations.
With the various GoFigure aniBlock collections, I've found a wonderful assortment of gestures and movements that are great for capturing individual motions, like the head/neck or the arms or one arm, etc.,
This makes it nice for starting at frame 30 instead of 0, because when I'm done making the clip I'm left with a figure in whatever default pose I like to keep with mmy figure at frame 0.
I can go through and make a whole bunch of individualized NLA clips for different parts of the body in a single session, all saved for future use in my browser.
It makes for a wonderful Construction Kit method of building animations.
Quick example:
I have a wonderful aniBlock of someone getting hit and falling down, so I load that straight onto a figure.
Next I load in the attacker and give it a walk that stops for a bit and then starts again (2 clips - Walk Stop, then Walk Start) but that only controls the torso through the feet.
Then I put a walk cycle arm clip on the right arm and a side-arm throw (baseball) arm motion on the left.
Now as the attacker walks up to the victim, his arm reaches out and punches the other guy, whose head flings back and he falls to the ground as the attacker starts walking off.
That is a very basic example, but one that I'll never forget because I was so tickled at how easy it was to do, after taking the time to build such a collection of clips.
Getting the timing right is as simple as moving around and tweaking the timing of the NLA clips.
Hope this helps
Extra Credit:
I find that it's easier for me to actually delete the keys of the body parts I don't wish to add to the clip before creating a clip, so I never even have to open the hierarchy editor in the NLA dialog.
So if I'm making a clip for the left arm, for example, I'll make the aniimation, then delete all keyframes except for the collar, shoulder, forearm, hand, etc., and then create the clip.
Often times I'll load the same aniBlock file several times, each time saving a clip for a different part of the body. When I'm all done, I could place all of thiose clips into the timeline to recreate the entire aniBlock, but now I also have the power to tweak several body parts on an individual level easily.
But more times than not, I'm mixing parts from different aniBlocks on different parts of the body to make something entirely unique.
Of course... this is all just talking about using aniBlocks.
I also make my own motions (especially different head and neck movements) and save them as clips as well - though I haven't done that for a while, since I enjoy doing the head and neck by hand for every given situation.
do you do anything differently for morphs and expressions?
the delete key method instead of heirarchy sounds handy. Thanks!
i'm all inspred to do some i am dragon type stuff. i love the light show of his transformation.
i wanted to do like a sphere to dust type transformation animation, but never could get it to look as good.
Well, if never adding them to an NLA clip is 'different', then yes! I always animate my morphs and expressions as individual elements according to the render I'm working on.
I would use Howler - make an animated texture map for the Glow channel to do that. I'd use that for the actual character render, then render separate particle effects to add later in Fusion or HitFilm, etc.,
The animated Glow map would just start of as a black image and then turn to the glowing regions on the skin - and like him, the glowing shapes would change and grow in time.
So to do that, I'd start by loading in the torso map and copy it to the Swap channel and even store a copy of it. Then use the magic wand to select evrything outside the texture itself to get an outline of the texture borders.
Invert selection > Store Selection. Grow selection 2 or 3 pixels > use the Subtract button on the previously stored selection > Store selection. Clear the entire image to black, then activate that last stored selection > Clear to White.
Now I have an outline on the outside of the material zone - but only just outside.
Next I'd paint in all of the shapes I want for the glows after they are all lit up, save that image for times I don't need to animate the effect, then Create Animation. three seconds (90 frames) should be plenty. Pick the option that copies the current image into every frame.
Using the timeline, use the Value filter, which gives Value, Brightness, Contrast and Gamma. Go near the end and set a keyframe without making any changes to any of the settings.
Go to the beginning and turn brightness to 0 and set a keyframe.
Play around with the transition if you like, but this already would make a perfect starting point animation - run the filter and let it do its thing.
So now we have a texture map for the torso that's three seconds long that fades from black to full-on glowing shapes on black.
Next I'd use the curve tool to select some of the shapes and use that same filter in the timeline again to tell the animation when to turn on that particular shape. Some shapes don't turn on as quickly as others, so we're making those adjustments now.
Likewise, we could have just done this for each symbol in turn and just animated their 'fade from nothing' effect individually. Yeah... now that I think about it, If I did as I wrote above, I'd likely start over doing it this way. Good thing I saved the image!
Now we repeat this whole process for the Face and Limbs - and do something special for those cool eye effects!
Next we can save each shape/symbol as it's own separate image and run them as "Facing Camera" particles and try different effects playing with gravity in each of the X, y and z axis', run them each individually from various angles using various particle settings - rendering each out with alpha. We can now add any of these at various stages in HitFilm or Fusion or whatever we want to use as a compositing software - even Howler.
The really nice thing about rendering all of these elements individually is that, when we're adding them in Fusion, HitFilm or Howler, they each have many possibilities for enhancing the effect and the underlying render to further make it all turn out really cool.
The people who did this stuff for the movie likely used a very similar workflow. That's where I learned this stuff - studying VFX for filmmakers.
They did a spectacular job! Their CG is so spotless!!!