How can I get rid of unwanted shadow artifacts?
 naql
Posts: 25
naql
Posts: 25
Hello,
I have been using DAZ and Poser off and on for several years, but am still a bit of a novice. Several months ago I purchased Carrara, but I immediately ran into all sorts of crashing problems and I didn't get far with it. So, I have picked it up again and am starting over. First, let me say that I am running on a late 2011 17" macbook pro with 16 gigs of memory.
I purchased the "Stoney Creek" environment scene, which I think is absolutely amazing. Aside from the fact that Carrara immediately seems to become unresponsive with a spinning ball whenever I click on the "Objects" tab in the Assembly room, I have been able to produce some nice renderings. (I assume that is because there are so many objects in this scene…. I have let it sit and spin for over an hour at most before forcing the program to quit. Any suggestions on that?)
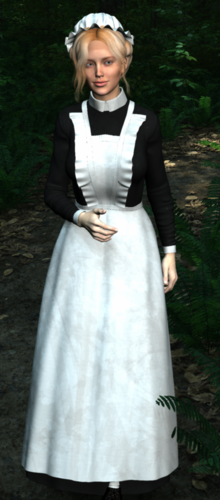
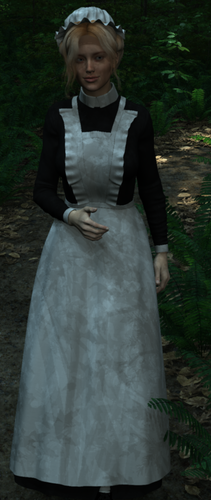
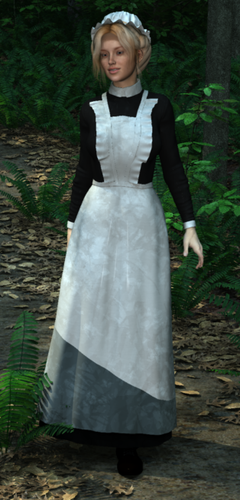
My question today though has to do with the rendering of Victoria 6 wearing the Maid outfit. I first noticed that her white apron had leaf patterned shadows on it which I thought looked unnatural. The less direct light on the subject the worse it looks. Take a look at the attached renderings. I can reduce this effect by increasing the amount of light on the subject, but I can't seem to get it to go away. Also, there is a dark band on Victoria's forehead between the hair line and the eyebrows. Regardless of the angle or the amount of light, it just seems too dark. Note that in sample2, without a spot directly on her, there is even mottling of the skin on her face.
So, is this a shader or a lighting issue? It definitely seems to be related to shadow rendering.
Daz 3D is part of 
Connect
DAZ Productions, Inc.
7533 S Center View Ct #4664
West Jordan, UT 84084
Licensing Agreement | Terms of Service | Privacy Policy | EULA
© 2025 Daz Productions Inc. All Rights Reserved.
Comments
The dark band on the forehead makes me think maybe you don't have the 2nd 'light through transparency' button checked (there' s 2 places it needs to be checked, at the top of the render settings page, and then about halfway down the page in the global illuminations settings). This is very common for transmap hair that there is an invisible layer of hair for the hair cap, and while it may be invisible, if indirect light can't get through it it's going to show as a darkened area of skin.
Just a guess, but might want to double check your settings on that to be sure.
So there isn't a pattern actually on the apron, that's coming from the scene?
If so, locate the various shaders for the leaves of the trees. I am not on my Carrara machine and am in bed right now, so I cannot check this myself, but I think his are like mine, where all of the shaders for each part of each tree is in a single shader tree. So just open each tree shader, and look through the list for the leaves, mine are at the bottom of the list.
Click the channel named "Shader" and scroll down the list of channels in the window and turn translucency to "none", and try the render.
At this point the pattern may be even more prominent. It's only natural to get leaf shadows in a 3d modeled forest scene.
To minimize or remove the pattern, before doing the translucency thing, change your soft shadows on the light(s) to a larger number.
Another thing you could try is a layered render:
Render the Stoney Creek scene using that same camera with Vicky hidden (turn off visibility)
Now load that render into the Backdrop setting (Click "Scene" in the list, Backdrop will be listed above, choose "Map")
Set the Stoney Creek scene invisible, and bring Vicky back. You may need to drag the light(s) out of the SC scene, or they'll be invisible as well.
Just a few quick idea from a fellow about to pass out ;)
I'll be back tomorrow
I'm going with Dart on this one. Howie uses a "fake GI" type light rig. It is essentially a scene encompassing invisible dome with lights (in Howie's case, spotlights) replicated on the dome. It can create a very nice looking effect, but if you don't have enough lights, you can get those shadow artifacts. You could edit the replicator to add more lights and see if that fixes the artifacts.
I will say, that Howies uses translucency in his leaves which Dart mentioned turning off. That can help, but as Dart mentioned, the leaves will now leave darker shadows.
If render time is not an issue, you could disable the fake GI light rig by deleting it or making it invisible and just use the Skylight option in the Render room to see what that does. I would not use the full Indirect Light option though.
The reason the Object tab takes so long initially, is that it is generating thumbnails of all the objects in your scene when you select it. The higher the resolution of the model, the longer it will take. My suggestion is to not select it with a large scene or a DAZ figure in the scene. There's really no reason to do so. If you need to edit a model, select the model and then the wrench icon on the top right side of the screen and the model will open in the appropriate modeler. If you know it is a vertex model and you want to edit it in the Assembly room, select the model and then the wrench icon on the top left of Assembly Room window.
Thank you all for your help. I followed Jonstark's suggestion by checking "light through transparency" at the top of the render options and that seems to have resolved both the dark band on Vickie's forehead as well as the leaf pattern on the apron.
I did a test render and rendering time was greatly increased. Alas, it crashed while I was away at lunch, but I got enough rendered to see that the problems were fixed. When I get a good render, I'll post a new image here to demonstrate for the sake of posterity.
Thanks for the other suggestions as well; I will definitely be trying out the layered rendering.
For now, I'm avoiding the "Object" pane like the plague. I wondered if there was an option somewhere to disable the preview so that I wouldn't be crippled by accidentally clicking on it.
My machine, with 4 cores, 16 gigs of memory… do others experience this level of instability with Carrara? When I buy that mac pro with 12 cores and 64 gigs of memory, will most of my problems go away? :) Or are many of these sorts of issues due to corruption in library files?
Beware of the Undo (cmd-Z) function, especially if you're undoing stuff that's in groups or replicators - it can pull the rug out from under you. Not in any reliable repeatable way, but often enough that you learn to be wary. Judicious use of Save is recommended. Which - sadly - will introduce you to the not-so-beloved "an error occurred while saving this file” dialog.
Buy me a 12 core 64-gig Mac Pro, and I'll tell you if it fixes the problems... ;-)