HowTo: Create missing Genesis 8 skin parts on Torso surface from Genesis 8.1 Body and Head surfaces
 markusmatern
Posts: 561
markusmatern
Posts: 561
With the latest update of the Genesis 8 Starter Essentials there are now four different skin tones called A-D when working with a Genesis 8.1 figure. When working with Genesis 8 however applying these material settings lead to a missing part in the Torso area of Genesis 8.
In this post I try to explain a procedure how to solve this problem.
The process I am using works with a tool included in DAZ Studio that is called Map Transfer. For a basic introduction on Map Transfer see an amazing tutorial of L'Adair here: https://www.daz3d.com/forums/discussion/184696/tutorial-from-map-transfer-to-material-presets
Here is my working process so far tested with the maps A-C in DAZ Studio 4.15: The example below uses Female, the process is identical for the male maps!
- Load a Genesis 8.1 Female Base Character
- Select it in your Scene tab
- Apply the Genesis 8.1 Female material settings from the starter essentials you want to convert
- Open the Surfaces pane and start the Map Transfer tool (you do this by right clicking on the Surfaces pane and selecting it)

- Right click in the Templates area and select New Template
- Drag and Drop the Genesis 8.1 Female : Head from the Surfaces area on the right to the left Template1 you just created
- Drag and Drop the Genesis 8.1 Female : Body from the Surfaces area on the right to the left Template1 you just created
- On the left select both new surfaces under Template1 and make sure the Surface Options: Target UV Map: says Base Female

- On the left select Template1 and check the settings in the lower part of the dialog where it says Template Options. I used these:
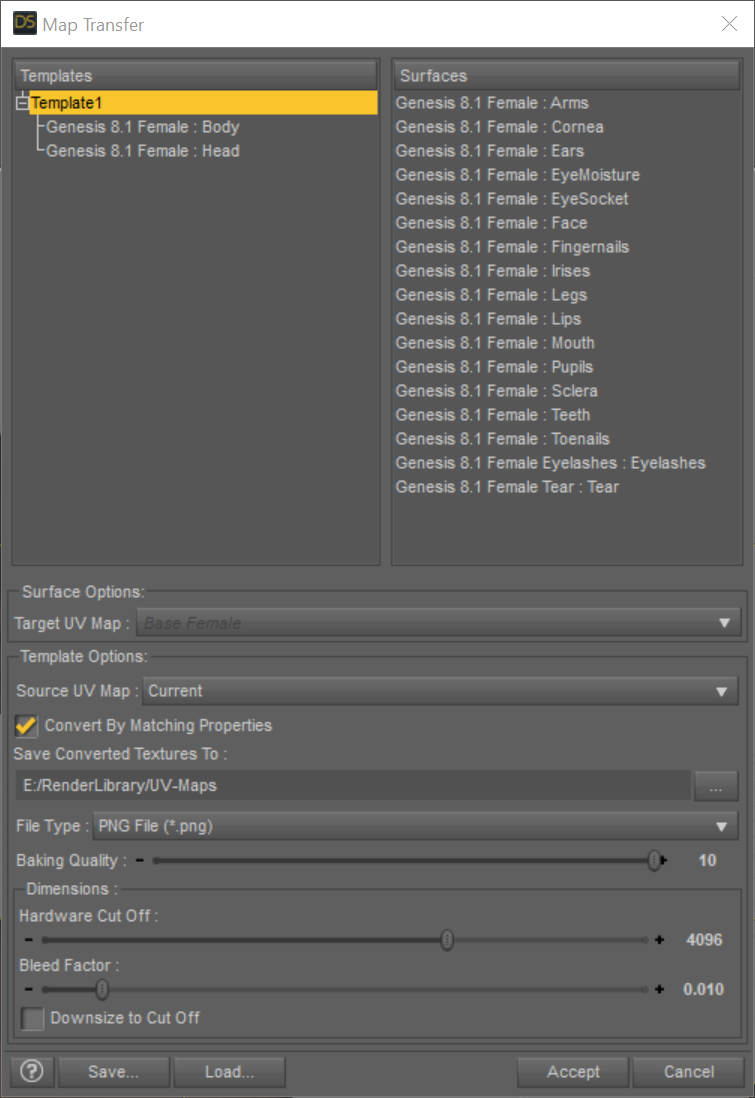
- Source UV Map: Current
- Convert by Matching Properties: Selected
- Choose a path where you find the generated textures later on
- File Type: PNG
- Baking Quality: 10
- Dimensions: Harware Cut Off: 4096 and Bleed Factor: 0.01
- Downsize to Cut Off: Not selected
- Optional: I saved the settings for later reuse using the Save... button
- Hit Accept and the conversion process should start.
- Navigate to the output directory, you should find four files:
- Template1 Bump Strength.png
- Template1 Diffuse Color.png
- Template1 Top Coat Weight.png
- Template1 Translucency Color.png
- Apply the new maps to a Genesis 8 character:
- Load Genesis 8 character
- Apply the appropriate Genesis 8.1 material settings you want to use (A, B, C).
- The Torso surface will not be changed all the other surfaces are changed
- In the Surfaces pane select the Legs and use the mouse right click context menu Copy Selected Surface(s)
- Select the Torso surface and use the mouse right click context menu Paste to Selected Surface(s)
- Now replace the legs images with your newly generated images from above:
- Base Color: Template1 Diffuse Color.png
- Translucency Color: Template1 Translucency Color.png
- Glossy Layered Weight: Template1 Top Coat Weight.png
- Base Bump: Template1 Bump Strength.png
- Top Coat Weight: Template1 Top Coat Weight.png
- Change the UV Set from Base 8.1 Female to Base Female
- Optional: Save the material settings
- Repeat the process for different material settings
The following posts shows the opposite process (creating head maps from G8 and G3 character settings):
This post triggered my HOWTO:
https://www.daz3d.com/forums/discussion/502671/juneteenth-free-additional-skin-color-options

Daz 3D is part of 
Connect
DAZ Productions, Inc.
7533 S Center View Ct #4664
West Jordan, UT 84084
Licensing Agreement | Terms of Service | Privacy Policy | EULA
© 2025 Daz Productions Inc. All Rights Reserved.
Comments
Thanks for your detailed instructions.
Thanks, this will serve as a great guide!
Thank you very much for this useful guide !
Works!
Thank you sir, you are a hero!
thank you! Very useful, I learn a lot!
Too bad the metallic and opacity textures aren't written out - while not usual for most characters, there are some (like the androids) that require them with no way to generate them.