Quick 'n Easy Dynamic Clothing
 JoeMamma2000
Posts: 2,615
JoeMamma2000
Posts: 2,615
For those who would like to try using the Bullet cloth feature for draping clothes on their characters, it really is fairly quick and easy to make your own dynamic clothes. So there’s really no need to be apprehensive about trying. I’ll show you a quick example of how you can very quickly make a woman’s dress that looks much better than most/all of the conforming clothing you see out there.
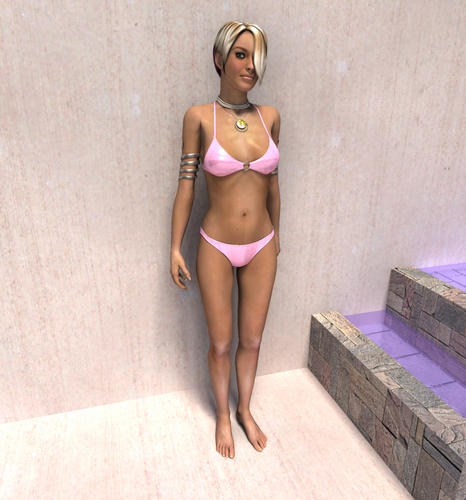
Here’s a simple scene with a character who needs some clothes. And we want to make a full length dress that drapes realistically.
Daz 3D is part of 
Connect
DAZ Productions, Inc.
7533 S Center View Ct #4664
West Jordan, UT 84084
Licensing Agreement | Terms of Service | Privacy Policy | EULA
© 2024 Daz Productions Inc. All Rights Reserved.
Comments
First, you need to make a couple of keyboard shortcuts so the process will be quicker and easier. I suggest you make a keyboard shortcut for “Loop from Selection” (which you should have already since it is one of the most useful selection tools when modelling). Just go to File/Preferences/Keyboard Shortcuts/Vertex Modeller, and enter a new shortcut. I use “L”. Also make a shortcut for “Extrude”, under Vertex Modeller/Construct. I use “E”.
Once you have those two shortcuts you’ll find you can make dynamic clothes very quickly and efficiently.
Now the concept is this: you start out with a very simple vertex cylinder with only a few polygons. Simple objects are much easier to work with, compared to objects with thousands of polygons. That is a VERY important concept in modelling. If you can, start out clean and simple.
What I’ve done is insert a cylindrical vertex object, with “object definition” of only 4, into the scene.
Next, for this example we want to make a full length dress.
So the basic steps to do that are as follows:
1. Loop select (“L”) edges around the top or bottom of the cylinder, then
2. Extrude (“E”) those edges to form another ring of polygons, then
3. With the ring of edges still selected, use the Scale and Move tools to “fit” the object as close as possible to the character’s body mesh.
In this image I’ve loop selected the edges along the top of the cylinder, extruded those upwards to form the waist of the garment, and used the Scale tool to shrink those polys/edges so that they fit the character.
At this point you already have a basic skirt you can “clothify” using Bullet cloth.
Really? Yup.
The only missing ingredient is Subdivision Smoothing. That’s how you turn this simple, low poly object into something that will work very nicely as Bullet cloth. It converts the few polygons into thousands of clean, perfect polygons that Bullet really likes. And the next image is that simple block cylinder after applying Subdivision Smoothing of 3, running Bullet sim on it, and adding a belt.
So the basic process is, Loop Select edges, Extrude, then Scale and Move to fit the garment to the body. And you can use the same process to make pants. Just start with a simple cube, delete the polys where the legs come thru, and extrude those holes to make legs.
And here's an image of that same skirt object that was further extruded up and down to form a full length dress. And the process of extrude and scale/move only took less than 15 minutes or so.
Thanks, J2K.
And people interested in dynamic clothing in Carrara might also be interested in a method to speed up calculations that uses a soft-body undergarment that is attached to the figure. See discussion, tests, and examples, in the following thread.
http://www.daz3d.com/forums/discussion/49954/
EDIT: typo
Really nice work Joe. After you smoothed the dress, did you convert it to actual polys, or just leave it smoothed?
No conversion. It's easier to make changes on the original low poly object. Once you convert you're stuck working with a gazillion polygons.
This is a very cool, clear example Joe - thank you.
Also, FYI, I think by default "H" is already the shortcut for extrude, at least in 8.5 Pro. Why "H" I have no idea, but that's how it was by default in mine and once I discovered that I use it constantly. I don't know why it never occurred to me to create a shortcut for loop though, that's great advice that I just implemented. :)
Mark
Awesome little tutorial, Joe, thank you! I admit I never realized that making a cloth effect for a static pose was so quick and simple before, or that it could be done so easily with a low poly object thanks to smoothing. I'm definitely going to making use of this little tip in future.
Keep in mind, aside from just making cloth for static poses, it can also be used to generate a mesh object (.obj) that you can rig and convert to conforming clothing....
And, of course, you can use it for animations when DAZ fixes the Bullet cloth collision problem...or if you use a workaround like was mentioned before.
This method will also work for conforming clothes. For conforming clothes, you can also use Daz Studio as a free rigging plugin. Follow J2K's excellent example above to model your cloth item in the "T" pose. Then follow the steps in the following thread to use Studio to rig the clothing item.
http://www.daz3d.com/forums/discussion/45361/#676987
I felt something was missing from the first image....
And here I was thinking I wouldn't mind if she took some more off... :)