Aeon Soul: Iray textures for 'Out Of Print' products available?
 AbrahamRockwell
Posts: 120
AbrahamRockwell
Posts: 120
I wasn't sure whether to if I should ask this question here, or in Technical Support, but, as it refers to a product, I think here is best.
As the title says, one of the things I would like to see is Iray textures for some of the older Aeon Soul products (when he/they went by other names in the past).
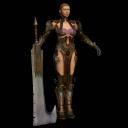
In particular, I would like to see Iray textures for the old Earthbreaker armor set for Victoria 4 (see attached image).
I have been able to use the base armor in Daz (and even fit it to Genesis 3 and Genesis 8 with a 3rd party app), but of course the textures don't transfer.
Even using various techniques to convert them to Iray (that I know of, anyway), the textures on the armor still come off as 'painted on', instead of the extreme level of detail they have in Poser.
Does anyone know if Aeon Soul has made Iray textures for his older, 'out of print' products, or where to find them?
If not, well, that's the suggestion I have to make 
Daz 3D is part of 
Connect
DAZ Productions, Inc.
7533 S Center View Ct #4664
West Jordan, UT 84084
Licensing Agreement | Terms of Service | Privacy Policy | EULA
© 2025 Daz Productions Inc. All Rights Reserved.
Comments
I hear you!
I wish that AS would get an intern, and put them to the task of converting their old items to Current Generation with Iray....
Sounds to me like the textures involve a lot of displacement, which doesn't always work well in iray. Try increasing the SubD value and/or converting the displacement map to a normal map.
It may also be an artefact of the version of DS being used. I'm sure 4.12 did more displacement with the same setting than 4.14 & 4.15. I haven't done a test to verify, but it is a feeling. I have tried to use displacement in the latest version & been a bit disappointed by the results.
ETA - try it using the Filament Renderer. I noticed I was getting very obvious displacement with Filament yesterday evening. Might even say a 'Disconcerting' amount.
Regards,
Richard
Well, I'm new enough to not know what "Increasing the SubD Value" or using the "FIlament Renderer" is, but thanks for the answers ^_^
I'll do some googling later to get tutorials on those and see if they work, but you are both right: the Poser textures rely heavily on Displacement, as they are not part of tha actual geometry itself.
To get the filament renderer to work: In the viewport you can choose the type of display you see. The options are texture mapped, smooth shaded, wire frames, hidden line, iRay etc. The bottom one of the list is the iRay preview. The lightbulb icon above the iRay preview selects the Filament Renderer. After choosing the filament renderer you will find everything looks washed out. To prevent this, you need to create a 'Filament Render Settings' node (I am away from my machine so I don't remember the exact name, sorry, but it's in the bottom 2 or 3 menu options of the 'Create' menu). Once created, select the Filament Settings node in the scene tree, and under the parameters tab, chose the parameter that says 'Film ISO' or some similar name. This will be set to 1.00, change it to 0.25 to stop the scene being so washed out. Now you are using the filament renderer as your rendering preview. There are ways to use it as the main rendering engine, but I fear someone else will need to tell you how as I have never tried it.
One thing I have never been able to prevent in Filament is back face culling, and as most hair models seem to have normals pointing to the head, back face culling makes hair models, in particular, look a bit odd.
Regards,
Richard
I am now wondering if the Thickener plugin would solve the Filament transparency issue.
It could well do, at the expense of a vast number of extra facets. There are one or two hair models with 500k+ facets and that may well take a huge time to do. I have a thickener I wrote into my own modeller 2 years ago. When I thicken clothing for 3D printing, no problem. Thickening hair... A few are OK (Jim Burton's V3 Las Vegas Hair is one, as well as many of the old Koz Hairs). My modeller works with up to 1 million facets or so, but there are hair models that blow it out of the water when thickening the hair.
OK, here's how to go about trying to get those textures to work in Iray...
Good luck!