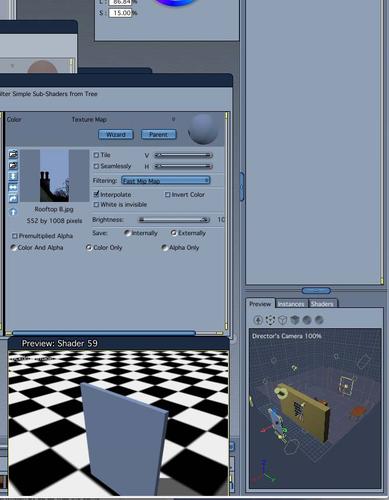
Texture maps on simple rectangle
 starboard
Posts: 452
starboard
Posts: 452
Good Morning,
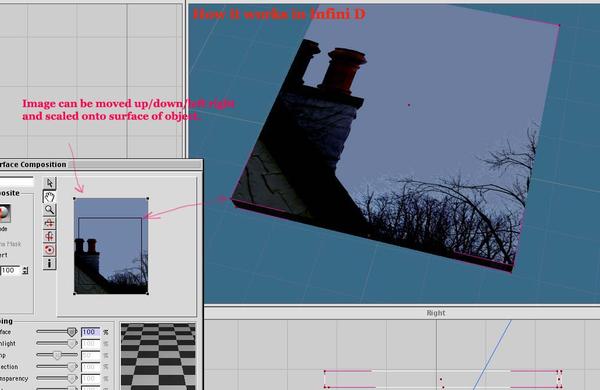
I have been trying and trying again, to put a simple jPEG image onto a basic rectangle. I believe it should be a simple process. but once again I am totally confounded by the interface or more correctly my lack of understanding. In Infini D 3D I can import an image locate it where I want it on the rectangle and bingo its there. I can scale it so any part of the image is on the rectangle and move it so I can accurately place the image where I want it on the rectangle.
When I try this in Carrara, although it shows it on the surface in Shader Room texture it does not show in the object preview window. When I exit to the Assembly Room its just a solid color rectangle. Obviously I am doing something wrong - some switch I didn't switch, some witch I didn't ditch, or I didn't turn around three times and say there is no place like home-- What is it ?
Also I have seen no controls in Carrara so that you can place the image where you want it on the object. It seems you import the image and it Carrara places it on the object where it wants it- and thats it. Again I know the controls must be there - but where?
Thanks, Confused, Confounded and ready for the asylum,
Starboard
Daz 3D is part of 
Connect
DAZ Productions, Inc.
7533 S Center View Ct #4664
West Jordan, UT 84084
Licensing Agreement | Terms of Service | Privacy Policy | EULA
© 2024 Daz Productions Inc. All Rights Reserved.
Comments
More than one way to do something in Carrara. Here is one way that I like.
- I inserted a vertex object and then used construct 3D cube, but I did not uvmap it (in some other methods you could)
- In the texture room, for the top shader, I chose "Projection" and "flat mapping"
- On the right you will see a series of cubes. Pick the face the pic should show on. I chose the top.
- In the color channel, I chose texture map and picked an image file.
- I returned to the assemble room and chose the textured preview but the cube remains black. Aaargh, but fear not.
- I went to the render room and rendered it. The image renders on the top of the cube.
- Ah, but you may want to constrain where and how the image appears. Again, no worries.
- At the top shader level, you will see a little plus symbol under the series of cubes.
- click this plus and choose "layers" from the pull down menu. You can then experiment with the top, left,... settings to constrain the borders of the image. You can also add additional pluses for even more complex results.
- and all of that with no uvmapping.
- clearly, you could uvmap the cube and then use photoshop or something to place the image where you want
- I also think you could use the "stamp" tool in the 3D paint function .
Whoah!!!
My apologies. I forgot a step!!!!!
To use the layers function in the second half of the example I gave, you must first have a multilayer shader. At the top level, choose complex shader with layers list. Then use the projection mapping for a lower layer and the constraints for a second like in the pic attached in which you can see the blue (which would be your pic) is only a subset of the top face, as constrained, and the red of the rest of the cube then bleeds over.
Ooops. Sorry if I contributed to more frustration.
Did you try doing a test render? Textures in the Assembly room do not always show up pre-render, but that doesn't mean they are not actually there. :)
If you need to see the texture to precisely place the object it is on you can click on the Textured Preview icon on the top bar (don't keep this on in a complex scene though as it can really slow things down).
Mark
Diomede64
I would have got back to you sooner but I have been busy trying to follow your directions. When I saw the number of layers in your second post, I gulped. I know it is second nature to you, but to someone new to this shader tree it is nothing short of an enigma machine. However in my many trial and error attempts, I tried using a primitive plane instead of a cube- thinking that if there were fewer sides less could go wrong. Then during a second series of trial and errors, I put in Parametric on the top shader..This immediately simplified the choices, next I put in texture map and chose my image...It worked I had my image and it could be seen in the assembly room. I could also move the image up and down, left and right as if it was on a continuous belt. Unfortunately I have not found a way to scale the image. If I change the dimensions of the plane, all this does is distort the image,
The work around that I can see is to make the image to the desired proportions in Photoshop and then shape the primitive to those dimensions, after this the whole plane can be made larger or smaller as desired.
I can use this image as it is for now as all I need is more or less a screen to project a background image.. However I have other objects which are dimensional that I would like to texture so there is a learning curve ahead. But, like you mentioned, the alternative, UV's may be the better choice. In the meantime I have to spend more hours on shaders
Thanks for your help once more, Diomede64.. I would not have stumbled on the "Projection" choices by myself
Starboardtack
First of all, it seems strange that you were actually confused and confounded by anything about Carrara. Just ask Dartanbeck, it's the greatest software ever developed by human hands in the history of software on this planet and all other planets in the universe, and possibly handed down from above by the Almighty... :) :) :).....didn't he say he's never, ever been confused by anything in Carrara? :) :) :) (sorry Dan, just poking some good natured fun...)
Anyway, what you generally need to do to apply textures to objects is called UV mapping. That allows you to specify exactly where you want the image to go. And IMO, Carrara's UV mapping leaves a LOT to be desired.
Depending on where your object originated, it will have some default UV mapping, so you can monkey around in the shader room and try different projections to see if anything works. But really you need to edit the object in the Modeller and do some UV mapping. And yes, IMO it's very confusing. And I've used a lot of different applications that do UV mapping.
As to simply placing an object on a 2D plane, so that it acts as a billboard, then you need to resize the plane to be the same aspect as the image to avoid distortion. If the image is rectangular, but you want the plane to be square, then you will need to edit the image in an image editor to be a square aspect.
Just a couple little tips and hints if you want to use an image as a billboard:
You can choose movie files or image sequences for animated billboards in the shader room by choosing the Texture Map option.
You can use an image with transparency in the Color channel, such as a .png, .tiff, etc. and Carrara will respect it- No need to mess with the Alpha channel!
If you are having problems lighting the billboard or you wish it to appear illuminated, simple copy the image/movie to the glow channel and adjust the slider below the thumbnail preview to adjust the brightness of the effect.
There is usually more than one way to do something. Here are at least 4.
1) You can uvmap and then use an image editor of choice.
2) Without formal uvmapping, you can use the layers function, which I botched showing above. It is actually not too complicated but I'll give myself a break before cleaning up the example.
3) You can also use the 3D paint function, which has a stamp tool.
4) You could use Blender, in which case J2K would explain how inconvenient Blender is in hopes of getting programmers to improve Blender (just giving you back a little of what you gave Dart)
-----------------------------------------------------------------------------------------------------------------------------------------
Using the stamp tool (assuming your version of Carrara has 3D paint)
- start a new scene
- from the top menu, insert a primitive cube. You heard me, not a vertex object. Just a primtive cube. (This works on vertex objects also)
*** note that you are not uvmapping this cube ***
- on the top menu in the upper left, click on the 3D Paint tool (names of tools appear if you hover cursor over them)
- Carrara will prompt you that the object has no textures. That is OK, time to create one.
- In the upper right, you will see tabs for "tool" and "textures"
- Under the "textures" tab, you will see folders for color, alpha, specular, etc.
- open the "color" folder and click the magic wand looking thing on the right
- Carrara will prompt you regarding creating an active color texture. Pick a name and a place to save the new texture map
- Make sure that this color channel is actve. The paintbrush and eye icons should be bright and the name you picked should appear.
- Click the "tool" tab. A menu will come up with a color wheel and other stuff
- In the upper left, you will see a menu with another paint brush, a couple of pen looking things, a stamp,...
- Click on the stamp
- Now look at the tool tab again. Under the color wheel, there is another tab that says "tool".
- There is box to load files. Click the box and navigate to where the image is that you would like to apply to the cube
- Note the other settings. You can change the size of the stamp. You can change its orientation. Even its opacity.
- Pick a size and orientation you like
- now click on the cube where you want your image
- don't like it? Use EDIT : UNDO then change the stamp size or orientation and put it where you want.
- as you get better with the stamp tool, you will learn how to adjust its size and orientation with keyboard elements (hold down control/command and drag for example)
here are more screenshots
To sum up the stamp tool.
- activate 3d paint
- click the wand to create a texture file in the color channel
- load the image as the stamp you want to put on the object
- adjust the size and orientation of the stamp tool
- click on the object
- if you don't like it, undo and repeat until you do like it
Very simple, very straightforward, and for this primitive cube, no separate uvmapping
** The layers thing is also less complicated than I made it seem. Sorry I botched that.
** It would not be hard to UV map a cube and then use photoshop or whatever
Diomede65,
That is really very clever use of the stamp tool. Your instructions were excellent - went there right away. Thanks for going to all that trouble. I was able to adjust the size..very good. However, I could only get the image in black and white..I went back through the chain looking for a color option but could not see it. I went back and looked at your images and I noticed that yours was in B&W also even though the original was in color. What am I missing.. Don't tell me it only does B&W.
Starboardtack
Maybe try un-checking the, Is Mask checkbox.
Evilproducer,
I gave it a try but it only gave a black square on the cube.
Starboardtack
The black you are getting is probably from the default setting of the color wheel and it is overwriting the picture settings in the stamp brush. In the color wheel, swap the white and the black and see what happens. In other words, make sure the color of the brush (top box) is white. Then try it with mask unchecked. Then experiment with a different color in the box, such as red. With red chosen, the stamp will have a red tinge.
Hopefully, that solved the immediate issue. Couple of other points to make.
1) Yes, the Carrara shader tree has a lot of options. Therefore, it will be daunting for a little while. Furthermore, several other tools can work with the shader tree, which can make things even more complex. However, in return, you get amazing control over how your objects appear. I think you will like it once you get the hang of it. The 3D paint tool becomes incredibly useful once you master the uvmapping tools. For example, it can be used to create separate regions to apply different shaders, it can be used to create regions for more dense or longer hair, it can be used to place replicated objects, it can be used to paint displacement or bump maps for additional detail, and it can be used just as a regular paint brush.
2) There is a good reason people recommended uvmapping and photoshop.
3) It doesn't have to be complicated if you don't want it to be. As the stamp tool shows, there are simple options sometimes. Unfortunately, the more experienced a person is, the harder it is to resist getting locked in the "usual" way of doing something.
4) I am attaching two pics of the layers list approach applied to a cylinder created in the spline modeler. Notice that I was able to place the image on the side (I could have put it on top), and I was able to move the image around (in this case to the right). If I said, I want to create a cylinder with a picture of Elroy Jetson on the side, how do I do that in Carrara? I'd get a bunch of people telling me how much easier it is in another program to create a vertex object, how much better the uvmapping tools are, and about the other program's ability to import photoshop files. When all I need to do is a couple of clicks in the spline modeler room and a couple of clicks in the shader tree.
5) Having had my rant in points(3) and (4), I repeat point number (2) there is a good reason people recommended uvmapping and photoshop.
Diomede64
I wrote a response to your posts last night, and clicked send..However, when I checked it was not on the Forum..There must be a time limit on the "Submit Posts" Although the page still appears active..its not. The learning continues.
You were correct it was the default black of the color wheel. I really like this method of projecting an image on a surface. I was playing a lot with it last night, changing the scale and position of the image. And thanks for making the extra effort and explaining its use and the alternatives. Its a tool I will be using a lot and I will always remember where and from whom I acquired it. Thanks again.
I am including an image of the Franklin project I am working on. You and some of the other wise heads of he forum, Phill W., JoeMamma advised me on the best overall approach for making or adapting a figure, At the time I was planning on using Sculptris but your advice was to stay within Carrara and use the morphs, displacement brush, paint 3D, etc. I am so glad I asked advice from the forum as I have not only come up with a usable Franklin, but what is I believe more important, learned the skills to create other characters. It has been a lot of fun- but intense. The image is just a dress rehearsal, as I have not finished with the figure or actually anything else in the scene, It was just an assembly to see what problems are in the wings..It turns out that one of the problems was I could not see the backdrop.. Now that I know I can do it all in Carrara - I am thrilled and enthused to continue with the learning and to move on to bring our friend Ben to life. In between its back to the books on Dynamic Hair and Phil's Tuts.
Carrara is a fine program -but this forum is its brightest assets.
Starboardtack
That looks really nice.
Wow, looks great. And I really liked the image of the harbor in the other thread. What a great project! I hope you keep us updated.
Thanks guys,
Compliments are nice..always. However I posted the image to show how the advice that is given is used and appreciated. I have noticed that many active members of the forum go to uncalled for lengths in answering questions, and following up to make sure its understood, and never knowing if all their efforts are for naught. I don't think you would get anything like this kind of support from paid experts working for software companies. Again, this forum and its members are a huge asset.
Starboardtack
Well, if it looks good, and is impressive, especially if the artist is new to Carrara, then I'm all for giving a compliment. You did/are doing a very nice job of getting a believable night look to the scene. All to often night scenes look muddy, especially when you are trying to contrast a darkened room with the window showing the night sky. So, even though the scene isn't done yet, what you have done so far looks great, and if we've helped you or others that come across this thread, then all the better!