Nifty Iris shader trick (mini tut?)
 Jonstark
Posts: 2,738
Jonstark
Posts: 2,738
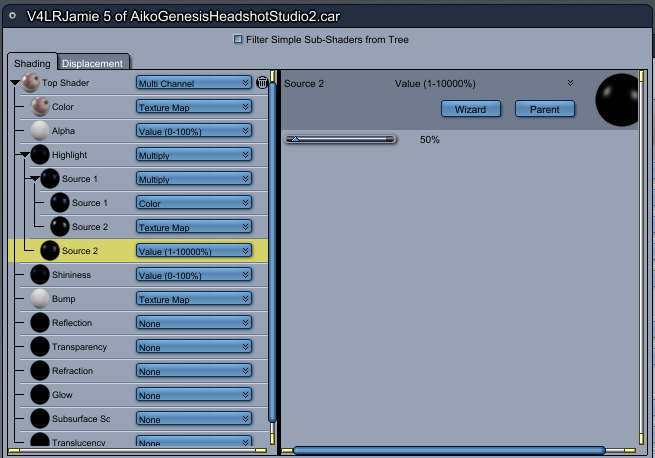
One of the problems of skin shading that has bothered me for a while was how to avoid a 'glassy eye' effect where the eyes look glassy/plastic/doll-like. I think I've stumbled across a way to make the eyes more light-reactive to make them look more interesting and arresting (at least I think so), and more alive in catching the light.
In the past most common wisdom I've seen is that the Iris shader doesn't need its own highlights, because after all the specular effect would be on the transparent cornea that is over the Iris itself. This does make logical sense, however I've found that if I add highlights to the Iris in a specific way, instead of giving the 'eye glint' which should appropriately be on the cornea and not the iris, I can still give a nice light-reactive effect to the Iris that will make it more 'irridescent' and perhaps even a little sparkly. What do you guys think? I have no idea how realistic this is, but it seems realistic to my untrained eye, and I like the way it looks in renders more. I bet Headwax could tell us from a professional's point of view whether this is closer to the way real human irises react to light or not.
Hmm, can't seem to figure out a way to upload an avi, which is a shame because it's set to repeat. But here's some youtube links instead.
First for reference, this is how it looks with the old method, where the Iris has no highlight or reactivity at all (I should note for clarity that the eyes have no reflectivity on at all, the bright specular glint is simply the highlight from the light hitting the cornea as I moved the light source from side to side in front of Aiko):
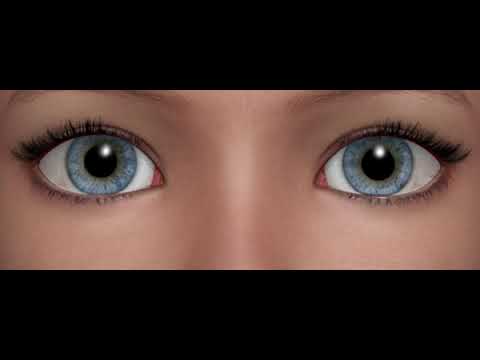
As you can see, the Iris does have a tiny bit of light sensitivity, but overall not much is going on.
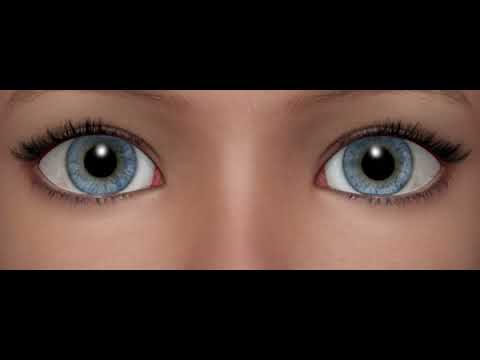
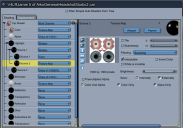
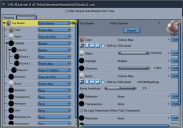
Now here's the shader I've been experimenting on, where the Iris has a 50% brightened highlight in a very specific way (screenshots will follow later to show):

Note the 'iridescence' that makes the Iris glint? I think it gives oomph to the eyes and lends a little depth.
I don't entirely claim this idea as my own, I got the idea from working on a Carrara analog to AoA's Subsurface Shaders for Anime. In that product, one of the options is to activate an Anisotropic shader for the Iris. I did a little googling and found lots of references to the anisotropic nature of the human iris, although nothing definitive on how much, so I could be wrong. But still I thought: 'hmmm, anisotropic eh'. So I also tried the same method, but within an Anisotropic shader:
I was expecting the effect to be more pronounced, but instead its more subtle. I think the non-anisotropic version has a bit more punch, so I'm leaning towards it.
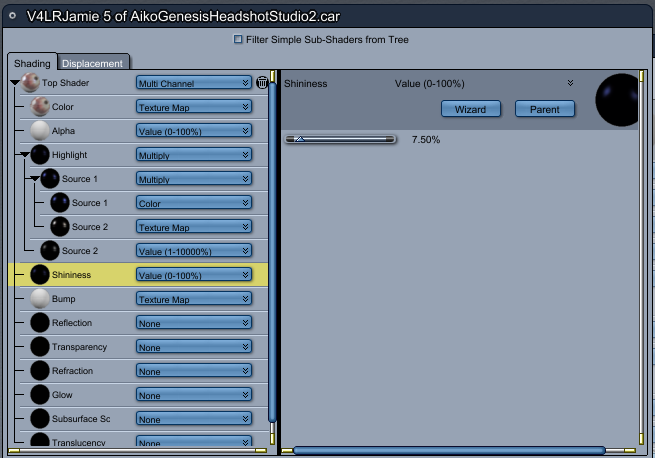
Anyway, here's the screenshots of the method:
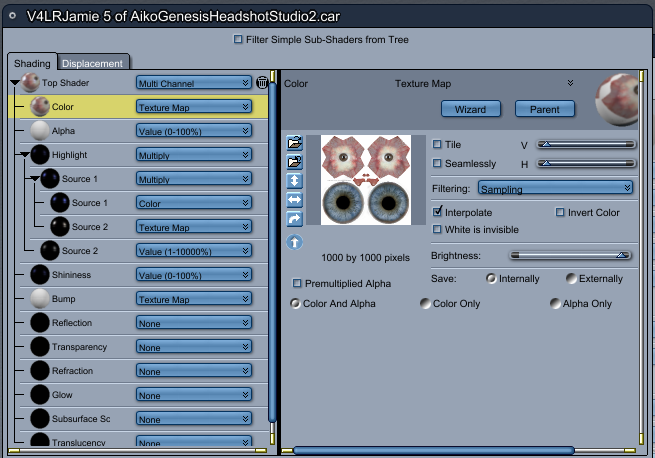

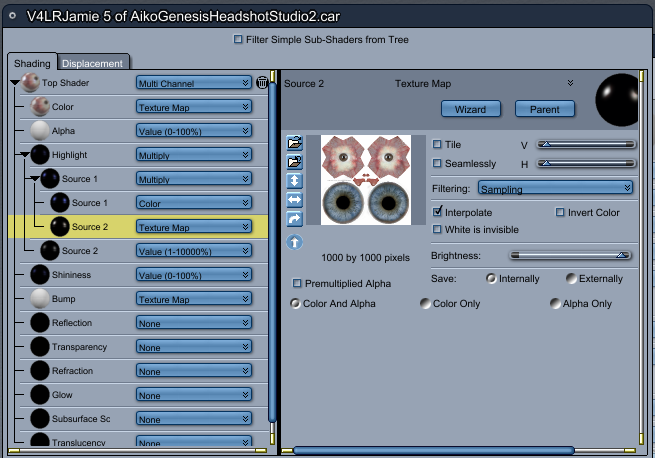
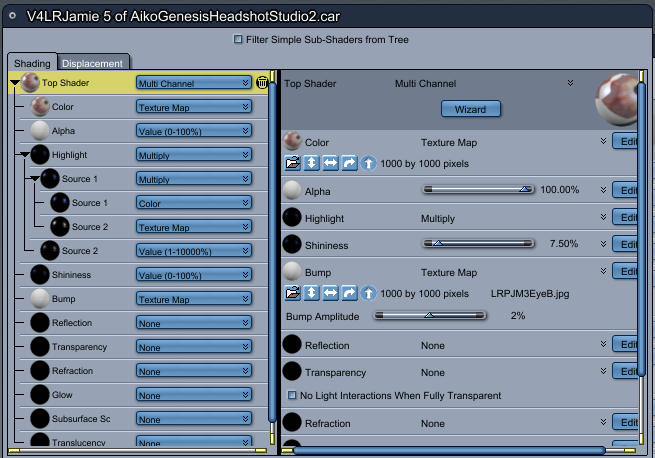
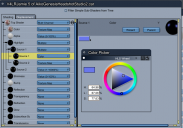
I should also add that for different colored eye textures, it's as simple as changing the color multiplier by only changing the hue, which means simply picking a different point on the outside of the color wheel that corresponds roughly to the color of the eye you're using.


Daz 3D is part of 
Connect
DAZ Productions, Inc.
7533 S Center View Ct #4664
West Jordan, UT 84084
Licensing Agreement | Terms of Service | Privacy Policy | EULA
© 2024 Daz Productions Inc. All Rights Reserved.
Comments
Nice! really interesting approach thanks for that!!! certainly adds realism
The light primarily reflects off the corneal surface but some light is not reflected, but is dispersed into the anterior chamber where it eventually falls on the iris section opposite to where it enters
I admit to doing mine in post - lazy bugger I am. I would never have thought of your method!
Next you'll be doing sclerotic scatter and Purkinje reflexes/images!
Thanks Headwax, I was really hoping for a professional opinion, and I'm sure you had years of waving lights in front of patients eyes, so I very much appreciate the feedback. But... now I've got to go look up what sclerotic scatter and Purkinje reflexes are... something I can't even spell, lol :)
Ha ha me neither . Purkinje gets me every time ! :)
Purkinje images - every optical part of the eye has a reflection - eg both back and front surface of the cornea and also the crystalline lens - I guess the front surface reflections are the strongest
Sclerotic scatter - on a biomicroscope/slit lamp you make a slit of light and shine it on one edge of the cornea (eg temporal side/ear side) - the slit of light will bounce back and forth within the cornea and come out the other side (eg nasal side) - it helps you see opacities within the cornea etc
That part is going a little over board - but your work with the iris is illuminating!
Thanks for this !
That's very much like the highlight I use on the Iris as well.
"I was expecting to see more...."
Where Eye Gleam really shows its stuff is when the prominent light source is not head-on, but strongly from either side, almost from behind.
In the picture on the right, notice how the light highlights the face. Now look at where the highlight is on the irides - it's the opposite side.
Cinematographers use this a Lot. Subtle light to not lose the actor to darkness, and a powerful key or even rim coming in at a pretty good angle to really bring out the eye gleam.
With those, I back off the Highlight/Shininess almost entirely on the sclera, and use the transparent surface layer to provide the moisture. But we have to be careful with the lens or it becomes all too easy to get gleam as shown on this owl.
In this example (owl) the cornea is so refractive that the gleam might still be on the opposite side, but it doesn't appear to be due to the reflection within the refraction - bringing the highlight back to the same side. On the unlit eye, we see the magnification of the lens showing the inner sphere. I was getting this all the time with Rosie's EYEdeas, so eventually just made the lens invisible.
I find that, after settling on a good highlight map (I often use a slightly different color in highlight than the diffuse, just to add the fact that eyes look a different color at certain times) and the Iris concave set to 1.00 (EYEdeas) that a shininess between 7 and 10 makes for a good gleam/shadow combination, which is exactly where yours is. Cool stuff!
Practical example:
In this image of Rosie the eye gleam is quite subtle. The gleam really does its job during animations where the character is moving through light sources, turning her head, looking around, etc.,
It also shows how, even though her Iris diffuse is green, we see a hint of blue coming out in the highlight. That's using a light blue eye color in the highlight channel.
The Surreality SG folder I'm using has an enormous collection of various iris patterns and clors with matching bump, and I made normal maps for each using Materialize.
It works though. When we get a profile of Rosie with the lighting as it is above, her cornea fills with iris color.
I can see that the sclera definitely needs some lovin' though!
Just gorgeous eyes on Rosie there.
I'm chuckling in a bit of a chagrin; sounds like a lot of people already noticed this effect before me and were already using various techniques to emulate it in renders. lol I didn't really invent anything new here at all, just re-invented a technique others were already using and claimed it was mine in typical villain fashion (muhahahah) :)
The Eyedeas+ product is definitely an excellent way to go, looks like it's still available in the DAZ store (for now, who knows what the future holds): https://www.daz3d.com/eyedeas-3-for-victoria-4-and-michael-4 ; For anyone who doesn't have it in their toolkit, I recommend picking it up before DAZ vanishes it.
I don't know if it was one of the morph pack add-ons I bought way back when, or whether this is a morph that comes with Genesis1 by default, but it is important to make your Iris at least flattened, if not concave. If using Genesis1 native eyes instead of a replacement, I recommend always using the morph 'eye cornea bulge' or 'eyes cornea bulge' (I just looked and saw I have 2 similarly named morphs that do the same thing), as well as the Eye Iris Correction morph and the AoA Iris Depth morph (looking at that name, I'm guessing it came with the Subsurface Toon product: https://www.daz3d.com/subsurface-toon-shaders ; which is well worth picking up).
Without an adequate cornea bulge, we can't get realistic refraction to enhance the iris color and look, and without the iris at least being flattened, if not a little concave, then it won't look right, imo.
Right. Especially during close-up profile shots, where the cornea bulge really expresses itself.
Arki also has EYEdeas for Gennesis 3 or 8 or both. I have them but can't remember who (both?) they're for. Instead of separate eye figures, these are morphs and shaders for the current eyes - just FYI.
Before discovering EYEdeas 3+ I made my own Iris concave morph for V4 and it was easy enough to do.
In the Vertex modeler, keep selecting outer layers of the eye until the iris are exposed - or select the iris and hide the rest.