Carrara 8.1 pro training request (texturing renders in photoshop)
I am seeking someone with strong skills in Carrara 8.1 pro that can help me learn/understand
how to texture stuff nicely using photoshop. I would like to build static scene renders of my 3d models and then
texture them in photoshop.
I really would like to avoid uv-maps, as my scenes would be used in hidden-object style games, where the objects will
only be scene in a single perspective, so texturing in photoshop seems like it would be the easiest.
I knew a guy, who used Maya, and he would render out an AO pass, then drop that into photoshop and set the layer for multiply,
then begin layer after layer of texturing the individual items. The results were stunning! and no UV maps needed since there were
static non animated scenes.
my problem is, i am ok with the modeling, but putting textures onto items my stuff looks like crap.
for example, i can easily model a treasure chest, with handles, a ridge along the lid, and a basic lock/latch/hinge
so the geometry is fairly basic when you break it down, but now taking that into photoshop and making it look awesome!
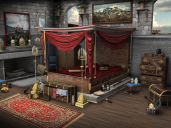
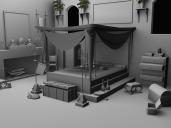
I have attached 2 images (the models were made in Maya but not by me)
the textures were all done in photoshop and no uv mapping.
this is the style of texture work i want to learn how to do...
anyone skilled in this or know a site that may be of help?


Comments
you would be off doing the textures in C - thats a lot of work to do in post
Wouldn't doing it in Carrara still be more work?
you need to get all the UV mapping right, then export it, then paint the UVs in photoshop anyways..
if there is a better workflow on how to get these kinds of results directly within Carrara, by all means please let me know.
you don't need uv
example - make a cube - goto edit - add texture for it - render
and if you do it this way - you will get more angles to use
give it a try - see if it will work for you
yea i can do that for a cube... easy enough
but how do u do that for something more complex, say like the gold in-laid
pattern on the drawers of the dresser in the scene above or the intricate carving
on the headboard of the bed... or the rolls in the cloth/draping on the bed cloth and canopy.
that's not just a simple add color to a color channel...
all my direct texuring in Carrara looks like this.. (see attached)
it is not in the same league... it is not good enough quality..
the tapestry in the back, was UV mapped and applied to the geometry with an alpha channel.
the rug is using the hair element of carrara to give it the fluffy look.
the other stuff is either texture maps applied to the color channel or internal shaders applied to them.
but it looks no where near what i want.. sure my modeling may be some what primitive in this scene, but over
time that keeps improving. making quality looking textures is whats killing me...
It can be done with Carrara 8 Pro, Adobe Illustrator, Photoshop and Phil Wilkes Carrara training DVDs. Alternatively, try Elance or Freelancer for commercial training request .
You need CarraraPro to get the MULTI-PASS feature. Render to PSD, and you will find extra Layers (some end up in Channels which you will need to copy/past into Layers).
The two Elements below are Shadows and Ambient Occlusion.
I own 8.1 pro, so that should not be an issue.
i have played with the multipass before... perhaps my lighting is not right in the scene, or i have shadows turned of etc..
i will mess with it and see if i can get those types of results
at that point, whats the best way to do it,
that the AO pass and put it as the top layer and set as multiply in photoshop?
them begin layer by layer painting/texturing the scene
where/how should i place the shadow pass?
i need GI turned on to get an AO pass? or no
I think you will be better off exploring the possibilities to be honest. It will need to be done to "your taste". You could decide to move away from that hyper-real 3D look to something that looks more like a storybook or old etchings or whatever you like....
This is a project where I used multi-pass and photoshop (and another program called Studio Artist) to imitate the post-impressionist paintings of Toulouse Lautrec:
I also like a plugin called WireframePro from Digitalcarversguild.com which can give you very clean outlines and you don't actually need any lights in your scene at all since it just traces off your geometry. Might be very useful for you where you need to align textures in PS...
One more in WireframePro... With an isometric camera so the perspective is like an architectural sketch....
Method321 - you seem to be setting yourself up to do an awful lot of postwork! For every texture, you would need to not only design the texture but also ensure that it is applied with the correct perspective (which I know Photoshop has tools for) - and if you ever needed to do another view of the room, but say at a different angle, you'd have to do it all again - by hand.
Also with things like bump and displacement maps, your objects will react to the scene lighting in a way that would take forever to do by hand in post. Reflections is another thing that would be a nightmare the way you are suggesting.
Most geometric objects are quite easy to UV map - and depending on your construction method, you may find that the default mapping is fine for your needs. It will certainly give quicker and more reliable results for you in the long term.
Oh and for interior scenes, I'd recommend getting familar with Carrara's indirect lighting, this will give you much more realistic lighting (at the expense of longer render times).
The Multi-pass render options will help in your postwork, whichever route you take.
http://www.spiralgraphics.biz/products.htm
The viewer is free and can save out the textures. There are a lot of free texture packs. The textures are seamless and can ether be applied directly, or worked on the the uvmap.
I make a lot of my own texture and wouldn't even try to texture a scene in post.
Hi, back to your original request.
What you are asking for is a Photoshop skill. It can be done, is fun to do and is very effective, as you have stated...if you have the skill.
My best suggestion, if you want to pursue that method, would be to ask in the photoshop forums but be a bit more general in your questions. You should be asking about texture overlays. e.g http://psd.tutsplus.com/tutorials/photo-effects-tutorials/apply-textures-uneven-surfaces/ . The real key to any method like this is to get used to layer blending, masks and the selection tools.
Carrara can be used to give a good tonal map to start by setting each shader on your objects to a basic matt colour or matt white but the real skill and art happens afterwards. Really Carrara is a very small part of the process. (You will still need to get the lighting right)
But learn texturing in 3d at some point, that's fun too.
You may also want to have a look at "Object Index" in the Multi-Pass options. This outputs a different shade of grey for each object, and so you can use this as a masking tool in Photoshop to apply textures to each object in turn.
Tthanks for all the advice folks.
sounds like my workflow may be antiquated, or more effort then its worth, and either
using internal shaders, or uvmaps with external textures seems to be the consensus
as to how to achieve this.
If your goal is to save time... then you are better off learning to do it in 3D.
There may be some specific effect you would want to accomplish in Photoshop, but that wouldn't be the way to go for everything....