Trying to Improve Renders with Zero Artistic Ability
 livepassioneveryday
Posts: 35
livepassioneveryday
Posts: 35
I have a story I've been trying to tell for about ten years. I've stated it as a novel, an RPG Maker game, and as an animated movie (that went horribly). Each time I started, I realized that the medium I was trying to use wasn't going to cut it, and just moved on with my life. I recently attempted to try it again as an RPG Maker game, but using a program to show character busts during conversations. I was unhappy with the quality of the graphics in that program, so decided to do a search of some other character creator software. That brought me to Daz Studio. Going down a rabbit hole for seventy hours, over the course of the next week, with only about four hours of sleep a night, got me to the point where I can imagine a day when I might be able to creates some really good renders for my game's cutscenes.
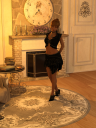
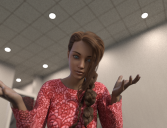
I have zero artistic abilty. I cannot draw a decent looking stick figure. So, if I can get to the point where I can create something good with this program, anyone can. Here are a couple of my newest renders. Let me know what you think I can do to improve on them.
Daz 3D is part of 
Connect
DAZ Productions, Inc.
7533 S Center View Ct #4664
West Jordan, UT 84084
Licensing Agreement | Terms of Service | Privacy Policy | EULA
© 2024 Daz Productions Inc. All Rights Reserved.
Comments
I think they are both good but the ldy in the red dress's hands should both be in the frame. The lady in the black skirt's feet are sunk below the floor.
You have a story to tell? Then you have come to the right place.
I was in your position early 2010. 11 years later with many improvements to both Daz studio, it's products and the built-in render engine, and I think we are there in terms of out of the box movie making (at least from a story board point of view).
However you are going to have to dedicate some serious time to learning. I recommend spending a little cash as well. In my opinion you should start with learning about lighting. Buy a few enviroments / sets on here that you like the look of and render them with default settings. Youtube and./ or buy some tutorials on lighting.
You see, if you can light, then anything you produce is going to look better than 90% of the newcomers. It's the quickest way to narrow the gap on the experienced artists.
Best of luck. As I say - I'm 11 years in and it just gets deeper and more fulfilling the more I learn, and believe.
Just some constructive criticism:
With rocker chick in the living room, she needs to be moved up a smidge. Her feet are clipping through the floor. Framing isn't too bad otherwise. If you're aiming for realism, look at investing in some higher quality hair and skin textures. It will change your world when you're aiming for realistic renders.
A couple other tips I've learned in the last few months (I'm no expert myself and have a long way to go):
1 - play with the camera for render instead of using the viewport for rendering. Using a camera will make the proportions look more realistic. Adding in some depth of field also dramatically bumps up the realism effect. The settings work just like a real-world camera, so get to know the settings for ISO, shutter speed, f-stop, etc.
2 - Another helpful thing I found that really helps with composing is enabling the grids in the viewport. Enabling grids (by clicking the 3 bars in the top-right of the viewport) will draw a grid of 3X3 boxes in the viewport. Use this to line up your shots. Check out photography and the Rule of Thirds. You'll notice that most DSLR cameras have grids built into the viewfinder as well for this purpose. That helps you centre your shots and set them up. There's lots of little rules for portrait photography, depending on how upclose and personal you want to get with your model. Closer=more intimate shots
So, that leads into your second shot. Cutting off body parts in odd places becomes unsettling. If you want her arms to be part of the subject (which it looks like they are), include the full arm. Try not to cut off fingers or elbows. Good framing for the second one would be having her eyes almost in the centre of the top-right 3rd grid, hands in the middle grids one on each side with her torso in the middle, then elbows in the bottom grids. Try to use leading lines in the empty space to direct the viewer's eyes to where you want them to go. In this case, I'd say it'd be to her eyes and expression. Which is where you tell your story. Is she happy you're awake? Sad? Scared? Worried? The face is where you tell your story. Expressions are probably the most difficult to tinker around with. Resting face in 1st one looks okay and conveys to the viewer, "She's ready...why are you not? She's getting bored waiting for you" But, you can change that story. Maybe she's nervous waiting for you, anxious for your date to start, happy to see you after so long. But, resting is just fine too. Second one, I'd give her some kind of expression. Her hands are saying something, but her face isn't.
Please don't take these criticisms harsh.
Good point on both of those. The first one, I just wasn't paying close enough attention on the positioning. I was more concerned with figuring out how to light the scene (I've been spending most of my time trying to figure out lighting.) The second one is supposed to be the main character waking up and seeing her face. Having her hands just disappear breaks that illusion, so I'll have to adjust that (plus the lighting). Thank you for the feedback. It means a lot.
The more and more I learn about this program (and visual storytelling overall), the more I realize the importance of lighting. I've got about ten more renders of that first scene, with different lighting already, trying to learn from each attempt. I've also been watching a ton of videos on YouTube about lighting. So far, I've gotten much better feedback here, than I have ever gotten on the game-making side of things. It is really appreciated.
I definitely want to upgrade the skin first, then the hair. As for your first point, I do all my render from a camera (none from the viewport), so I must need to change my camera settings if it looks like I'm rendering from my viewport. I'll definitely have to look into the Rule of Thirds. Framing my shots is something I'm planning on spending a lot of time working on in the next week or so.
As far as expression is concerned, I'm an empath, so I really play off facial expression in real life. I'll really have to think in terms of how I would read the character if I was the one actually interacting with them.
Don't worry about the criticism. I livestream a game I'm mediocre at on YouTube. I've learned to have thick skin.
I've been playing around with my first scene's lighting in between games of Battlefront 2. The first one is a little change to the lighting, the second one is a warmer color, but low lighting, while the third one is low lighting, but cooler color.
I really wanted it to be bright on one side of the face, but then slowly darken. I've got a long way to go before I figure out how to do that right.
Just a few comments, definitely not complete and definitely very subjective, maybe some of it is helpful to you!
- Yes, you need to work with a better skin. V8 is free today, her skin is pretty decent!
- A woman who dresses like that and has (relatively) elaborate hair like that probably wears make-up!
- Work on facial expressions! They are quite difficult to get right but in my opinion it's worth the effort.
Right now the rocker chick looks pretty vacant. The lady with the braid has an expression I can't read at all. And if it's supposed to be a POV shot then I think the character should be looking directly at the camera. Right now she's almost looking at the camera but not quite, which is very distracting.
- For lighting, have you looked into HDRI's? That's pretty fundamental, you should start there.
For a scene like yours I would start by placing a HDRI like this free one then go from there, adding point lights (or whatever) to further illuminate your character.
Oh wow! I didn't know Victora was on sale! Thanks for the info my man! I snatched her up.
In regards to using the camera, the further you are from the model with the camera, the better. Proportions look better. Back up at 200-300M (if you scene allows it), and use the view distance to zoom in on the character. Also play around with Depth of Field. The red and green cross in the DoF box indicates which part will be sharpest in the image. Position this right about at eye-level with the model. That will add depth to the scene. Once your camera's in place, click on each eye and under "Parameters/Constraints" select "Point at: Camera". This way, the model will be looking dead-on into the camera.
And yeah, play around with the emotion sliders to throw a bit of character into the faces. The canned ones aren't too bad. Personally, I prefer the more subtle emotions, setting a smile or flirtatious look at about 25% or so. I find it's enough to convey some emotion in the character without going overboard...unless i'm looking for some kind of over-enthusiastic expression. Sometimes, though, I do like the resting face. When the model's bored, zoned out, or pensive. Though, this still gets conveyed through the position of the eyes.
When it comes to the lighting, this is probably one of the most tricky things of any scene. Lighting is what conveys the overall mood of what you're trying to capture. As a viewer, I'd be frustrated with the darker images if that's all that was offered. If there's a reveal at some point in a series of pictures (dark figure lurking in the background, she steps into the light and her features are revealed) this is fine. If you're going for a one-off and want a warm, intimate mood, the background lighting is just fine, but I would throw some extra lighting on her in the same colour temperature and maybe have some dramatic shadows elsewhere. She is the subject of the image after all, right? Put her in the spotlight. Maybe step up your ISO to 150 or 200.
@livepassioneveryday well done for studying and playing with lighting. I recommend looking into 3 point lighting rigs. They are simple to set up and if focussed on your central character allow them to stand out against a back drop. Used in conjuction with HDRI lighting (I buy up any offers on HDRS all the time), then you will get the best of both worlds (the scene lighting the figure), and the shaders on the character + clothes reacting to the lighting rig. For example (just a quick WIP to demonstrate, not a great example but an example).
Here is Bonnie against an HDRI backdrop. Now I haven't matched up the scenes lighting with the rig accurately, but you can see the character stands out and the rigs lighiting plays with the metal on her costume, her hair and skin. The HDRI is also lighting the figure. The combination plus choice of duller backdrop, plus a bit of depth of field on the camera, gives me a range of lighting and display options.
By the way, I create to animate so if that is where you are heading as well, then you might be interested to know this "cheap/quick" ligthing set up rendered out in just 15-17 seconds per frame!
Thank you everyone for the feedback. I think I'm going to take the candlelight photo, and start playing around with all the advice ya'll have been giving me. I'm looking around for some good skins right now, and learning about HDRIs.
I just started playing around with animation a couple of days ago. I'm not sure how much of it I'll do in the future, but I enjoyed learning how to do it.
Put some new skin on her, and used an HDRI. Also had to fix her mouth. Apparently I had applied a smile to her blank expression, so it looked funky when I added an expression to her. I did some face and bust sets for RPG Maker. Considering I started using Daz Studio to create characters for a game, it is kinda funny that I haven't even worked on the game for about a week. All my time has been put to learning how to use Daz.
Those look pretty decent, as far as I can see!
Looking good! I'm still a long way off myself, having only really used it for about 10 months or so now.
For myself, I find it helps to look at other content creators and what they do. Trying to study how they set their lights and textures.
That is totally normal ,I got into DAZ Studio to help me visualize fairies and mermaids to sculpt in clay or wool .......while occassionally it works that way ,ummm no mostly I'm in DS trying to learn it , or how to do stuff ,posing ,texturing etc .and the time does fly !! Welcome to the madness!!