DAZ horse and rider - posing help
 taliren.silverhawk_0856f45c6a
Posts: 19
taliren.silverhawk_0856f45c6a
Posts: 19
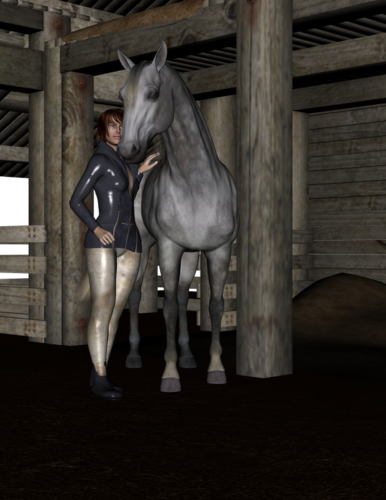
I recently bought the DAZ horse pro bundle because it was on a major special ($22 USD!) and I'm doing really well with bridleless and riderless renders - I'm a natural horsemanship rider, and I don't really do bits. But I wanted to do a render with a nasty girl from a book I'm writing, and I have everything sorted - skinny little white bucking pony, riding gear, crop, blah - but I don't know how to pose the rider's hands on the reins. Someone help, please? I'm using Genesis with the DAZ horse.
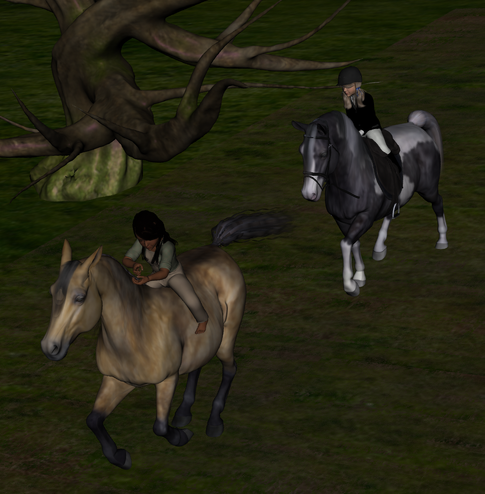
Also, that dodgy tail and general rider weirdness on the palomino is bugging me - help?


Daz 3D is part of 
Connect
DAZ Productions, Inc.
7533 S Center View Ct #4664
West Jordan, UT 84084
Licensing Agreement | Terms of Service | Privacy Policy | EULA
© 2025 Daz Productions Inc. All Rights Reserved.
Comments
The poses that come with the horse are mostly for M/V4 riders, so they will need tweaking to work properly with Genesis. You'll have to adjust the poses manually by moving the arms, hands, finger digits, as well as the legs, using the sliders in the Parameter tab. For that, you have to select them in the scene tab first.
The same goes for the tail; if you select the tail, it will give you movement options. The tail is also split into segments, so you can move them individually.
If you haven't done manual posing before, try these:
http://www.daz3d.com/help/help-daz-3d-video-tutorials/
If that doesn't help, I can make screenshots for you once I get home after work tonight.
EDIT:
http://www.daz3d.com/pegasus-drama
It might work for you if you do bareback poses.
http://www.daz3d.com/walking-trotting-cantering-galloping-and-jumping-actions-bundle
has poses for G1. They still might need tweaking, as they are set for a full scale adult; if you are applying them to a teenage scaled character, they will no longer fit properly.
Thanks :D I'm a bit of a novice (as is obvious by my less-than-perfect renders) so thanks for helping.
No problem. Let me know if the turorial videos helped. If not, I can pose the instructions for you.
It's still not much of a success - would you be able to do that, then? This is as far as I've got :(
Okay... Sorry for the wait.
Picture are counted from top to bottom.
The first picture is my starting point - using one of the horse poses and a teenage character with the rider pose that belongs to the horse pose.
Some basics first. I apologize if this covers things you already know, I just want to make sure :-).
Most characters have bones, which allows you to create poseses and manipullate them. You can see if a character/item has bones by selecting it in the Scene tab (shown in the second small image and marked with a (1)), by clicking on the small, downward pointing triangle. The bone structure will unfold. More on this in the second post. :-)
Some also have built-in morphs that can be accessed through sliders in the Prameter/Shaping tab. To access them, you first have to select the item you want to manipulate in the scene tab - in this case the tail (Marked with (1) in the second image). After you select the tail, go to the Parameter tab (If you don't see it, activate it under Windows --> Panes).
In the parameter tab, you will fiond two sections. One is called "Actor" and one is called "Pose control".
Let's have a look at the "Actor" settings first. Once you click on the small triangle, you can see the subcategories (see picture 3). One of them, in the case of the tail, is "Shaping". Here, you can influence various aspects about how the tail is formed, which are listed on the right side, each with a slider. You can manipulate them by sliding the slider left to right. I suggest you play around with them a bit to see what exactly they are doing.
Further down is the "Pose Control" (in image 4). In a human, here you would be able to access, for example, facial expressions. In our horse tail, you will find some movement presets, which allow you to manipulate all the swish-swoshing aspects of a tail. :-)
As with the "Actor", click on the small triangle next to the word "Pose Control", and it will show you the subcategories. One of them is called "Movement". If you click on it, you will see the movement sliders. Feel free experimenting around with them. :-)
In image 5, you can see the result of playing around with the movement- and shaping sliders a bit.
A word of caution - some manipulations can only be seen properly when you actually render, and sometimes, what looks great in the preview window doesn't look as hot in the render, and you will have to readjust settings.
Off to the second part, which is the actual joint manipulation.
In picture 1 of the previous post, you saw that my rider was not really positioned well.
I fixed this by selecting Genesis (check (1) in the first picture of this post) in the scene tab, and using the "Transforms" in the Parameter tab. Generally, X will move the character left/right, Y will move the character up and down, and Z will move it forward and backwards, if you are starting at the default loading position. You'll have to see what the movement direction actually is once you poisitioned your character and camera.
In the second picture, in the scene tab, I clicked on the small triangle next to Genesis, to unfold the bone structure. There are several shortcuts for doing this, but the easiest way to manipulate a certain limb is to click on it in the viewport once you selected the character. In my case, I will start out with the Shoulder, which is the upper arm area.
What is important to remember is that the most important swection of the character is the Hip bone. This is the bone which decides the basic position; all other bones move in relation to it.
I have selected the Left Shoulder (3) in the scene tab.
In the Parameter Tab, you can see that the title has changed to "Genesis: Left Shoulder". In the "Transforms" (4), you see that the Y, X, Z now has been renamed to Bend, Twist, Front-Back. To the right, you can see the numbers, which represent the current position. When you move one of the sliders, say, Bend, you will see how the limb changes position. You can also make "slow" adjustments by clicking on the + or - on the left and right of the slider bar, for better control.
In the final image, I have moved the forearm a bit so it gets to the mane posision. From here on, I would go and manipulate hands and fingers, until I am happy with the position.
Unfortunately, there is no "quick fix" for pose twisting.
Find out what bones you have in an item, what morphs are available for them. Sometimes, the creator of the item has already added movement adjustments (like, Aave Naiven does for the clothes).
The rest is practicing a lot. The more experience you get, the easier it gets, but the beginning is always a bit frustrating. :-)
(Also, check the reigns, they come with some movements and shape adjustments. You should be able to stretch them into your character's hands.)
I hope this helped you a bit with the basics. Let me know if you need additional explanation. There are no stupid questions, just stupid answers. :-)
Thanks very, very much. I'll sit and have a tinker with all of that :D