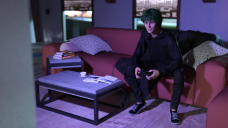
How to remove noise?
How can I adjust my render to fix the noise that can be seen on the windows and back left corner?


Beau Game 2.png
2560 x 1440 - 6M
You currently have no notifications.
How can I adjust my render to fix the noise that can be seen on the windows and back left corner?


Licensing Agreement | Terms of Service | Privacy Policy | EULA
© 2025 Daz Productions Inc. All Rights Reserved.
Comments
Have you tried the Denoiser?
You'll find it in 'Render Settings', the last item in the 'Filtering' section.
How many iterations did your render take?
A bit of theory behind the words :
- Let's say you choose to set Max Samples to 2000 (Render Settings > Progressive Render > Max Samples). Render will stop at 2000 Rays samples. But this is unprecise especially if you render while you're sleeping or away.
Personal advice for better resuts : set the Max samples to a huge number (10K or more), set the Max Time (secs) to a huge number also. This way the render won't stop because you set a limit to quality manually. Instead, set a Rendering Converged Ratio to something high enough like 98.0% for example (don't set it to 100% or the render would likely never end), and let that percentage decide for you when to stop the render. This value of 98% will make the scene converge to a noise free result on its own without any Time limit or Max Samples influence.
- Even with a high Converged Ratio, there might always be noise in some complex areas (refraction, etc.). Sometimes, it's better to render a whole scene with more simple materials and Spot Render later complex areas : like for your window, you could simply hide the window object with glass shader during the main render to speed it up, then show the glass window and Spot Render that area to get a fast and clean result of that area of that specific part of the image. You can then composite the main render and the Spot Render(s) with apps such as Photoshop.
Denoising :
You don't want the denoise to compute too early. It's preferable to wait until pixels receive enough light information from the bounces of rays before letting the denoise kick in.
I'd estimate in such an interior scene with transparent materials and a rather high blur (Depth of Field) to plan on let's say 1800 Max Samples for a decent result. So, even when you set the Max Samples and Max Time to VERY high values and decide to relate on Converged Ratio (which is always preferable in my opinion), try to estimate the Max Samples your scene would need and set the Post Denoiser Start Iteration to something close to that : in this example, I would set the Post Denoiser Start at 1700.
Denoise values that I used for a while and that give excellent noise free results without "smushing" pixels (as default denoise values tend to blur the final result a tad too much to my taste) :
Noise Degrain Filterin : 1
Noise Degrain Radius : 1
Noise Degrain Blur Difference : 0.010
Post Denoiser Available : On
Post Denoiser Enable : On
Post Denoiser Start Iteration (depends on the scene) : 1700 (this example)
Post Denoiser Denoise Alpha : Off
- A good way to estimate (But with practice one does it in one's head) when to start the denoise, is to Spot Render a complex portion of the image, like the back window with blur, and wait for this render to become clean enough. Then you remember the ray iterations of that render and use that info to decide what'll be the value for the Post Denoiser Start Iteration.
- There are others, sometimes faster ways to get noise free results. You can for example render your image in a slightly higher resolution than the one you need. And later scale down that noisy but HD render in Photoshop, Luminar AI, Topaz Gigapixel AI, etc. with or without resampling, to the dimensions you needed at first. The interpolation will average pixels' color, thus "denoising" the image. I personnaly prefer the hard way (3D calculation) than the soft way (2D fixing). But Nvidia does that after all (DLSS) and manages to end up with lighting fast calculation and crisp results. So... ;)
Good luck.
P.S : Don't hesitate to ask precisions to iRay developpers, it's a small team and usually they answer : https://blog.irayrender.com/
There are also some useful insight that help to understand how to use iRay properly in their blog.
Hello,
I have followed all of HanSolo's tips and still have a lot of noise in some scenes, like the following. Even after a few hours of rendering, it's not much better than in the screenshot. Any tips?
Thanks Heidi
Which GPU do you have?
NVIDIA GeForce RTX 3080
RAM 32 GB
"Hours of rendering" normally means falling back to CPU - either because you do not have an nvidia card or the scene is too big for your VRAM. In those instances you first need to look into either hardware upgrades or optimising the scene before worrying too much about noise. Or failing those two options setting the render to run overnight. This is just because CPU rendering is VERY slow compared to GPU rendering.
It looks like you have set the denoiser to not start until iteration 8,500 which does seem incredibly high. Have you tried it at 1700 as per the tips referenced?
Other than that, you have lots of emissive and reflective surfaces and so I imagine that particular scene would always take longer than a similar one that was set in a current-day environment instead of a cyberpunk one.
@SofaCitizen: the Post Denoiser Start Iteration makes no difference, I tried it with 1700 at first time. I have a NVIDIA GeForce RTX 3080 and I think it should create such scenes, but I find out, that my NVIDIA settings for DAZ was not optimized
but at the end .. it was the DOG I deleted the dog respectively the fur and it works. I don't know, what the problem with it is, but it makes a difference ;)
Thanks Heidi
Oh, that's the card I have. So, I would say you are generally correct that it should be possible to have a single figure, outfit, hair and pet in an environment and be able to render that fully on the GPU as it should not exceed the VRAM. However, not all assets are created equally and some are a bit more hungry for resources than others. However, I have rendered some scenes with the Daz Dog in a variety of types and not really noticed it being overly problematic (atleast not rendering-wise) so I still think it's likely the combination of everything adding up that could be causing a tip-over into CPU rendering - e.g. potentially it would render fine if you also left the dog and removed the model instead.
Unfortunately I don't have the Cyberpunk Metro Station product so don't really know too much about it. It does seem from the promo pics that there are more things in there that are not featured in your scene so you could try removing/hiding some items that are not visible - e.g. the illuminated maps (other than the one in the back), overhead screens, turnstiles and vending machine. Something like the Camera View Optimister product would do that automatically but you can do it manually if you don't have it. That may be enough to keep the scene as-shown under the VRAM limit.
Another option you could try is to keep your current dog-less render image to one side and then - without moving the model - remove/hide her hair and add the dog back in. Then change to the spot-render tool, change the setting from viewport to new window and draw a square across the viewport that covers the dog and it's reflection in it's entirity (including behind the girls legs). When you release the mouse button it should start rendering just that particular portion of the scene - and hopefully it does it on the GPU. If it does complete then make sure you change the output to a PNG and save as an additional image. You can then open your dogless image in whatever image editor you have and overlay the spot-render which should fit in place exactly and thus add the dog to the scene. So you can then merge the layers and save the composite image.
A further option could be to reduce the texture size of the images in the scene, but that would be a pain to do manually so only really an option if you have the Scene Optimiser product.
Alternatively, if you are happy enough with what you have now you can ignore all the above :)
@SofaCitizen Thank you so much for the explanation. At first I reduced the textures for the dog .. Yes I did :) I rendered the picture in 3 seperate layers. BG with dog without fur and the girls shoes, dog with fur and the girl (this takes the longest render time and the girl was noisy) and at last the girl.
Now I have a result I can live with :)
No problem - I'm glad you managed to get the scene put together in the end. It can be frustrating when things do no work as you want "out of the box" but there are plenty of tricks and methods to working around issues and it's always better to not let hardware limitations stand in the way of making the scene that you want. It can be a little more work but often is worth it in the end :)
I don't have the dog, but does its fur use Strand Based Hair ?
The shader used by the older SB hairs can gobble memory like there is no tomorrow (I had a scene needing 32 GB or ram when rendered on my Mac, so CPU only and half that memory was used by a Strand Based Hair with the previous shader) so if the dog's fur is using SBH, with the dog, the scene may be too much for the 10 (I think it's 10) GB of your video card.
If it's the case, a solution could be to replace the Dual Lobe shader (I think it's the name of the old SBH shader) by the much more recent Omnihair shader. Here's a discussion about it:
https://www.daz3d.com/forums/discussion/675841/omni-shader-hair-thread/p1
Maybe you could try looking for a luminance value on the firefly filter. I do not know the relationship between the luminance value of the firefly filter and the intensity of the lights, the visibility of reflections and refractions and their intensity or color and black and white value, and the dispersions of the materials. It seems to me that there is a balance between these values that make the granulate appear, and that can make it less visible or need less itinerations to solve it, perhaps this is simply nonsense. But in the Iray preview, depending on whether there is a lot or little intensity of lighting, adding more luminance or reducing, deactivating the denoise or post denoise filters you would have to see it in the first itinerations, if you configure for example the progressive render in 30 itinerations that also affects the preview in Iray of the viewport, increase or decrease of the grain, more or less white dots in those 30 itinerations or 25 or 40 and can help to configure that value . But I can't tell you what the luminescence value of the firefly filter does on the non-grainy parts.
Enabling the optimization Guided Sampling option in the render settings says it helps to solve these situations a bit better and helps the firefly filter and noise eliminators.