[DAZ3D] Artefacts
 vascoaredji
Posts: 28
vascoaredji
Posts: 28
Greetings !!
I'll try to do my best to describe what bothers me in this particular scene...
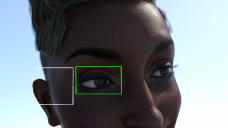
What should I do to avoid the artefact within the "white square" ? It is rendered in this scene and not on the other scenes this model "Kala" is present. The position of the model is the same, only the orientation changes.
On the other renders from the same model this "related to hairs" artefact is not drawn.
These hairs don't feature "head size" to be modified so... it is frustrating.
Concerning the issue within the "green square" I just wonder which parameter(s) I have to modify to avoid the eyes to mirror the surrounding lights ?
I can't remember which Bulge/Cornea Raised amount but it is less than 25%.
Daz 3D is part of 
Connect
DAZ Productions, Inc.
7533 S Center View Ct #4664
West Jordan, UT 84084
Licensing Agreement | Terms of Service | Privacy Policy | EULA
© 2025 Daz Productions Inc. All Rights Reserved.
Comments
Those are coming from the hair cap that doesn't fit properly this custom Genesis 8(.1) Female morph. You can solve the problem in several ways :
1- Resize the cap. There might be a parameter for that hair bundle in the Parameters Tab, it's usually called "Expand All". Reduce the hair size of 1 or 2% and it should do the trick.
2- Render the image with Cutout Opacity set at 0 in the Surfaces Tab for the hair cap. If there isn't a Surface just for it, you can select the cap with the Geometry Editor tool and create a surface from selection (right-click in the viewport, Geometry Assignment, Create Surface from Selected).
3- Render the FULL image once with those artefacts. Then hide the cap from the Scene Tab if it's possible, or change the Cap's Surface Opacity (Cut Out) to 0% in the Surface Tab. Then you Spot Render only those areas with artefacts (Alt+Shift+C > Tool Settings Tab > New Window)
You'll then have a full render with artefacts + Spot Render(s) without artefacts. Mount the renders on layers in a 2D app such as Photoshop. Set a black mask on Spot Render layers. Paint the mask in white to display only the pixels that need to be replaced.
4- Send the Genesis and hair, in default position/no Subdiv, to Blender or Zbrush. Then use Edit Mode > Mesh > Transform > Push/Pull (in Blender), or Tool > Deformations > Inflate (in ZBrush), to move the cap's vertices inwards. Or manually move the open edges of the cap inside the skull. Then load that modified cap as a morph in DAZ. This way it'll be fixed once and for all for this scene if you plan to make multiple renders.
------------------
For the eyes, check your cornea's material in Surface Tab. I guess playing with the Glossy Roughness should do the trick (?)
Wow !! I'll get back with all tricks done in the way described in your answer !!
Thx !!