Messie Ness 0.0.1
 Ender
Posts: 23
Ender
Posts: 23
Hello all,
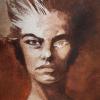
I was working of my first morph of Messie Ness a character I am developing for a Web comic. This work is intended as a reference that I will use for the comic. I also plan to share the resulting morph (and those that will come in the future) as she evolves and produce some renders... Maybe even a story rendered in DAZ or Blender, who knows?
Don't take it as a definitive product. The shape is still far from the actual facial traits I imagined for Messie, though I am happy of the result so far, also because I am proud I have been able to understand the roundtrip workflow using DAZ Studio Pro and Blender and at least it chatches her personality.
I taken this picture from an extreme witn a 18mm focal length. The reason for this angle and the focal length is that with the advent of smart phone cameras, that usually have short focal lenghts, everybody started to publish selfies (especially OnlyFans girls) with this kind of perspective/distortion (and I didn't add lens distortion, vignetting... yet). We became so accostumed to it that this is what our brain evaluate as authentic. At least these are my observations on the base of other 3D works considered to be very realistic (there is an example in particular that comes to my mind but I don't have the link anymore).
I am not sutisfied of skin and in particular the amount of Sub Surface Scattering. The material looks like plastic and I don't exactly how to tune the values in in DAZ / Iray. I made some attempts to modify SSS values but it looks like nothing changes.
Also I don't like the nostrils: they look too "dolly".
Sculpt in Blender
I also found difficult to sculpt in Blender. The mesh expored from DAZ is quite "low" poly and it's complicated to sculpt the details. In particular I was working on the features on the side of the mouth that every human has. The original shape was too smooth in that area.
I am not certain if there is any solution to this problem. Every tutorial I saw tell to set "Resolution Level", in "Parameters" pane, to "Base", before exporting and I don't know if I can change the "SubDivision Level" value and export a higher density mesh or if I can leverage the Blender multi subdivision modifier (for example) to sculpt the shape at a higher subdivision level without affecting the original mesh vertices order when exporting back to DAZ Studio (I guess I have to try).
Mess up with Messie
Also I messed up (after all she is Messie Ness) with the teeth. I don't know... Those morphs "Mouth Realism HD" and "Mouth Realism 8.1 HD" sounded so good too me and I set them both to 100%  and exported I'd never imagined that their effect was to make teeth very irregular.
I used the default hair for Genesis 8.1 Basic Female just to give her some hair. I plan to model her hair soon: i know exactly what I want.
Original Assets
The starting shape, developed in DAZ Studio, is based on these free products:
Cora Character Morph For G8 and 8.1 Female by HumanXYStudio
SY 200 Free Morphs Genesis 8 by SyckleYield (which apparently works even with Genesis 8.1)
Nyotengu for Daz Genesis 8 *DOWNLOAD* by TaliDesade
Process
Then I exported it in Blender 3.3 for further editing. In particular I was happy with the face but not the body (too thin) but it was not possible to apply only the face morph of Cora because it is a full body morph. So I used Shape Keys in Blender to obtain a mid way between Cora body and the default Genesis 8.1 Basic Female, while keeping the Cora face morph at 100% since the Shape Key is applied only on a Vertex Group that doesn't include the head vertices. To get a smooth transition around in the neck area I modified the Vertex Weights associated to the Vertex Group. Finally I sculped the face a little bit in particular around the mouth and a little bit on the nose bridge.
And now... I don't know how to save the morph. But I guess that have to save it as a product.
Daz 3D is part of 
Connect
DAZ Productions, Inc.
7533 S Center View Ct #4664
West Jordan, UT 84084
Licensing Agreement | Terms of Service | Privacy Policy | EULA
© 2025 Daz Productions Inc. All Rights Reserved.
Comments
Sorry, but please see Acceptable Ways of Handling Nudity