IRAY rendering issues, block-shadows and not obeying "NO render" rules.
 JD_Mortal
Posts: 760
Here is the issue I am having, starting with the greater issue... Shadows.
This has two lights, one (due to the messed-up values), is nearly "OFF". (I am using it as my ambient light since I can't find the ambient light settings and there is no ambient light, light... (Should be a setting of the sun-light, AKA: Distant light. Which is backwards, as "distant" = "not strong", unless it is the sun, which is still "not strong" on Earth, compared to being on Mercury which is not so distant from the sun.)
The second light is a standard spotlight. I have a "Circle" form for the soft-edges with an edge-softness of 20-units.
The other settings, because the lights are not tuned for IRAY yet, are crazy values of 10-units for the "Factor" (As opposed to the standard 4), with intensity up to 200% (as opposed to 100%), and Lumins up to about 32,000 (As opposed to 1,500 for the default) {All that, just to make it equal to the defaults in the other rendering engine and GL, which makes the light blinding in the on-screen view which doesn't match the rendering at all.}
However, that isn't my primary issue. (But it does lead to the secondary issue of lights not obeying the ON/OFF setting for render/scene/visible)
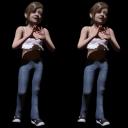
The issue is portrayed in the stereoscopic image below. (Both are the same image, just stereoscopic, not two images for comparison.)
The shadows cast from the arms, onto her chest, are as expected. They show the soft edge from the circular 20-unit sized light-volume, mini-sun. However, on her legs, the shadows are light-cast shadows without obstruction, and they have hard edges and completely ignore the "soft surface", drawing "boxes" for each quad or square-true surface on the smoothed surface. Yet, in the preview screen, in DAZ, the GL has those shadows perfectly smoothed across the smooth surface normals.
This also shows under her nipple, where the cloth protrudes from the models form. However, that surface is NOT a cube, but it is still drawing a cube shadow, floating on the curved surfaces. Again, it shows on her under-side arms, mostly on the arm on the left-side of the image, where the shadows have that zipper-look, hard broken shadow lines where it should be as smooth as the ones obeying the model smoothing surface. (Harder to see those ones.)
Not in this photo, is a rendering of hair, with opacity, on some models, it looks like "dust bunnies" rendered on top of the models heads, in the hair. There are no protruding "translucent surfaces", the dust-bunnies just appear from nowhere, floating above the hair, usually at the top-side parting-line of the hair-do.
The secondary issue I am having is that the options to "Not render" lights is not being obeyed. If you tell it NOT to render in the rendering, it stops rendering on the screen too. If you tell it to NOT render on the screen, it renders on the screen and in the rendering. If you turn it off, in the screen, by hiding it, it doesn't render in the render, or on the screen.
The only reason I am trying to hide lights, is because the screen is not taking the "Lumins" value into account when lighting-up the preview, so everything looks black, and impossible to edit. So, I add another light, that I DON'T want rendered, to light-up the screen, so I can see what I am editing, and it is rendering, causing blinding-white renderings with the second light that I tell it NOT to render. (Which is also an issue with the new values not being taken into account, as the "distant light" has to have values of 10% brightness (instead of 100%), with 4 luminosity (instead of 1500), so it does not blind you when rendered, because it renders pure white, but on the screen, everything is pitch-black, the opposite of the spot-light which blinds you on the screen, but renders black with default values.
Those settings need to merge, combining the luminosity, or just replacing the luminosity with brightness, or vice versa, where you use one OR the other, not both. (There are getting to be a lot of double-redundant and nested values, adding to the confusion.) You don't tell the sun to spit-out 10K lumins, and 50% brightness, then again, in the rendering, adjust the brightness and luminosity again, and strength, and intensity... They are all the same value. If you are wasting time rendering the same value ten times, when one works fine... "Luminosity" or "brightness" (Same). You will speed-up rendering 75%, instead of slowing it down 75% to render stacked lighting that is poor-lighting stacked on top of HDR lighting, on top of ray-cast lighting, on top of gamma-surface lighting. It isn't adding more reality, it is degrading it and causing issues. One light, does it all... Once you pick one rendering engine, that only uses one, or the other, it just uses that same value, for all settings. (I believe the standard scientific and RAY-cast term is actually "Photons", which is the only light source you ever need. Ambiance is not light, it is a surface-mod to all the image files or a zero-adjust to the BLACK on all the shadow-maps. Solid rays are the same as soft rays, as soft-rays are just altered and stacked solid rays, which later get blurred if you are using that setting. If not, then it's just ray-cast, and still the same light-ray.)


Comments
Once you set the lights to the real light values you want you have to set the camera values to see them. Iray uses two camera settings. The actual camera that you are viewing through to set the DOF and the camera settings in Tone Mapping that sets the 'brightness' of the scene the same way you would set up a real camera for different lighting situations.
Window>Preview Lights will switch to using the headlamp for sceen set up, no need to try using a second light (which won't work as you desire unless you manually switch it on and off when posing ore rendering).
If by ambient you mean image-based lighting that's in the Environment group of Render Settings - turn on one of the Dome options, with or without Scene (local lights). Don't use an actual modelled sky dome with Iray.