Artists and their Tools
 Dartanbeck
Posts: 21,623
Dartanbeck
Posts: 21,623
I chiselled stone for more than thirty years. I also like to paint, sketch and create digital art. Each of these forms require different tools.
I could try and sketch with my stone tools and I can sketch on stone. Taking my chisels to my computer would be a disaster!
That said I'd like to try and explain that, although I did spend a good amount of time lately learning Daz Studio, I'm never 'jumping ship' from Carrara, like some folks might have thought. Just expanding the tool range. Why?
 There's a thread in this forum regarding the use of Genesis 9 in Carrara, and it's a good one. I think it's really cool that we can get Genesis 2 through 9 to work in one way or another in Carrara.
I bought Misty's Genesis 3 presets for Carrara and also have the ones she made for Genesis 8. They do allow me to bring Genesis 3 and 8 figures into Carrara, and I've done so on many, Many occasions.
Now, when I load Genesis 3 through 9 into Daz Studio, I can literally give them a pose and render them in Iray, and not only do they work, they really look good!
So I took the time to learn how to animate in Daz Studio along with getting (at least a little) familiar with Iray and OctaneRender within. Compared to Carrara, Daz Studio is a cludgy, headachy disappointment when it comes to animating. It's like it tries hard to diminish my attempts to do so.
Before this whole endeavor I used Daz Studio for other things like adding Triax rigging to older Poser-style rigging, adding new morph target posibilities to the figure so that I could more easily add full-body morphs while working in Carrara, without having to unloack the figure, creating custon aniBlocks and so forth. It was, as Haedwax
calls it: my Carrara Plugin.
Using what I've learned over the years on working in Daz Studio in this limited way, I was able to create my own custom tools to help me animate directly within Daz Studio in a much more efficient, less headachy fashion. For how I work, this was a lot easier and faster for me than trying to get any one of those figures to do in Carrara what I need them to do - and the end results are a lot better, in my honest opinion.
Genesis 3 introduced a whole new figure architecture that plays more and more toward what professional filmmakers are expecting to see in a commercial figure. Big difference that the average user might not notice much aside from the fact that it's a new, different figure setup. Genesis 8 took that many steps further and then came Genesis 8.1 and now 9. This not only helps Daz 3d get these figure more widespread into cinema and professional use, but it also adds a whole set of newly improved system to the software that's meant to make it shine - Daz Studio.
So that's why the
analogy at the into of this message. I could paint with my chisels and get it to work - and maybe I will from time to time.
Carrara is still my Powerhouse when it comes to everything that doesn't include working with Genesis 2 - 9. So I'm grateful that I have it.
Daz Studio renders to alpha by default. Bonus! Didn't need to learn that!
In my early tests with this process, I would take my resulting animated renders from Daz Studio, apply them as an animated texture map to a plane in Carrara, and have my actor directly in the Carrara scene as I work and ultimately render. I can still do that and in fact I plan to be doing a Lot of that. But when it comes to my main heroes, it's really nice to keep them as separate 'layers' to be used in my movie composites. Since they're not being baked into the final render, I get a Lot more flexibility on how the end result turns out.
Genesis 3 came out at a time when Iray was introduced to the world and was incorporated into Daz Studio, so it's the
generation that started getting these amazing Iray shaders thqat came with the character products we buy from Daz 3d. Genesis 2 can work in Carrara, but the auto-fit mechanism in Carrara sees it as "Genesis" and doesn't know that Genesis 1 items should be changed to fit. For me this poses a Huge problem working with that generation in Carrara. I will use Genesis 2 in Carrara, but only if I'm okay with using Genesis 2 (only) conforming items with it.
In Daz Studio, auto-fit can literally work with any figure - period. It is what contains the toolset to make it so - and it works brilliantly.
Diomede and I attended a webinar that shows how to create a character convertor that takes Genesis 8 character shapes to the new Genesis 9 as a new morph. The process for making Auto-fit Clones is incredibly similar to that same process.
Once made, Daz Studio will know what to do from there.
I'm using very similar techniques to be able to make my own animation tools that reside directly on the base figure as morph dials, even though they aren't morphs at all. This took a bit of hit and miss attempts and a lot of head-scratching. But it
was So worth it.
So when it comes to making figure compsatible with Carrara, the best solution for me is to simply use the best tool for the job at hand. I use "Animation" as my reason, but these same techniques work very well for the still artist. Most professional illustrators using these tools will take their renders into an image editor like Affinity Photo along with other elements, sometimes (always for me) with other renders and combine them using layers, crafting them into their final result. VFX artists do the same thing for films. The tools are different because they're working with many frames instead of one, but they're So Incredibly Similar in how they work and how we use them.
Blade Runner was released in 1982. If you watch the Behind the Scenes of that, you'll notice right away that somebody made that look a Lot more interesting than what came from the original camera footage. "Colorists" use software like DaVinci Resolve to color grade films to make sure that the colors from one shot match the colors from those that have to be cut into it. It's a lot of work and they love it. Color is what they do. Color matching is only the first step, however. They follow that with giving the film what's called a "Look", which is to enhance the contrast, alter the color - sometimes only for part of the image, like the irises of the eyes of one person, for example. Sometimes there's a whole lot of this that ultimately make the movie look the way it does.
...and since the very beginning, nobody has Ever expected the camera operator to get this final look using nothing more than the camera.
So while I did stray from Only using Carrara for my work, I only did so to make my Carrara results even better.
Cheers all, and I hope you enjoy my little explanation that I truly did Not "Jump Ship"! :)


Daz 3D is part of 
Connect
DAZ Productions, Inc.
7533 S Center View Ct #4664
West Jordan, UT 84084
Licensing Agreement | Terms of Service | Privacy Policy | EULA
© 2024 Daz Productions Inc. All Rights Reserved.
Comments
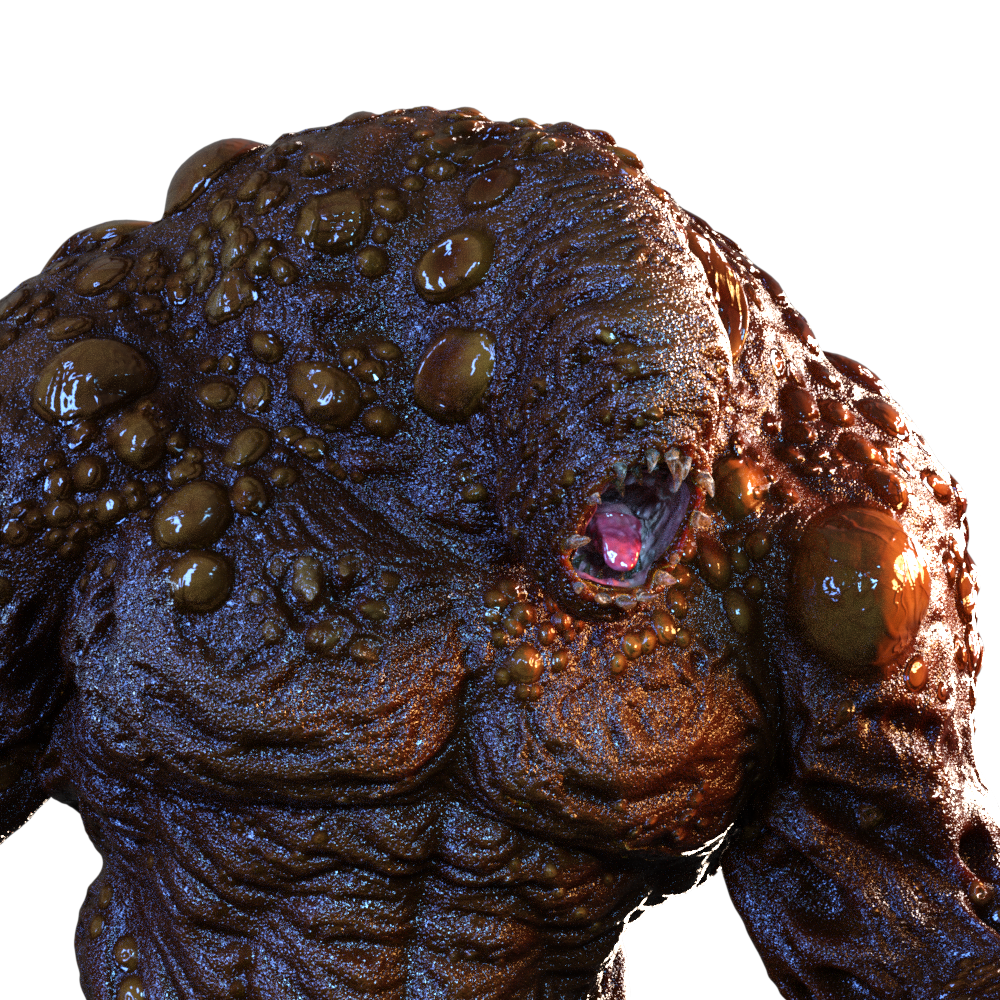
Geometry Shells are another Daz Studio stroke of genius that help to drive this point. Here in Iray, we have water(because she'll be walking in the rain in the final cut) and her Cyberlook pants have a clear plastic over the cyber-designs on her legs. Nothing but the texture maps in this scene would work for me in Carrara. I'd have to spend a l o n g time figuring out how to get this look, when all I have to do in Studio is to load it, animate, simulate, simulate again and render.
It was this hair that initiated my wanting (needing?) to learn Daz Studio in the first place.
None of this takes away my love for Carrara!
With today's modern render engines it's hard to ignore the convenience, ease and results for rendering realistic skin. Everything else too, but the skin really looks good, and the shaders that come with Iray characters can be really nice. Some are better than others, so I like to compare.
When it comes to animating environments, Carrara just plain Rocks it! Carrara's arguably dated render engine still shines brightly rendering these too.
I think that Carrara's render engine is still very formidable. I really love how it's not tied to the graphics card at all, so we don't have to apply a massive extra cost to get great renders in a timely fashion. It has what it takes to make beautiful skin too. So it's easy to pick Carrara as a "One and Only" software solution.
I have been a Carrara-Only person for a lot of years. Learning VFX and Filmmaking kinda makes it a lot easier to change that, however, because we're going to eventually be using Many tools for Many various tasks.
It was after I started working on these workflows when I started lightening up on the whole Carrara-Only thing. We already know it was the hair that made me investigate Daz Studio, but getting the above 'wet' result in Iray in not much more than a minute per frame blows away the results I've been able to get from my Carrara workflow. I know that others here can get awesome skin. I liked the results I was getting too... but this is a lot more efficient for me.
Carrara being Carrara, I can then apply that rendered result to a card in Carrara to bring her into the scene. It works really well. Although I prefer to leave them all as separate layers to bring together in Fusion within DaVinci Resolve, or also HitFilm Express.
That said, pJotter's comments in the "Bye" thread could also translate. What I'm using Daz Studio for, others might use Blender, Silo, Modo, Lightwave, Poser, or whatever makes them feel more comfortable.
And then, like the Daz promo for Carrara, break out the Swiss Army Knife of 3d and further it along any way we need to. Carrara allows for So Many ways to work... and the results can be stunning!
oooh, you got that original 'cute' back into this iteration of Rosie! Wet skin (brilliant execution) aside, she looks *awesome*.
healthy and happy holidays to all.
cheers,
--ms
(eta: loving this thread, dart - good to see you back, and in solid form)
Thanks Mindsong!
Good to see you too!
An example that will become more clear in time:
We'll begin this time with Green Screen footage of one of the actors. Since we're filming in CG with Carrara or Iray, we can simply render to Alpha.
In doing so we must know what's going to be going on all around the actor being rendered. What light is in the scene, where is it coming from, what temperature and intensity are they?
Beyond the lights, will there be anything in the scene that needs to also be in this render? Sometimes leaving the wrong things for post work can seriously prolong the VFX operations!
These images are test renders I conducted before setting the entire animation to render. Specific parts of the animation where I wanted to check lighting and hair movement. I have to be careful with this bass guitar, for the way I have it set up, it can really shine a lot of light into the camera due to the reflective nature of the finish. Sometimes I want that. But it doesn't work right if such intensity fills the entire time range of the clip. Test renders like these help to identify problems with it.
Now that the actual animation render is underway, I can watch the progress as the images are rendered, as well as to look at these test renders - to start wrapping my head around what the rest of the scene should look like. By this point we've already determined the idea, but now we decide all sorts of things like: Carrara or DS (for backplate rendering)?; Carrara or Particle Illusion? (for lighting effects); and things like that - and more.
For this, the song is outlined, but not fully written or recorded. I needed the basis of the beat and melody to animate the bass. Now I'll use the finished render and play my bass to it to check the timing. With audio and video software, timing can be changed in post as well, but I'd rather slow down the video to match the actual audio if I have a choice. The slightly slower speed of the rendered animation looks really nice for musical performances.
I already know (knew) that I'll be doing the stage in Carrara. It's just too fun to be able to animate lights and effects directly into the main render. But sometimes we have a lot more flexibility doing this, also in layers - and I often do this with Carrara as well. Keeping the visible (volumetric) lighting separate from the main backplate allows us to change what they're doing without having to render out the whole scene again - and the same goes for any other animated effect.
There's a trade off though. When I render the backplate as an animation in Carrara, I get the pleasure of matching the visible light with everything going on in the scene, lighting-wise. So everything matches. Everyone has to sleep sometime, so I just let the backplate render during those hours and check it in the morning.
Still, I'll also come back and render some of the volumetric lights by themselves against Alpha so that I have matching additional elements that I can layer in if I think they'd belong. The most obvious place for this would be the foreground, but effects like that can enhance any depth within the scene.
As for the scenery, my "What Happened on Odysseon Station?" article really helps to illustrate how I use purchased content to wrap my head around a story through the scenery, and the scenery through the story.
And are you useing a D.A.W. then ?? thanx
Digital Audio Workstation? Yes. I have a commercial license for Reaper and MusicMaker.
My Audio/Visual engineer at Pirahna North Studio finally talked me into using "Addictive Drums" for my live drums. What a dream-come-true that has been!
Only playing my digital drums for around three years, I'm still somewhat of a noob with all of that. We play so many shows I don't have a whole lot of time to study - especially since I pour so much of my time into my CG Movie production. Switching from the built-in sounds of the e-drum kit to using midi into a laptop holding Reaper and Addictive Drums 2 has opened my eyes a lot more to the possibilities.
Back when I first got MusicMaker, I also picked up the Miraslav Philharmonik Orchestra, which is HUGE! All orchestral instruments were recorded in surround from their position within the orchestra. Not that I need that, but it's nice. Using all of this, I can actually use my drums to play French Horn, Strings, anything I want! It's awesome!
Once again, having trouble keeping internet. I'll be coming and goind as I can.
D.A.W.( Digital Audio Workstation ) yeah , And there is CalkWalk by BandLab ( Windows ) And is Free
_ which was Sonar Platinum basicly/mostly still is from all seen about it _ Thanx
A sound from the Wayback Machine ... I was using Cakewalk on 5.25" floppies ...