Glass objects
 insomnia_5c322be5d8
Posts: 16
insomnia_5c322be5d8
Posts: 16
Carrara 8 pro
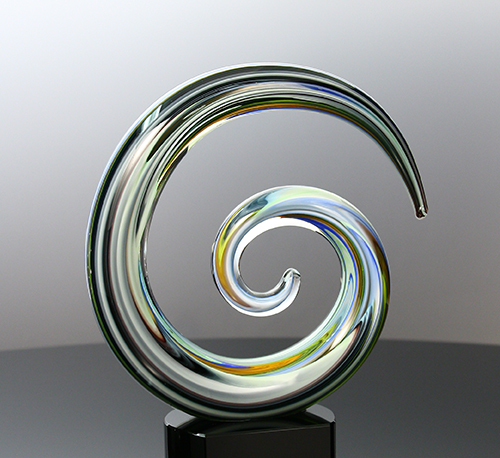
Can anyone help me find a tutorial that will help me make blow glass objects? Similar to the object below.
Daz 3D is part of 
Connect
DAZ Productions, Inc.
7533 S Center View Ct #4664
West Jordan, UT 84084
Licensing Agreement | Terms of Service | Privacy Policy | EULA
© 2024 Daz Productions Inc. All Rights Reserved.
Comments
Would you like us to move your thread to the Carrara forum,
Yes. I though I was in the right thread.
Is it something like this. There are at least two tools you can use.
One is the vertex modeller, and the other is the spline modeller.
If you give me a couple of hours, I can make a mini tutorial, how to do this in the vertex modeller.
This model was done in three minute.
The challenge is when you are going to shade it, and then render it.
HI
1./ Insert / Spline model.
2./ Create an Oval / circle shape,...(Hold Shift while dragging to size equally)
3./ Go to Geonetry / Extrusion preset / Spiral
In the "spiral" options pop-up menu,
Set the Number of turns to 1.75 for the object you posted,..(or whatever you need).
Set the length to 0 (zero)
Set the Cross section scaling to 50, and set the Spiral scaling to 25
You should now have a spiral with a thick end and a thin end,.
You can click on the "cross sections" (the oval you originally created, and the end oval shape which carrara creates) and scale or move them.
You can create more cross sections,. (Sections /Create Multiple) which can be scaled independently to create a thicker area in the middle, or as may changes in the thickness as you want.
You can also convert this Spline model into a vertex model to refine the shape, add sub division smoothing, or model some distortion to the ends to create that "blown glass" effect, like a little drippy/pulling/cut distortion.
Add a glass shader,. and render with an HDRI to provide the reflections.
Hope it helps
Varsel, that looks great and it's entirely up to you if you want to take the time to do a tutorial. I'm sure it would be helpful.
3DAGE, I look forward to trying your method.
Within the past year and a half I've been designing 3D concept drawings for glass awards and I want to learn how to create more complex organic shapes like this spiral blown glass piece.
Trying to do this so basic as possible.
Hopes this is usefull.
Insert Vertex object into scene.
Create a cube. Change object definition to 1
Using the extrusion tool, select one side of the cube, and start extruding, while holding the Ctrl key at the same time.
Release the mouse key, and do it again. and again ....
Until you have enough part to start to work with.
Switch to front view, and Center the object.
Use the manipulator tool and start to give the object the base shape.
Select hole object and Smooth All edges.
Subdivide the object. You van now refine the shape, using the manipulator tool.
You will probably find that you should have more segments to work with.
Then set subdivision to None. Select a line, and extrude a new line.
Subdivide again, and continue to refine shape.
In the end, since this is hollow glass, select hole object, and Add Thickness. To have thickness on glass, when using refraction in the shader, makes a big difference when rendering, but will add to render time.
In the vertex modeller, I'd make a Circle,with about 5 sections,. or a rectangle would do., since the final shape can be "Smoothed" as Varsel shows above.
then use the Interpolated curve tool, to create a spiral shape,. Once you've created a basic circular shape, you can refine it by moving the main vertices you created when clicking to create the spiral. the interpolated (inbetween) vertices will auto adjust smoothly as you move vertices.
You should now have two line shapes, the base circle and a spiral,. you can use the "path sweep" tool to sweep the base circle/rectangle shape,along the Spiral curve.
Select the base Circle shape, then select the Path sweep tool, then click on the spiral shape..
That should create a spiral shape,. you can then use "Soft Selection" and the scale tool, to alter the shape, to make the ends smaller, and the middle section larger.
a couple of test renders
You could also start with a 4 sided cylinder. Give it 12 segments (or whatever) and go straight to Varsel's step 5 without all that mucking about with extrusions. :)
If we are playing another fun round of everyone's favorite gameshow "How many ways can you do this in Carrara?" then I have one more suggestion: Gordon Surface.
It might be a bit complicated for this specific example but modeling things like complex glass objects is exactly the sort of thing this tool is for.
Like I said, probably too much work for this simple shape, but for more complex ones you can get really crazy with this tool.
I'm a huge fan of blown glass artwork, and, FWIW, I'll mention a couple of things that might help the overall presentation of your blown glass renders.
One of the least discussed, and, IMO, most important aspects of modelling is "imperfections". Nothing in this world is perfect, and glass is a perfect example of that.
Especially blown glass. It has tiny internal bubbles from the blowing process, and the overall shape has irregularities. And it's those imperfections that we see an subconciously associate with "real".
And an absolutely critical aspect of any glass render is reflections. Clear glass by itself is pretty much invisible. Because it's clear. The only thing that makes it visible to us are the reflections of the surrounding environment as well as the distortions of light as it passes thru the glass.
What studio photographers do to make their gorgeous fotos of expensive glass sculptures look so gorgeous is to provide stuff for the glass to reflect and refract. And a favorite technique is to provide a big, glowing, white (or other color) plane for the glass to reflect. Actually they often use multiple of these planes (aka, "softboxes").
So what I would suggest, after you've made your glass model, go back and insert some slight imperfections in the surface to give the viewer that added interest and reflections. Otherwise your render might look like a render, not a gorgeous photo of some glass. And take some time to consider specifically how you want to place reflective surfaces in your scene. Often just a small tweak in the placement of a softbox can give a wonderful glint of light or interesting reflection.
BTW, if you want to see some gorgeous images of blown glass, stuff that make me get all giggly, just Google "blown glass" and select "Images". Cool stuff.
And BTW, glass renders is one of those areas that, personally, I tend to do in another app rather than Carrara. I've found that the time it takes to get a really awesome glass render in Carrara is far more than with some other apps, and often I've been exasperated and just can't get to where I want to go. Glass is very complex and subtle and requires some really good physical simulation in order to produce a great render, especially if you're doing caustics and stuff.
But that's just me.
To add to what Joe has said, there are shader settings that you should try and use to help the glass effect, and a big one is the Fresnel effect and Index of Refraction.
For rendering, you may also want to employ caustics as well. If you do, it is important to remember that a white light in Carrara isn't broken down into prismatic colors when refracted and with caustics enabled. You can however, get the effect if you have a pure red light, blue light, and green light set to the same intensity and pointing the exact the same way. The effect is a white light, but when using caustics, it is broken apart into a rainbow, similar to how you would expect white light refracting through a prism to be broken apart. It is important to note that the effect is not a true representation of the effect, as Carrara is primarily an art program, and the renderer is biased and not a physically "correct" un-biased renderer. Caustics settings and other factors will factor into the effect.
Hmmm.... I thought I had a couple sample renders using this technique, but I can't seem to find them. I know I used it for this render, but I used them on the pool lights below the water surface and the effect isn't really that visible as it is obscured by the V4 model. The caustics effect on the pillars is a light gel, so that doesn't help much. You can kind of see the effect on the blue and white tiles on the right side of the image.
In another forum the artists mentioned everything above and: HDRI lighting to get really sharp and beautiful reflections, and upping the reflection count to a high number. I presume in Carrara that would correspond to the Max Ray Depth parameter.
- Don
http://carraracafe.com/tag/fresnel/ is a discussion of fresnel and carrara
I really appreciate every ones input. I've attached a glass image that I created as a concept drawing for one of our clients. It's not as elaborate as the spiral but this is what the client wanted. I added the color in Photoshop. I look forward to attempting more complex shapes.
Dondec, I definitely need to learn more about HDRI lighting, backgrounds and reflections especially when it comes to metal flat metal objects.
HDRIs are hugely useful when it comes to rendering anything reflective. All reflective surfaces need something to reflect, and an HDRI gives you an instant environment around your object.