Landscape Backgrounds
 JoeMamma2000
Posts: 2,615
JoeMamma2000
Posts: 2,615
One of the nice features of Carrara is the included content, including Landscapes/Terrains. And as with other apps you can also buy environments that others have modelled and textured and drop those in your scene. Nice and easy.
Or, of course, you can make your own.
I thought I'd give my 2 cents on some options and considerations for Landscape Backgrounds and Environments for those who might want to be aware of the different options they have. None of this is "right" or "wrong", just some alternatives and considerations.
First, I'll mention a concept that I tend to use very often, and that is "added value". What that means is "am I and my project getting any additional value by me performing those steps and doing it myself, or should I just use an existing library item?"
As an example, let's say you want some trees in your image. Your options are these:
- Model and texture your own tree
- Use a tree that someone else modelled and textured (ie, content)
- Use a photo that someone else (or you) took
Now the first option, do it yourself, typically requires a lot of work. So the question becomes: "Do I and my project get any added value from me doing it myself?"
Well, for some, the answer might be yes. If you want a certain artistic look that isn't available elsewhere, and you have the necessary skills, then maybe it's worth the effort. For others, a tree is a tree, and as long as it looks good and like a tree, then it doesn't matter to your overall image. Maybe the main subject of the image is a character or something, and the tree, or the clouds, or the grass, are just "window dressing" to support the image.
If you've accepted that you don't want to do it yourself, then you'll likely choose to use someone else's work. And that is either an image someone else took or a model someone else built and textured.
Now as I mentioned in my compositing thread, an image has some advantages, including:
- Ultimate realism...it's tough to beat a photograph if you can find one that meets your needs
- Minimum resources required (render time, computer resources, etc.)
On the other hand, a 3D model has some advantages, including:
- Flexibility in tweaking modelling and texturing...you can modify the fine details of a model and textures, and are more limited with a photograph
- Flexibility in 3D animation...you can animate a 3D model anywhere in 3D space, and are more limited with an image
Next I'll talk about getting the best of both worlds.
Daz 3D is part of 
Connect
DAZ Productions, Inc.
7533 S Center View Ct #4664
West Jordan, UT 84084
Licensing Agreement | Terms of Service | Privacy Policy | EULA
© 2025 Daz Productions Inc. All Rights Reserved.
Comments
Now, one of the main difficulties with expansive landscapes and backgrounds is that they are usually pretty complicated. And they CAN take a lot of time to generate from scratch in 3D.
At one end of the spectrum, IMO, are items like the terrains that come with Carrara. As far as I can tell, for the most part they are simple meshes with textures to simulate grass and rock and sand, etc. And that may be fine for your purposes. For others, a solution like that might be lacking in the quality they are after.
At the other end of the spectrum are some of the content environments, where every object is hand-modelled and intricately textured for maximum realism. Each blade of grass is a mesh, even the trash on the sidewalk. And those scenes might give you the realism you're looking for. For others, they might be too restrictive and define only a single look, and/or require too many resources in terms of render time and computer requirements.
One option is to try to get the best of both worlds.
And to do this, why not consider modelling and texturing a real 3D model (or tweak an existing), and then convert that render to an image, which is then layered/composited externally to generate a final image? That gives you the flexibillity to define exactly what look you want in your elements, and at the same time lets you manipulate those elements in real time later on in a compositing app?
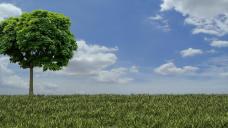
Now the image I posted has all three elements present. Real life photos, packaged content, and tweaked models. Can you tell which is which? And more importantly, does it matter?
If that image is exactly what you wanted, does it matter how you got there? Maybe not. It's up to you.
Keep in mind that every image you see is a 2D image. Every JPG you see is 2D. The purpose of a 3D app is to generate a 2D image. Does it matter if you use a 3D app to generate a 2D image? Maybe not.
In the image above, I took some modelled, 3D blades of grass and duplicated them in a 3D app. I then rendered only the grass by itself, and brought that render into a compositing app.
Once that grass is converted to a 2D image, I no longer need to spend 10 or 15 minutes each time I want to get grass in my image.
The only question that remains is "does the 2D grass image give me the flexibility I need later?"
To give a visual idea of the concept, here's an image of the 3D view in my 3D app. And it shows each image as what's called a "card" (or "plane"), and each card is placed in the 3D view.
Two of the cards are images, and one is a 2D render of a 3D scene.
Very interesting Joe, looking forward to where this leads
So one option, which is extremely common in professional filmmaking and VFX, is to replace 3D objects with 2D card images of those objects. For complex and detailed items such as grass and buildings and mountains it might be the fastest and most efficient way to build your scenes. And it greatly reduces the render times and computer resources that you will need, especially as you make minor tweaks to your scenes and have to re-render one or more elements.
And as your landscapes and backgrounds become more complex and intricate, this method might make more and more sense. Or not, depending on your needs.
As a side note, just to give an idea of what resources are available, many/most 3D apps have a feature which allows you to import an image directly as a card. For those using Blender, "Import Image as Plane" imports the image and automatically applies the image to a plane/card, and if it contains an alpha channel it automatically shows transparency resulting from the alpha channel information. As shown in the tree card image I posted. I don't believe Carrara has this feature, though there may be a plugin out there I'm not aware of.
Now, once you have that concept, the sky is the limit to what you can add to your 3D scene. You can add mountains, you can add buildings, you can add plants. But even with all of that detail and complexity, your scene is comprised of only 4 or 5 or 10 simple planes/polygons with images on them. Extremely fast and efficient for any future work or renders you might do with this scene.
Compare that to 288,000 polygons in your objects and 386 different textures and lighting effects and shadow effects and so on...
And on the subject of using cards in a 3D scene, here is a very very old Carrara render video I did using a 2D card mapped with a real life flame image (including alpha). I placed it inside a real 3D object and showed how even a 2D flame can look very convincing from multiple angles.
So the concept of cards can be used as all, or part of a 3D scene.
Instead of a plane you can also use place an image on a spat, which has the advantage that it will always face the camera. Great for self-illuminated things like flames etc., and anywhere you may want to move camera position. Although if your picture has baked-in highlights and shadows, it may look a little creepy in an animation.
True about splats...
Though my fuzzy (and probably incorrect) recollection is that they had some strange behavior that I couldn't quite nail down. Instead I think I opted for a regular plane with a "Point At" modifier, and then limit rotation as needed. Like for a tree you might want it to rotate around the up and down trunk axis only.
Oh yeah...after firing up Carrara and throwing a Splat in the scene, I think I recall my problem: You can't see them in the 3D View !!! So you can't visualize their size or lighting or whatever without doing a spot render or whatever.
Or maybe I just never understood how to use them...
And here's the result of just throwing a bunch of cards/layers into a scene/image. Nothing noteworthy, other than to say you can quickly generate and manipulate a full environment in your 3D or 2D scene using methods other than using thousands of 3D meshes and textures.
And to extend on my point about "added value"...
In the images above I used a real life photo of clouds. Why? Well, because to me at least, for the purposes I'm using the image for, there is no value to me in spending the time to try to generate a convincing sky and clouds using 3D. Often, the results just don't look like clouds, and don't give you the same feeling you get when you see the intricate detail and lighting of real clouds. Too often you get some sort of "cotton balls" with an uninteresting, uniform lighting.
So for me at least, with this image, I decided that spending time making clouds provides no added value, so I chose to take a photo and use that. Same with the mountains.
Yeah, you can spend a lot of time trying to model and texture a 3D mountain range, and that might be fun or instructive, but if that's not your goal, then IMO it's better to use a photo to give you that breathtaking feeling you get from real life lighting and detail of a mountain range. Sometimes, using just an altitude-based texture doesn't really do it, as you can imagine from the photo I used.
So for me, whether you use someone else's content models, or someone else's software algorithm, or someone else's real life photo, it doesn't really matter. Unless you want some special artistic control over the element that you can't find elsewhere.
Now, while these concepts seem pretty straightforward if you're generating a single image, what if you're doing an animation?
Well, there are a number of techniques for extending this concept to an animation. They all have their uses and limitations.
I showed previously how you can use an animated texture on a card (a flame..) and place that in a 3D scene which you can animate. And that animated texture can be a character in motion or anything else you can think of. Especially for a static camera shot, where your camera is fixed in position, this technique is very simple and straightforward.
Another technique is to populate your 3D scene with the cards I showed previously, and move your camera inside that scene. Of course, this technique is limited based upon the perspective when using 2D planes instead of true 3D objects. Often your camera motion must be limited to pull this off. It is similar to the technique of "camera projection" mentioned before, where you project an image (usually a photo taken of an environment) from the camera's perspective onto a 3D object in the 3D scene. Then you can animate the camera (within limits) to simulate motion in a 3D scene.
And another, highly useful technique, is to make a 3D scene comprised of both 2D and 3D elements as necessary.
Because of the way perspective works, typically stuff that is off in the distance doesn't appear to move as we move our perspective. When you're travelling down the freeway and look off at the distant mountains, they appear to stay in the same position, while stuff close to your car whizzes by.
So that's a great opportunity to use 2D cards for distant environment elements, while close objects are 3D objects. That gives you a lot of freedom of camera movement, and at the same time removes the heavy rendering times for distant landscape, etc., elements that don't appear to move.