how to make G3 a single-color no reflect figure

Dear guys

I want to put more people in scene for crowed backgroud , but it will be too lag when I operation DAZ and won't be rendered within short time , my video card is not good .

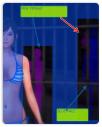
And then I was enlightened by a game , it make crowed people only a single-color paper , no reflect , even no 3D,just blue for male, pink for female .

I can only set the G3 skin pink or blue on "diffuse color", but it still has 3D effect and reflect light like a glass-man , not just a color paper , I really want it to be simple ,so I can render more people with my poor video card .

Thank you for your help!

attached file is the game picture.
S3.jpg
474 x 592 - 38K

Comments

  • Here is how I would go about doing it, assuming you are using Iray:

    1. Load the base G3F and make sure she is selected in the scene
    2. Go to the parameters tab, and change Render SubD Level to 1 (to minimize mesh complexity of the character, might save a little bit of processing overhead)
    3. Go to the surfaces tab, and select all surfaces.  Apply the Iray Uberbase shader to all surfaces
    4. Set Translucency Weight, Glossy Weight, and Top Coat Weight to zero
    5. You will need to set the maps to none for Base Color, Glossy Color, and Displacement Strength by clicking on the drop down box for each setting (see picture 1 below). I left the bump map in place just to add a little texture, but you can remove it as well if you want.
    6. Finally, click on the color area of the Base Color setting and choose the color you want the figure to be.

    This still won't quite be the cardboard looking figures like in the picture you posted.  It will still have the shape of a G3 female.  You can go in to the shaping tab and remove or minimize the breasts if you want something more flat looking.  You will still get shadows on the body though, depending on your lighting, but it should look something like picture 2 below.

    One other thing that might help you is to not create a new figure for each person in your crowd.  If they are all going to be posed the same way, you could select your first figure you create, then go up to the Creat menu and select New Node Instance (Note that I highlighted the 's' on purpose because there is also an option for New Node Instance, without the 's').  Then just enter the number you want to create.  I did 10 in the third picture below.  While it does take longer than if rendering just a single figure, it won't be nearly as long as if you had created 10 actual figures, and it should help conserve memory.

    Hope this helps.

    Daz_MapBox.PNG
    277 x 76 - 4K
    Pink_G3F.PNG
    520 x 1083 - 577K
    Many_Pink_G3F.PNG
    1457 x 1199 - 2M
  • nicsttnicstt Posts: 11,715
    edited November 2015

    I did similar by sellecting all surfaces

    apply iray uber base,

    then in the same folder is rubber matte

    or try the wax.

    With all surfaces selected, turn down Glossy Layered Weight if still too shiny.

    You could then perhaps find a tileable paper texture and load into the base color (select the skin or skin-lips-nails).

    Post edited by nicstt on
  • I didn't use the rubber or wax shaders because OP was trying to reduce render times with a lot of objects in the scene. The wax shader in particular uses SSS I believe, which can add quite a bit to render time.

  • kyoreonakyoreona Posts: 176
    KurzonDax said:

    Here is how I would go about doing it, assuming you are using Iray:

    1. Load the base G3F and make sure she is selected in the scene
    2. Go to the parameters tab, and change Render SubD Level to 1 (to minimize mesh complexity of the character, might save a little bit of processing overhead)
    3. Go to the surfaces tab, and select all surfaces.  Apply the Iray Uberbase shader to all surfaces
    4. Set Translucency Weight, Glossy Weight, and Top Coat Weight to zero
    5. You will need to set the maps to none for Base Color, Glossy Color, and Displacement Strength by clicking on the drop down box for each setting (see picture 1 below). I left the bump map in place just to add a little texture, but you can remove it as well if you want.
    6. Finally, click on the color area of the Base Color setting and choose the color you want the figure to be.

    This still won't quite be the cardboard looking figures like in the picture you posted.  It will still have the shape of a G3 female.  You can go in to the shaping tab and remove or minimize the breasts if you want something more flat looking.  You will still get shadows on the body though, depending on your lighting, but it should look something like picture 2 below.

    One other thing that might help you is to not create a new figure for each person in your crowd.  If they are all going to be posed the same way, you could select your first figure you create, then go up to the Creat menu and select New Node Instance (Note that I highlighted the 's' on purpose because there is also an option for New Node Instance, without the 's').  Then just enter the number you want to create.  I did 10 in the third picture below.  While it does take longer than if rendering just a single figure, it won't be nearly as long as if you had created 10 actual figures, and it should help conserve memory.

    Hope this helps.

    Thank you ! That's what I need ,I will do more research how to do it look more 2D , not plat breast,haha

    BTW, can I save the setting of this G3 surface,and apply it to any cloth or prop in other days ?

    CDE.jpg
    855 x 691 - 201K
  • kyoreonakyoreona Posts: 176
    nicstt said:

    thank you sir ! the uber base is so useful !laugh

  • kyoreonakyoreona Posts: 176

    @KurzonDax

    sir ~according to your advisedevil

    ACC.jpg
    855 x 691 - 201K
  • KhoryKhory Posts: 3,854
    kyoreona said:
    KurzonDax said:

    Here is how I would go about doing it, assuming you are using Iray:

    1. Load the base G3F and make sure she is selected in the scene
    2. Go to the parameters tab, and change Render SubD Level to 1 (to minimize mesh complexity of the character, might save a little bit of processing overhead)
    3. Go to the surfaces tab, and select all surfaces.  Apply the Iray Uberbase shader to all surfaces
    4. Set Translucency Weight, Glossy Weight, and Top Coat Weight to zero
    5. You will need to set the maps to none for Base Color, Glossy Color, and Displacement Strength by clicking on the drop down box for each setting (see picture 1 below). I left the bump map in place just to add a little texture, but you can remove it as well if you want.
    6. Finally, click on the color area of the Base Color setting and choose the color you want the figure to be.

    This still won't quite be the cardboard looking figures like in the picture you posted.  It will still have the shape of a G3 female.  You can go in to the shaping tab and remove or minimize the breasts if you want something more flat looking.  You will still get shadows on the body though, depending on your lighting, but it should look something like picture 2 below.

    One other thing that might help you is to not create a new figure for each person in your crowd.  If they are all going to be posed the same way, you could select your first figure you create, then go up to the Creat menu and select New Node Instance (Note that I highlighted the 's' on purpose because there is also an option for New Node Instance, without the 's').  Then just enter the number you want to create.  I did 10 in the third picture below.  While it does take longer than if rendering just a single figure, it won't be nearly as long as if you had created 10 actual figures, and it should help conserve memory.

    Hope this helps.

    Thank you ! That's what I need ,I will do more research how to do it look more 2D , not plat breast,haha

    BTW, can I save the setting of this G3 surface,and apply it to any cloth or prop in other days ?

    Go to the file you want to save it in. Click on the little + at the bottom. Select shader preset from the pop up. Be sure that you only have 1 surface of the figure selected. Name it and hit enter and you will get a list of properties. Click the arrow and a list of properties will show up. Then uncheck UV and click enter.

  • kyoreonakyoreona Posts: 176
    Khory said:
    kyoreona said:
    KurzonDax said:

    Here is how I would go about doing it, assuming you are using Iray:

    1. Load the base G3F and make sure she is selected in the scene
    2. Go to the parameters tab, and change Render SubD Level to 1 (to minimize mesh complexity of the character, might save a little bit of processing overhead)
    3. Go to the surfaces tab, and select all surfaces.  Apply the Iray Uberbase shader to all surfaces
    4. Set Translucency Weight, Glossy Weight, and Top Coat Weight to zero
    5. You will need to set the maps to none for Base Color, Glossy Color, and Displacement Strength by clicking on the drop down box for each setting (see picture 1 below). I left the bump map in place just to add a little texture, but you can remove it as well if you want.
    6. Finally, click on the color area of the Base Color setting and choose the color you want the figure to be.

    This still won't quite be the cardboard looking figures like in the picture you posted.  It will still have the shape of a G3 female.  You can go in to the shaping tab and remove or minimize the breasts if you want something more flat looking.  You will still get shadows on the body though, depending on your lighting, but it should look something like picture 2 below.

    One other thing that might help you is to not create a new figure for each person in your crowd.  If they are all going to be posed the same way, you could select your first figure you create, then go up to the Creat menu and select New Node Instance (Note that I highlighted the 's' on purpose because there is also an option for New Node Instance, without the 's').  Then just enter the number you want to create.  I did 10 in the third picture below.  While it does take longer than if rendering just a single figure, it won't be nearly as long as if you had created 10 actual figures, and it should help conserve memory.

    Hope this helps.

    Thank you ! That's what I need ,I will do more research how to do it look more 2D , not plat breast,haha

    BTW, can I save the setting of this G3 surface,and apply it to any cloth or prop in other days ?

    Go to the file you want to save it in. Click on the little + at the bottom. Select shader preset from the pop up. Be sure that you only have 1 surface of the figure selected. Name it and hit enter and you will get a list of properties. Click the arrow and a list of properties will show up. Then uncheck UV and click enter.

    Thank you for so much instruction details!!wink

  • KhoryKhory Posts: 3,854

    Always happy to help. Especially someone with an avatar that adorable.

  • kyoreona said:

    @KurzonDax

    sir ~according to your advisedevil

    Looks great to me.  Might need to render longer to eliminate some of the noisyness, unless that is what you were going for.  Glad the instructions helped.   smiley 

  • kyoreonakyoreona Posts: 176
    Khory said:

    Always happy to help. Especially someone with an avatar that adorable.

    haha,thank you ,I think it's cute too!cheeky

  • kyoreonakyoreona Posts: 176

    @KurzonDax

    sir , I try the last step you said ,step 6's basic color to BLACK.

    It's the really effect that I want ,you can only see the outline of the figure ,just like the game picture I upload ,haha.But when I choose other color, other lines will appear.surprise

Sign In or Register to comment.