Mirroring Conforming Clothing Geometry
 DopeFusion
Posts: 24
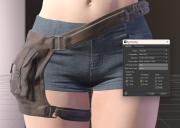
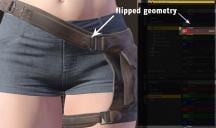
I am trying to take a belted leg bag rigged clothing figure, mirror its geometry on the Y-axis, and then auto-conform it to my Genesis character and have it follow her movement. I began by unhiding the parameters of the clothing figure to expose the X Scale parameter, and then changed it from 100% to -100% to flip the clothing item. I then opened the Symmetry Tab (Shift+Y), changed the Propagation to "Recursive", the Direction to "Swap Left and Right", and Trunk Nodes to "Mirror Across Y-Axis". Under Transforms, I unchecked all boxes except Rotation: Y-axis. I clicked Accept and then right-clicked the clothing figure in the Scene tab and chose "Fit ACLegBag to" and selected my Genesis character.
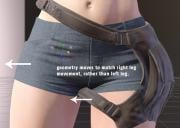
The resulting fit shows that it did not flip the weight mapping or conform nodes because, even with the bag on her left hip now, it continues to move only when she lifts her right leg.
Can some kind soul please walk me through how to achieve flipping the geometry, bones, and weight mapping along the Y-axis properly? I've attached some images that may help describe what I'm attempting. Thanks in advance.




Comments
Export the mirrored leg bag to OBJ, import OBJ. Rig it to Genesis figure with Transfer Utility.
Thanks! I haven't used the Transfer Utility yet, but I'll find one of Jay's tutorials and give it a shot.
Yea, no problem ! Actually that'll be simple:
After exporting / importing OBJ (Base Resolution !), go to : Edit > Object > Transfer Utility, rig the mirrored object with the settings in below ss1.
Then, if there're adjustment morphs as well as corrective morphs on the original leg bag, dial the adjustment morphs on the original right leg bag with mirrored status ! Export it to OBJ, import OBJ to the newly-rigged left leg back with Morph Loader Pro, in below ss2 ~ 3. Do the same for the corrective morphs but the relevant pose needs to be dialed firstly ~~ (I'm one of Jay's fans but I don't think Jay has ever given a relevant tutorial about this workflow, IIRC.... )
)
But if you find this workflow cumbersome, you also can consider using this product, which automates the whole process : https://www.daz3d.com/mirror-geometry (only there're 3 products for G3, G8, G9...)
Thanks!
You're right that Jay doesn't have a tutorial for this, but I simply followed the Daz Studio online user guide to do the conversion. It worked great, but as I went to sculpt fit morphs in zbrush, it appears that all of the normals are inverted. This makes sense because we didn't really 'mirror' the geometry as much as turn it inside out, lol. So I am unable to sculpt a fit morph for the bag. If you have any suggestions on how to flip the normal view in zbrush, let me know. I'm worried if I flip the normals, even though the geometry hasn't changed, Daz Studio might not recognize it as a morph and refuse to import it. Thoughts?
EDIT: So it looks like, if I go Tools->Display Properties->Flip in zbrush, it will flip the normals so I can do my sculpt. Exporting that morph, however, doesn't work. But if I flip the normals back to the way they were after doing my sculpt, I can import the morph. So, problem solved I guess. Sloppy hack, but whatever. XD
I would flip the normals first and then import that and do transfer rigging.
Then on top of that you can do fit morphs to specific characters.
Yes, better flip normal in DS with Geometry Editor before GoZ to Zbrush for sculpting where there's such a "display issue". There's no this display issue if sculpting with Blender but you still need to flip normal before saving the figure asset.