Iray rendering

Hello, I have a problem with iray rendering: with 3000x2400 pixel size, but also with lower resolutions, Daz gives me the result in the image.
I want to know if I can avoid this kind of ginning.
Thanks.
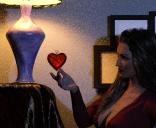
Schermata 2016-03-22 a 13.57.34.png
1054 x 864 - 1M
Post edited by jh_63114 on
Daz 3D is part of 
Connect
DAZ Productions, Inc.
7533 S Center View Ct #4664
West Jordan, UT 84084
Licensing Agreement | Terms of Service | Privacy Policy | EULA
© 2025 Daz Productions Inc. All Rights Reserved.
Comments
From my experiences, improper lighting.
The grain that your seeing is because the render is not running long enough to get rid of all the grain. If you go to the render settings tab you can increase the max samples and max time to increase the length of the render. You might also consider increasing the rendering quality to 2 and the rendering converged ratio to 99 (not 100 as that will cause errors).
OK thanks. I'll try your advice and I hope that it is the solution. Thank you so much for now.
It doesn't have to be that the render hasn't ran long enough although that's the usual cause. It can be if the ISO of the emulated film is not fast enough you'll get the same effect. The renderer is trying to emulate film.
and therefore what I have wrong? how can I avoid it?
If there isn't enough light in the scene, you will have to adjust the exposure settings. The default for this is the same as the default environment light, which is a bright sunny day. Go to the Render Settings tab and click on Tone Mapping, this lets you see the exposure controls Shutter Speed, F/Stop and Film ISO. Treat these just like the controls on an actual camera. (Leave the others at default values for now, until you have more experience of adjusting Iray settings.)
in fact, I think you're perfectly centered the problem. Many thanks.
The dark spots are from so-called unconverged pixels. These happen when not enough light samples reach those pixels. You can always let the render go longer, but it's better to simply add more light. The more light, the faster the pixels are sampled, and the faster the render progresses.
Adjusting the tone mapping settings don't add light, so this isn't the full solution. Just like in a real-world camera, changing shutter speed or another setting doesn't change the amount of light around you. Since you have control of the light intensity in a 3D scene, you might as well take advantage of it. Adjusting lighting just with tone mapping is like playing the piano using only the black keys. You're missing half the potential.
You don't mention what kind of lighting you're using, but the first order of business is to boost it. Double the intensity of the light, and try again. If the scene starts to become too bright, THEN adjust the tone mapping to give it the look you want. You can most easily use shutter speed for it. If you double the intensity of the light, increase the shutter speed by a factor of 2: set it from 125 to 250, then 250 to 500, and so on.
Thanks for your help, I will try your suggestion, I hope it is resolutive.