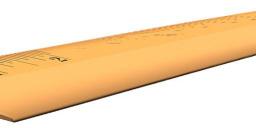
Ha, my first-ever "finished model", bwa-hahaha!
 Roman_K2
Posts: 1,252
I'm still having trouble understanding chamfering but I was able to use my newfound skills to flatten and stretch out a cube primitive into a "wooden six-inch ruler".
I even tugged on some edge lines a bit, to "bevel" the top to resemble an old time, 1950's style ruler. Exported to DS 4.8 and added color, and played around with the Transform tools in PS to put some ruler-like writing on it. Bit more post-work to "chamfer" a little bit here and there and there it is!


six-inch-ruler-created-in-hexagon.jpg
1024 x 254 - 36K


Comments
Well done Roman, there will be no stopping you now :)
Chamfers are your friend at making things have edge that look sharp, but realistic. http://previews.123rf.com/images/luminis/luminis0802/luminis080200025/2517607-Wooden-ruler-and-pencil-crossed-on-blue-background-Stock-Photo.jpg While the edges look sharp, if you look closely, the are not two-sided angles. Those tiny little bevels are what take things from looking computer generated to having a more real feel.
Well done, Roman - next stop the nautalus?
I fully agree with Cris - beveling or chamfering gives that realistic touch.
Next time you have a problem with chamfering post an image (flat solid with edges is best, spheres at the bottom of the screen) and hopefully one of us will be able to point you in the right direction.
Heh heh, thanks. I've installed Blender now because I saw video clip that showed a tool that sort of let you "rub some of the rough edges" off of a surface, if I may put it that way, helping you to make it smoother looking I guess. I was intrigued... Blender looks like a challenge but installs easily and I must have D/L a dozen "how to" video clips from YouTube, using the Mozilla "download assistant" add-on.
I take it that is the "smooth vertex" tool - very handy and much like Hex's "soften" tool - to be used very sparingly at low settings to avoid overdoing it:)
Right... I've now downloaded at least twenty Blender tutorials so I'm off to the races with that.
Getting back to Hexagon though I have managed another model - just my idea of what a photographer's no-seam paper background roll ought to be like; for starters I've narrowed the back corner considerably.
I started with a flat plane on the floor but that was a bit too thin to model with, so I switched to extruding a cube. Hopefully my idea for the geometry is clear? The PROBLEM at this time seems to be that all of my planes (including Nerd3D's "Backdrop Deluxe" which is no longer listed in the DAZ store) and textured primitives seem to be acting funny. Textures don't seem to want to "stick" to the surface; I'm getting a gray patch across the top of Backdrop Deluxe when I render in 3DL, and the whole thing is gray when I try Iray. Is this a Hex problem (a difference between "Send to DAZ Studio" and "Export as .OBJ"/"Import .OBJ" perhaps?) or a DS problem or what. It SEEMS to have started right at about the time when I got the easy Iray backgrounds and lights kit, although of course that may not have anything to do with it.
Perhaps there was a switch that I accidentally adjusted for Iray, that is still "on", in DS 4.8 although again, Iray seems to treat my Hex props funny too.
Maybe it is a Hex-UV mapping issue although I have not changed my procedures with "Backdrop Deluxe" since doing, say, this picture of my dog stopping for take-out coffee on his way back to the local airport.
P.S. I was very surprised to see this model come out looking really smooth after I sent it to DS 4.8
Screenshot of latest, successfully-chamfered object attached. Bwah-ha-ha-ha!!
That rules!
Sorry... couldn't help myself.
-silently crawls back under rock-
Roman, I maybe wrong (I usually am) but I think you're not allowed Ngons. To check, select your object in the scene tree and have a look in the Selection menu for the "Not 4 point faces" - I think it will highlight the middle section of the uprights.
I understand that sending N-gons to DS is bad... so are you saying that when I chamfered the H-like shape, I may have generated some N-gons?
I did the whole thing over (the H-like, chamfered object) again, paying more attention to detail and measurements, and I made a UV map and it seemed to be ok.
Roman, I've done it many times in the past, way back in the early days of DS so may-be things have changed. But I've got used to work-arounds (or work-flow) which makes things easier in the long run. So I try to check for Ngons, Normals and saving stuff on the 0.0.0 etc before saving the final model. It does get easier with practce :)
Being able to make a UV map does not mean everything is okay. You have to check for Ngons in the Selection Menu.
Most apps will let you slide by with using n-gons, as long as n is not > 5 and the n-gon is planar. Best practice though is to use just 3 and 4-sided polygons in your mesh.
I think I get it, re: positioning. Rather than use the background grid per se, to hold the object, it would be possible to put a texture file on a vertical plane at 0,0,0 or close to it, and then bingo, you're working close to the object, or at least
Too bad there isn't a forum sub-section for beginners... anyway I accidentally clicked on a point while working on a primitive shape and bingo, I got a conical, witch-hat like shape! The touchpad on my laptop tends to do weird stuff.
So I worked on it for a while... not bad for a first try! Thinking of posting it on one of the free-sharing web sites.
The version where the tip of the hat is warped was done with postwork. I realize I could add more roughness and undulations etc. to the actual .OBJ format file.
Nice witches hat. If you add more lines to the top you could morph the fold.
You could start a "Beginners Post" if you want, then ask for it to be Stickied.
Yeah... "Fast Extrude" one or two of the loops, I guess, and then stretch or slide/scale some of them a bit. I can do that. Funny thing about the hat was that it started with a rounded off cylinder shape, and I only got a pointy conical shape by accident.
Also I was going to mention that I tried working on the brim a bit, and when I applied some chamfering there were "flashes" of material that slid out, not like you saw with styrene model kits from time to time.
No, not Fast Extrude, I meant add more tesselations/smoothing so when you add a shaping morph it does not look so stiff.
I think your problem is Normals facing the wrong way. It would be easier to start the model from scratch rather than fix the problem. Another approach would be to use the "Extrude Line" option.
Hmmm, let's move on if we can to these engines for my space ship. I made this here model and sent it to DS, adding a little hexagonal (?) bolt-like object in the... exhaust pipe that I got from Maclean's Everyday Morphing Primitives set, before rendering in Iray. The red exhaust plume is postwork based on one of the items and shaders in the DestinysGarden/InaneGlory special effects props set (currently on special, 40 percent off plug plug, heh. I have no affiliation... just typin'... ).
).
Ok so that... seemed to go reasonably well, but when I tried to apply a JPEG texture file to the engine with the Surface Tool in DS, nothing happens. The texture doesn't show up! Huh? This (no sign of the texture) has never happened before.
Also the UV Mapper program has choices like what axis do you want, and how many pixels etc. I'm just guessing whether any one choice ought to override the other choices, and why... my UV map file came out looking more or less as so... again I'm not sure what I'm doing wrong and again the issue appears to be in the Hexagon > UV Mapper.exe > DAZ Studio work flow.
I see now that you've made a fairly complex little "line" construction for me, for making the witch's hat. I actually missed that when I first looked at your message; from time to time (in Mozilla Firefox running on Win7) I don't seem to be able to enlarge forum image attachments.