Simple Material Mixing With DS4.5 Shader Mixer [What's up with normals?]
 3dcheapskate
Posts: 2,720
(Yeah, I like amending the titles of my threads - helps remind me of where I'm up to!)
Here's the questions I've asked so far, with links to the relevant post within this thread:
Question 1: Is it better to use two DS Default Material, or to plug two things into each input of a single DS Default Material?
- Seems like it's down to personal preference.
Question 2: How can you duplicate the auto-selection of ray-traced reflections in the standard DAZ material Surface tab?
- Seems you can't. So I've chosen to give the user an extra slider to mix between mapped and ray-traced reflections.
Question 3: What’s the correct way to combine two normal maps, and how do I do it in Shader Mixer?
- Got the method sorted, I think, but something very odd is happening...
Question 4: What’s up with refraction when applied from Shader Mixer?
- Nothing, provided you pick the right values for Sample Cone, Max Distance, Samples, and Bias in the Reflect And Refract brick.
And here's a useful link for anybody who's just starting to play with Shader Mixer Shader Mixer Tutorials and Recipes
I recently started playing with Shader Mixer. I've just got my first reasonable result (still a WIP though) which uses a mask image to apply one of two alternative textures to the surface. I wanted this for a couple of current projects - shield designs in gold paint on wood/leather, and gold leaf applied to stone carvings.
I had a couple of specific requirements:
- the shader has to work in DS3 as well as DS4 (I know that DS3 Shader Mixer never left beta, and some bricks have changed)
- it has to work in the FREE versions of DS3/DS4 (i.e. all paramaters must be sensibly laid out and adjustable on the 'Surfaces' tab, because users can't open Shader Mixer in the free versions)
- I want the 'Surfaces' tab parameters for each of the two textures (base and overlay) to closely match the normal parameters you'd get if you create a simple primitive (to make it as easy as possible for a user to work out what does what).
I've now got a simple material shader that more-or-less meets this goal. I created it in DS4.5 and exported DBM, DUF and DSA files. The DSA and DBM files seem to work fine in DS3. I can use the shaders in DS4.5 and DS3 without opening Shader Mixer.
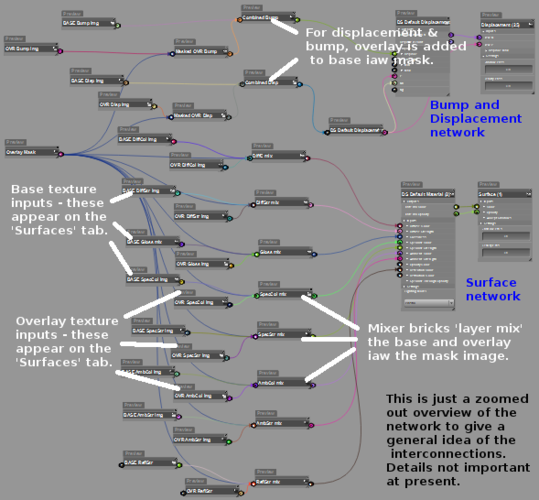
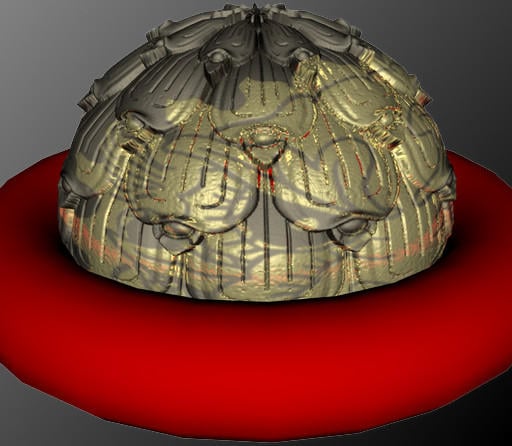
There should be two images attached - a zoomed out overview screenshot of shader network, plus a DS4.5 render of a sphere primitive with the shader applied (red torus primitive simply for checking reflection


Comments
Question 1:
An obvious alternative to the network I used is to have TWO 'DS Default Material' bricks and to feed their color outputs into a single 'Mix' brick controlled by the overlay mask image. It works (I did a basic test using just a few parameter). But I read somewhere that a second DS Default Material brick will have a big impact on render time. But doing it that way I'd do away with three bricks per parameter (e.g. for diffuse colour I currently have a 'BASE DiffCol img' brick, 'OVR DiffCol img' brick, and 'DiffCol mix' brick.). Any ideas about which way is preferable, or pros + cons for each way?
Question 2:
When you Create > Primitive > Sphere you get two reflection parameters on the surfaces tab:
- Reflection Color (allowing you to set image and/or colour - default no image, white)
- Reflection Strength (allowing you to set image and/or value - default no image, 0)
If you set reflection strength to non-zero, and there is NO 'Reflection Color' image, then the renderer uses ray-tracing.
If you set reflection strength to non-zero, and there IS a 'Reflection Color' image, then the renderer uses that as an environment map.
With Shader Mixer it's easy to do ray-traced reflections and/or environment-mapped reflections, but is there a way to automatically switch between them using the same criteria? I.e. can anybody suggest what I should plug into the inputs marked '?' on the attached image?
No bloody idea...that's something that's been driving me nuts. I can't figure out how the 'automatic' part is done. For my stuff, I just leave it alone an make it manual.
I tried the attached network but it doesn't work. It always defaults to the non-string colour. :-S Plus, it would work in DS4 only.
Re Question 1 (Multiple DS Default Material bricks)
Glad to see it's not just me having trouble with this
Re Q2 (Reflection): Now have a work-around - one extra control on the Surfaces tab
I couldn't get that idea to work - no way to get at the fixed colour of the image map brick, or to feed a fixed colour to it!
Couldn't find any on/off switch either. However, a slider to control the balance between reflection mapped / ray-traced reflections seems to work.
I'm assuming that when the 'Reflection Map v Ray Trace' slider is set to zero, then the rendering software will completely ignore the Trace brick, since the Alpha i/p to the Mix brick tells it to use all base, no layer. Am I correct?
Attached: network screenshot, plus example renders with the Surface tab paramaeter settings.
(P.S. Rob [rbtwhiz] mentioned that there was a reflection bug in DS 4.5, but I found that setting Sample cone, max dist, samples and bias all to +1 gave me reflections!)
In the absence of any more responses (must be the weekend) I'll just keep bumbling away... :cheese:
It's going nicely now - I've combined the reflection stuff with what I already had, and added opacity (which I'd overlooked). Et voilà! Ballons décorés! Here's a DS3 Surfaces tab screenshot, and the render that these settings produced (didn't touch Shader Mixer, just loaded a sphere primitive and applied the latest DSA shader)
Reflection seems to work great (reflection mapped penguins for the semi-transparent blue bits, ray-traced for the gold)
Only things missing now are refraction and normals:
- Refraction: I can honestly say I've never used it, but I should probably include it for completeness.
- Normals - vector addition seems to work fine, scaling the overlay normal down in magnitude iaw the overlay first, and rescaling the result to a unit vectors again. But when there are no normal maps things are wrong (just needs a bit of looking into).
Thumbs up for Shader Mixer - I likes it! :coolsmirk:
Hmm... wrong'un there! Sooo....
Question 3: What's the correct way to combine two normal maps, and how do I do it in Shader Mixer?
Vector addition is definitely the wrong maths to use on normals (hopefully the attached sketch shows why*).
Assuming I can work out the correct method for combining the vectors (my maths is rusty), then plugging the result into a Value (Normal) brick seems to scale it back up/down to a unit vector correctly.
Of course, the normal map colour value that produces a flat surface is (RGB) 128/128/255, not black or white. But ideally I want to disconnect the whole normals calculation network if no normal map is selected, so failing some flash of insight it looks like another slider (although only 'on' or 'off' make sense for normals - how could you apply a percentage of a normal map? Doesn't make any sense!)
Found a useful video on Vimeo here - Photoshop - Combine Normal Maps. Covers the subject in a non-mathy way. Now how can I apply that to the normals in my shader network? (Looks like red and green components [can't recall RGB to xyz correlation] should be combined in the same way [adding?], and blue components in a different way [multiplying?]. But I can't get the maths to add up)
*Sketch needs a few words:
Left to right, base normal values (blue): 0, -45, 0, -45
Left to right, overlay normals (red): 0, 0, +45, +45
(0 is straight up from surface, -45 is 45 degrees anticlockwise, +45 is 45 degrees clockwise)
Question 4: What's up with refraction when applied from Shader Mixer?
I went back to basics on this one. Cranked up DS4.5, created a sphere primitive, on the Surfaces tab set opacity to transparent/semi-transparent, set Refraction Index to mid-range and Refraction Strength to a high value, with no images linked to any refraction, did a test render (fine), imported into Shader Mixer, applied straight back from Shader Mixer to the object, did a second test render and DS4.5 locks up the system (all 4 cores at 100%, Ctrl-Alt-Del to get out)
Tried the settings that seemed to get reflection going (setting sample cone, bias, max dist, & the other one to +1) and it just renders as if the object's invisible.
Maybe this is part of the reflection problem Rob (rbtwhiz) mentioned (referred to earlier in this thread)
Luckily normals and refraction aren't really necessary for what I'm trying to do (a shader for applying a gold-leaf pattern to a wooden shield or stone carving) - I'm just trying to do them for completeness.
Failing a breakthrough today I think I'll just export DBM, DUF, and DSA versions of what I've got and upload them to ShareCG/Rendo as beta.
No breakthrough - still can't get normals and refraction working properly.
Beta uploaded - see this Freepository thread if you're interested.
Re combining normal maps - simply adding red channels, adding green channels and multiplying blue channels seem to be the accepted way to do it. Splitting the normal maps into RGB (xyz) with a Component brick and doing the necessary maths on each component seems to work, but I can't see how to combine the three results back into a vector. (also the Component brick seems to be DS4 only)
Refraction - no idea what's up there. Index Of Refraction seems to have no effect on ray-traced refraction. Maybe setting sample cone, max distance, samples and gain all to +1 (which seemed to get ray-traced reflections working) doesn't work here? Maybe it's a DS bug?
Here's a really zoomed out overview of the whole network as it stands for the beta - DS4.5 Shader Mixer screenshot (well 2 screenshots combined - can't zoom out below 30% and I'm on my laptop)
I have no idea about your normals problem.
In DS4 it's Geometric->Point, which outputs a point, you'll get a warning in the log that a normal isn't a point, but you can ignore it. Or you can use Utility->Color->Color Transform, which outputs a colour. They both exist in DS3 but are placed elsewhere in the brick-yard, IIRC.
In DS3 they are both under Math in the Brickyard...
Thanks again, couldn't see it for looking! Colour Transform is the one I wanted. So all the bricks I need (I think?) for sorting out normals are there (and they work in both DS3 and DS4 - I double-checked).
Regarding refraction, I guess you're talking about mixing the four outputs of the Reflect and Refract brick (Reflection/Refraction Color/Transmission)? The little it says in the Reflect And Refract online docs has me flummoxed.
Time to go and sit in a quiet corner, examine Zigraphix glass Shader Mixer preset, and think about the 'how' for the normals.
Refraction - simple fix, just adjust a parameter or two in Shader Mixer (the parameters are ones I chose to hide from the Surfaces tab!)
-Sample cone: Set this to 0, not 1
-Max distance: Start with it set at 1. If the refraction doesn't work try 10, then 100, then 1000, etc.
-Samples: leave at 1
-Bias: leave at 1.
(Not sure why those settings seem to work, since there's no documentation I can find. Max distance seems to be related to the distance between the refractive surface and the object you are expecting to see refracted through it.)
Normals - I think I've got a 3D coordinate geometry based solution, 15 bricks, but I think somethings up where there are negative values for the X, Y, Z components of the normals. More thinking.
Spoke too soon! I'd missed something really obvious (again!) - I didn't think it could be that simple! In fact my MkIV solution is even simpler. Problem is it still doesn't work, but I think I'm misunderstanding something in the type conversions in/between bricks. New query posted in Nuts And Bolts forum - Shader Mixer: type conversions in/between bricks, parameter ranges, brick ‘preview’ renders
Very simple normals network here. From the Shader Mixer brick Preview renders it looks like it should work. But if I apply it to a sphere primitive and render, the sphere is rendered plain black! The maths is really simple (suffixes - b for Base Texture, o for Overlay Texture, c for combined - Bc is calculated as the value that, combined with Rc and Gc, will produce a unit vector (Bb and Bo are ignored)
Rc = Rb + Ro
Gc = Gb + Go
Bc = SQRT( 1 - ((Rc*Rc)+(Gc*Gc))
If I connect the outputs from the 'XYZ Component (5)' brick [top left] to the inputs of the 'Point (13)' brick [top right], apply, and render it works fine, so it's defintely something wrong inbetween...
Any ideas?
(P.S. The 'Normalize (21)' brick appears to have no effect, which is what I'd expect since I've calculated a unit vector already.
Although the brick preview renders of the 'Normal Map (3)' and 'Point (13)' bricks in the network of the previous post look the same to me, it's clear from the four renders in the attached image here that the outputs of those two bricks are very different:
Top left - 'Normal Map (3)' output connected to 'Displacement (22)' 'New N' input.
Top left - 'Point (13)' output connected to 'Displacement (22)' 'New N' input.
Bottom left - 'Normal Map (3)' output connected to 'DS Default Material (2)' 'Diffuce Color' input.
Bottom tight - 'Point (13)' output connected to 'DS Default Material (2)' 'Diffuce Color' input.
Can anybody explain this?
(P.S. if I take the outputs of 'XYZ Components (5)', plug them into 'Point (13)', and use the output of 'Point(13)' I get the correct results - i.e. same as using the output of 'Normal Map (3)' directly.)
Sounds like DS uses the other kind of Normal Maps (I don't remember what they're called specifically), the ones in which the blue channel does have an effect. Try reducing its intensity.
Or perhaps it guesses it is the other kind of Normal map if blue values are different from zero?
Thanks ReDave. I don't think it's the type of normal map that's the problem (though I may still be proven wrong). I create all my normal maps in Blender 2.49 using the 'tangent' option (the other options being normal space, world, object, and camera). These Blender-generated normal maps seem to work fine in DAZ Studio. (I'm fairly certain that the red and/or green channels need to be inverted and/or swapped over - something I haven't done - but I'm 99% certain that has nothing to do with what I'm seeing here).
I've been trying all sorts of things, and I have to admit I'm at a total loss now. The problems come down to this:
- A single normal map in a 4-brick network works fine: Normal Map -> XYZ Components -> Point -> Displacement).
- Adding a few maths* bricks in the middle and plugging a calculated value into the Z (blue) input of the Point brick doesn't work. Even though the calculated value appears to be identical to the Z (blue) output from the XYZ Components brick!
I think it's time to take this query over to the Developer Discussion forum...
*using simple trigonometry to work out the blue component:
B = SQRT( 1 - ((R*R)+(G*G))