Uberenvironment2 noise
 KuriosDrachen
Posts: 25
Ok, I'm not sure what I'm doing wrong, but every-time I try a render with uberenvironment2 (because renders look SO much better that way) there is a TON of noise! Especially in the shadows. I realize I may be dealing with a lighting problem, but I'm just curious if anyone knows of a way to fix it. Even when I render with little to no shadows, there is still just this annoying grain/noise over the whole image. I render using bounce-light (GI) and a couple of spots or distant lights, if anyone could shed some light on this for me I would greatly appreciate it, because I've been trying to figure this one out for a while. :)
(And btw, I'm using the standard 3Delight renderer that comes with my Daz 4.5 pro, i can't afford realistic light 2.2 or whatever it's called)
Don't ask me about comp specs, my babies fine ;)
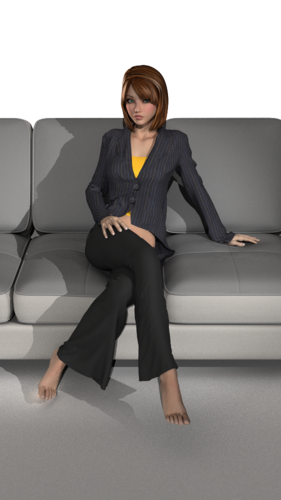
Here's an example:


Comments
Post a screenshot of your advanced render settings...
I would say your baby is fine using Uber GI...nice.
I wouldn't mind seeing your Uber Enviroment Parameter settings too. Not for the noise but the see if you are getting the best out of GI.
mjc is on the right track with the advanced render settings more importantly Shading Rate. With GI I would be starting at 0.10 (lower being better quality) You might have to go even lower if the noise is still there.
The grain is coming form the Ambient Occlussion hence why it is still present when no other shadows are there.
UE2 does have its own quality settings, so you need those to be right as well as the global render settings - I suspect your occlusion samples are too low for one thing.
And don't forget the shading rate in UE2 itself.
For UE2...
Shading Rate Lower=better
Occlusion Samples Higher=better (from the 3Delight docs, it seems that 'power of 2' samples are desired...16, 32, 64, 128...in any case, at least an even number is desired)
Max Error Lower=better
Ok sorry I'm late, thanks SO much for the abundance of help :)
Here are my advanced render settings and the light settings for ubervenvironment2.
I do know that I always have my Occlusion samples set to the highest (128), but I don't know much about the other settings... O.o
What I didn't know was that the lower the shading rate the better the image, I must have misread something somewhere, thanks Szark!
Here are the images:
(what you see here are the settings for the first image, problems and all)
Well! After changing a few dials (namely the shading rate), there is now considerably less noise. At least it's down to a level I can live with. Let me know if you can see the difference! :D
For the second image, all I changed was the shading rate (down to 0.01) on both my render and unberenvironment2 settings.
(and it only added a minute or so onto the render time, which is nice)
(also, the second image is darker because I dropped the intensity scale of unberenvironment2 back down to 100%)
(and (again), I realized that just by decreasing the intensity scale much of the noise goes away, so I guess I need to work on my lighting techniques.)
I was taught that when using IDL or GI with UberEnviroment we should be aiming at a Uber Shading rate of 1.00 at worst...super sampling even better at 0.10 also try dropping the Occlusion strength to 75% I am assuming it is at 100% as you didn't show all the uber parameters. ;)
Also have you noticed how the colour bleed area from the foot touching the floor is lessened with the increase in quailty? IMHO it needs the Uber shading rate lowered at lot more.
Max Error looks good to me.
Max Trace Distance could be lowered to 50 CM or even down to 20 but since you have a super computer you could probably leave it. :)
Occlusion samples can probably be dropped to 64 without much noticeable difference in appearance, but probably a slight speed boost.
Also if you aren't going to have glass, mirrors or stuff that will be highly reflective, you could drop the raytrace samples back to 2 for another slight to significant speed boost. Basically that setting is how many surfaces the ray will penetrate/bounce from. 4 isn't really needed for scenes without transparent/reflective objects, but the traces are still calculated ( :ohh: ).
Occlusion Strength affects how dark the shadows will be...100%...dark, well defined...it's not a straight linear item though. So the shadows will become practically not noticeable well before you hit 0%. Sometimes, backing that off from 100% will clear up some 'noise', too, as some of the noise may actually be a not very strong shadow from something...
Hmmm... so many things I didn't know! The color "bleed" you reffer to Szark is actually a distant light that was intended to help distinguish the side of her face from the shadows of her hair, but I've shifted it up a tich so it no longer does that, the light was hitting her foot really strong and reflecting onto the floor, quite distracting actually. Thanks for pointing it out!
And yes, dropping the occlusion sample rate down to 64 and the ray trace depth to 2 really made no difference, and helped speed up the process, and thank you mjc1016!
And if anyone has a good tutorial off the top of there head, I've yet to find (or maybe just understand) a tutorial that points out each slider for lights and render settings and tells what it does/how it effects the scene. That way I won't pester you wonderful people with a dozen more questions. :D
Actually two more:
#1: Is there a setting to limit the amount of CPU Daz uses while rendering? If I ever try and render a scene at say, 2000 x 1500 (or something like that) for a wallpaper, Daz uses up 100% or EVERYTHING. At that point I can't do anything even if I see a mistake I missed, I either have to wait a good 20 min for the render to cancel (it seriously take that long) or wait a few hours for it to finish. Can I stop Daz at 80-90% so I can still use basic computer functions? Maybe there's another program that does that...
#2: Oh! And any suggestions for communities dedicated for critiquing Daz studio renders? Maybe a good group on DeviantArt or a blog or something?
You can make an cpu affinity batch file to control it. I kind of detail it in a mini-tut / example in this thread: http://www.daz3d.com/forums/discussion/768/#7298
Apologies for reviving this old thread, but it is an important issue and all too common! I tried all of what was discussed above,turing shading rates of DAZ down to 0.10 and Uberenv down to 0.01. That plus 128 occlusion samples still didnt help. Still a lot of noise, especially if uberenv is your only light source (most natural looking) like when you use DimensionTheory's Luminance pack from the store.
I just found a crude but absolute solution to the problem. Click the gear beside the occlusion sample slider in the "uberenvironment2" light's properties. Re-define the maximum as 512 (4x). BAM no more noise.
NOTE: Render times will increase by about a third compared to 128 samples.
EDIT: I lied. Render times will double.. or worse (but the result is so beautiful).
I could be wrong, but ave you tried dropping your DS shading rate down to 0.01.
Yeah. It didnt seem to make a difference for the occlusion shadows. Im starting to think that the occlusion shadows are totally independent from the base DS settings.
Actually Freelancer604, what you see in the images and what I continue to get is noise even with your advice. I'm not sure how your settings were different, but my copy of Daz studio can with that setting preset. So unfortunatly that doesn't solve the problem for me. Could you perhaps show me a render (doesn't have to be big) or this perfect noiseless settting?
One that jumps out is Max RayTrace Depth it should never be above 1 or 2 unless rendering Reflections in glass or a mirror.
Pixel Samples (X),(Y) set to 8 are good but 12 or 16 samples per bit will clean up your renders even more. Just as it does in DOF.
Then your Shadow samples are very low at 8, at 12 Pixel Samples try a setting of 32 for Shadow Samples.
All this will Ramp render times way up but your finished renders will be much clearer.
I think I might have an idea of what's going wrong. I'm treating the lights and uberenvironment like it's luxrender, which it clearly is not. I can't simply place a light in a scene and expect it to act like a light in real life right? And if that is the case, what's your opinion of the Reality2 plug in? Because from what I've seen it almost looks worth the 60 dollars...
Can I get the same results using the 3Dlight renderer? And if I can what are some good tricks for getting those results? My end goal is to get my renders to look life like, the kind you look at and think "holy shit!".
Yes, it's very possible to get those results...but it's not as easy as using Lux.
Here's a dirty little secret about UE2....the presets...the images used are not real high resolution/quality...so it's quite possible that some of the problems are coming from low grade 'light sources'...kind of like trying to set up a scene with dusty, grimy bulbs in all your lights. I've tried some self made presets, from higher quality source images and have less noise on lower settings that using the ones that come with UE2. The 'base' UE2 and it's presets are a good starting point, not the finish line.
They're not "final quality" when used as the primary source of shadows/occlusion. When you're using helper lights, they 4X high preset is often overkill.