Planning a starship build, scale questions
 Tramp Graphics
Posts: 2,412
Tramp Graphics
Posts: 2,412
As thetitle sugsts, I'm thinking about building a starship for some renders of my Star Wars RPG character, namely 
Now, the big question is, how do I make sure I build it to proper scale so that I can add interiors, and such, including the two decks, and fit characters inside?
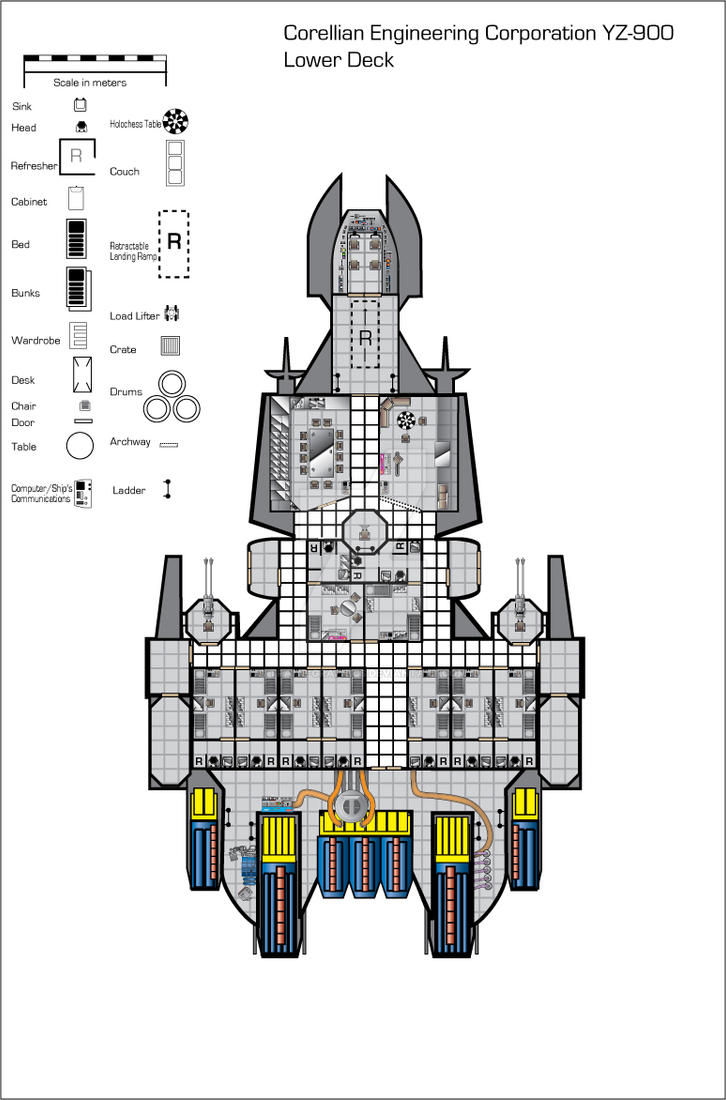
For the record, the YZ-900 is 54.3 meters long, has an 8 man crew, passenger space for 14 passengers, and holds 500 metric tons of cargo.
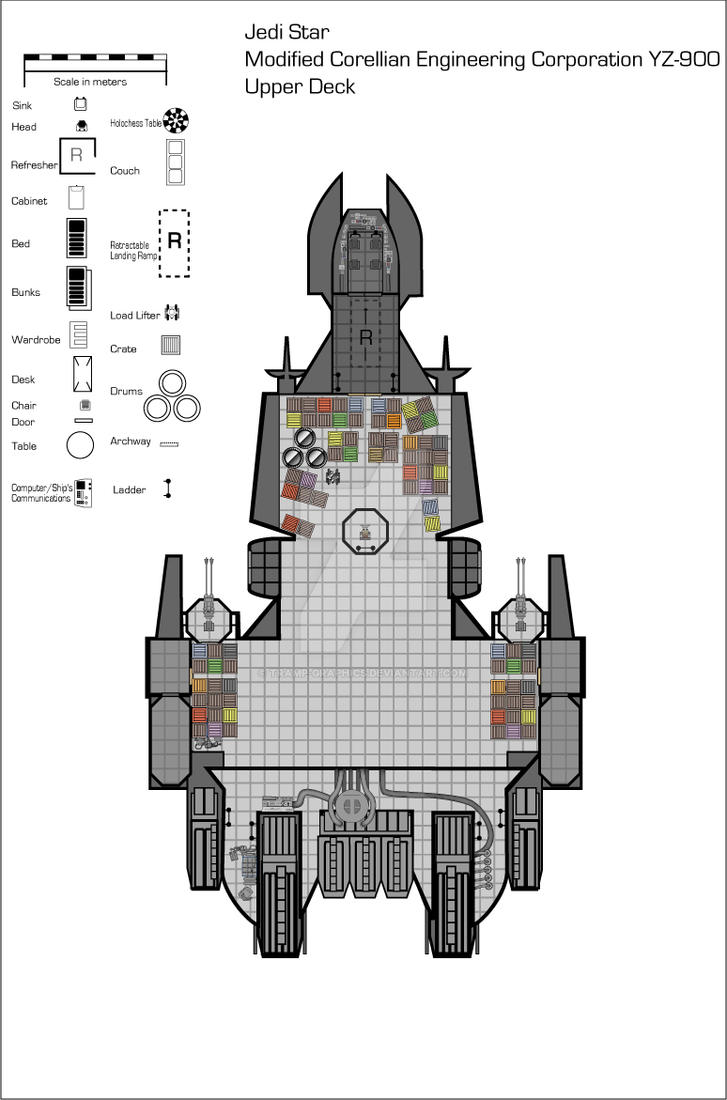
These are the floor plans for the passenger and cargo decks for my character's custom YZ-900 the Jedi Star
Daz 3D is part of 
Connect
DAZ Productions, Inc.
7533 S Center View Ct #4664
West Jordan, UT 84084
Licensing Agreement | Terms of Service | Privacy Policy | EULA
© 2025 Daz Productions Inc. All Rights Reserved.
Comments
It depends - most if not all modellers can use feet/inches etc. alsongside generic system units, so you can use that to your advantage. I personally keep a textureless humanoid male model (6ft) in each scene i work on to avoid perspective distortion and scaling issues.
The good thing about scale is it's all relative.
Here's what I did for you, I made a 3d model out of your layout, and sized it accordingly in a HXN file, that way you can compare its length/width directly in the program, along with the texture overlayed onto it so you can compare the sizes of other objects/sections. Just unrar the file, load up the Hexagon file, and if the texture doesn't show up, go into the texture panel in the left, select the shading domain, and just update the location of it on your hard drive. As long as you keep this model the same proportions, it doesn't matter how much you scale it up or down to work with it, you can always scale down and work with specific meters later. This ship has a length unit matching 53.4. When it comes to scale, you still need to know more though, because height is a big factor too.
I've constructed several replies, detailing "how" to approach modeling what you actually want. But, this is what I've decided to reply with: :) (And, I've rewritten this post plenty of times, trying to be brief. :) )
OK, first off - Hexagon has little support for CAD-related "measurement." In other words, don't try to use Hexagon to get exact measurements for real-world dimensions. You can do that, using some extra objects, some maths, etc. But, it's totally not worth doing. Instead, you need to do basically what user.operator provided for you - Follow only the relative dimensions of the model you're creating. Then, you can scale at need.
What I really wanted to discuss with you is "modeling for use." Specifically, the idea that you want to construct the model so that all the interiors "fit inside" it and, basically, the notion of creating a "real world", true-to-life, 3D model of this ship, with everything nicely placed on the inside, where it should be, corridors, rooms, etc..
Don't do that. :)
(You can't know how many times I've rewritten this post... :) )
OK, from experience I can tell you that you don't want to model this entire ship at "real world", sort of 1:1 content-scale. You do not want to model the ship intending for it to be used as one single unit. Do not do that. You will spend hours constructing a model that, in the end, will be extremely difficult to deal with when it comes down to rendering realistic scenes. I know it sounds crazy, but it's true.
Instead, focus on making a good density exterior mesh and focus on making it realistic from the perspective it is likely to be rendered. Make a bunch of "greebles", things that don't really serve a purpose other than to give the illusion of detail to something, and focus details that MUST be in-built into geometry of the ship in order to for the whole thing to be suitable for exterior renders. (ie: The complex gimcrackery around any access points of the ship, like hatches where you'll render crew entering the ship or areas around the portholes/windows.) When needed, for the few shots a character might be climbing on the hull, add the greebles to add detail. Dupe, rotate and scale them to get more variations.
Make some "blanks" that look fairly realistic from long-range interior shots through the windows. Texture and light these to give the illusion of more depth/detail. While it's flying in a dog-fight, with renders encompassing multiple ships, you don't need to dedicate RAM to a three-hundred-thousand-poly cockpit that won't be seen. (Occlusion culling is awesome, but what is culled still eats up RAM on the desk.)
Make only one model of a stateroom. Later, in your renderer, you can copy/paste/load another of those as needed. You may want to make all of your corridor, but make it in sections, loaded as needed, and be sure that you can get good camera angle renders when using it. (ie: Perhaps make each section of the corridors in four parts, longitudinally, so you can remove/hide a part in order to get the right camera angle and still get good renders without having to mask much.) Staterooms should also be considered in this way - Make walls and ceilings removable/hideable. You might even want to consider splitting the cockpit into two groups so one can be hidden.
Each workstation has to be unique in order to be believable. But, the chairs don't. :) The same goes for anything that is duplicated like beds, sinks, toilets, mirrors, etc. That also includes things like pipes, utility boxes, wires, etc. These are sorts of "internal greebles" you'll add for realism. Make a variety of each, so you can mix and match as needed. It doesn't matter that they don't serve a "canon" purpose on the ship, since they serve a "real world" purpose of making the interior look realistic. (Think of the set-design of Star Trek. In Star Trek, there were plenty of "GNDN" pipes. They went nowhere and did nothing, but made the set look realistic. ("Goes Nowhere, Does Nothing" :) )
Plan out your modeling before starting. Make a list of what you need to actually model and what is going to be duplicated. Make a list of where all the renders are going to likely take place, or most of them, and pay special attention to those areas. As long as you model so that everything is relatively scaled well to itself, in regards to the blueprints, then if you absolutely have to, you can "fit" the interior into the ship for an internal/external combo render. Plan for that. (Blocking/masking objects that will hide splits in geometry.) The one exception, quality wise, I'd say is the forward command section and the ball turrets. In both cases, I would model them separately as stand-alone versions, with both a high-detail interior and exterior. I would avoid creating a model where you had to use only a "backdrop suitable" version of the exterior in those case, especially the foward cockpit, which needs a high-detail joining of the cockpit to the exterior windows.
Yes, it's a lot of work. One would wonder why one shouldn't just model the whole thing at once in high detail. Sure, you can do that. But... in the middle of doing that or when you finally take it into your renderer and start trying to work with it, you'll wonder who that weird dude on the forums was who was trying to save you some pain. :)
Good luck! If you have any issues, be sure to come back and post them.
What morkonen said.
Basically, take a cue from how studio's approach set building. For wide angle shots, you have a smaller less detailed exterior model. For closer beauty shots, a larger more detailed one. If it's big enough, you'd make it in set pieces that are shot specific. Interiors would also be made with a shot specific goal in mind. The thing with interiors, they're often easier to deal with as you can get away with a modular approach.
As it is, if you try to make the whole thing complete with interior, it can easily get unwieldy.
Well, there is actually a practical reason why I need things to fit into the ship and keep it to scale. It's as a RPG aid I need to make sure that everything in the floor plan would actually fit. Thus, I'm not so much concerned with building a super detailed interior so much as having the size of the roms, ceiling height, decks, etc to proper scale.
As for rendering interiors, I never remove walls to render. If need be, I simply adjust the frame width to create a wider angle shot. The reason for this is simple: reflective surfaces. Now, if it were possible to hide a wall from the camera but have it still show up in a reflection, I'd be allfor it, but that's not an option as far as I know.
It's possible if you can work with the face normals. There are likely some Material settings that could be arranged, too, I bet, depending upon your renderer. (I'm not a big "complex materials" guy, sorry.) Or, you could just reduce your camera size and make adjustments to its settings so you can easily place it in front of the wall that you need the reflection from.
Don't underestimate the practical use of "Object Groups" as well as Material Groups. With the former, you can hide/unhide geometry easily in most applications. With the latter, you can apply transparent materials. (Be sure all nodes are zero'd or are transparent.) Using Material groups that you can render transparent, in order to hide them, can be of use on models with contiguous meshes. An easy example is an open window. The geometry is really still there, but it's transparent to the renderer. If you think you may want some extra versatility with a single object mesh that you might want to hide bits and pieces of, from time to time, then assign those bits different Material zones. Otherwise, you'd have to create transparency/alpha maps for the object and those don't always work well. (ie: Creating a room as one object, but with six different material zones, would let you hide any of the walls, ceiling or floor, that you needed to, without much fuss, and you could still have the same, single, object to deal with instead of wrangling multiple ones. You could even, if necessary, create transparency maps so you could display only part of a wall/floor/ceiling if that was needed. That's a lot of versatility! I prefer multiple objects, myself, but it's all user or application preference, really.)
Most 3D renderers have "Occlusion Culling", which culls any non-visible (blocked by other geometry - "occluded") mesh bits. This reduces the geometry calcs for the renderer. However, what some people forget is that geometry that is not directly visible, but is visible to the engine for raytracing/shadows/etc will still contribute to the rendering overhead, for all these effects that end up being seen, since they've told the engine to do that. That's why objects in Poser, for instance, can be toggled visible/not visible and/or material settings can be set so they don't interact with certain render effects, even if the object won't eventually be visible. (Think about a very shiny frying pan that is blocked by another object in a chosen render. If that frying pan is reflecting light, that light may still show up somewhere, even though the object itself is not visible. So, that object's effects, not the geometry itself, still contribute to the overhead.)
As far as interpolations and external/internal lighting, as well as textures/materials associated with this, I'm not quite sure what you're asking. Sorry. :) However, consider this: There are several different sorts of "lights" in many renderers. By this I don't mean the type of light, but the... type of light. :) In other words, and this is just in general, EVERYTHING you see in a render is because of the interactions of "light" generated in one form or another. Those forms of initial light generation can be from projection lights, mesh lights, area lights, etc OR they can be generated by materials, like ambient channels that "emit" light. How all these are handled depends on the renderer. Other things happen with light, as well. Light can be emitted/radiated, reflected, transmitted, absorbed and refracted. In many renderers, these qualities of light interacting with matter are approximated. In some, like in PBR (Physicality Based Renderers) they are actually modeled, the precision of modeling being determined by the renderer or the user's inputs. (NO renderer attempts full PBR of light that I know of. But I don't know everything, so maybe some do! However, light never stops - Ever. Only one of the above interactions alters light. There's practical limits to rendering.)
So, since I don't know what you're really asking about external/internal lighting, just think on this: Everything in the scene that you see is due to light interactions. Materials, like those containing ambient channels, can emit their own light, as well. To reduce rendering time, you have to know the renderer and what it "chugs" on. Some renderers don't like material emissions, since they are "fake", since anything that actually generates light in such a renderer is supposed to be a real light. Sometimes, trying to fake light emission can cause issues. Most of the time, though, it's a time saver, since certain things aren't calc'd in renderers that use material emitters. Things like shadows and such, for instance, won't be calc'd, since it's assumed they're unnecessary. Highlights on other objects, of course, would likely be, otherwise what good would the emitted light be? :)
On large meshes - Why? First answer the question of "Why is the mesh so large?" Most of the time, in situations like this on a general 3D Poser/DS forum, people discussing overly large meshes are talking about meshes that have been generated with 3D scanners or programs that generate complex meshes from a series of inputs. (For the former, things like 3D scans of real people, places or objects. For the latter, high resolution topological maps made by programs like Terragen.) If the mesh is large because it was generated or provided by one of these methods, then you have to ask yourself if the mesh is actually suitable for your intended use. That use may be other than the use for which the object was generated in the first place.
Some programs can reduce the polys of generated meshes. Poser 11 can, to some extent, and I think there's some add-ons for DS that can do that. However, if you need to do it and want a free solution, I suggest this: http://meshlab.sourceforge.net/ Meshlab is a powerful, free, program that is targeted towards dealing with objects/meshes and specifically includes mesh reduction for generated meshes. Give it a try.
When you mean "model borderline rediculous polycounts" do you really need to model "model borderline rediculous polycounts?" :) For instance, let's examine LODs. https://en.wikipedia.org/wiki/Level_of_detail What level of detail is actually necessary as viewed from the distance of the intended use of the model?
Most 3D modeling is actually lying, in some way, to either the renderer or the viewer. (3D models don't actually exist, anyway, except in mathematical space, but that's just a tiny lie.) So, with your model with a huge poly count, what sorts of lies can you tell and what sorts of lies can you absolutely not get away with? As an example, consider a game model of a human being. Most of them are basic tri meshes with excellent normal maps and good texture work. Since they're mostly clothed, if you downloaded one and took its clothes off, you'd see that things like the hips, abdomen and chest are not going to be fully modeled. Why? Because - The gear the character is wearing throughout the game is covering up those bits, so they're unnecessary except where rigging constraints may demand that something be there if the rigging doesn't use the clothes model.
As a 3D modeler, if you want the easiest time of producing the best quality models for your intended use, you have to look outside of the capabilities of just the geometry. You have to plan what other tools you're going to be able to use in order to tell an effective lie. :) So, you don't model every stitch of a complex lace pattern in a skirt. Instead, you use an alpha/trans texture map. Problem solved! If you're modeling a tree and need a bunch of leaves, what do you do? You make a nice, small, square, uv-map it well, then populate it/instance it/copy-paste it everywhere you need a leaf on that tree. One face becomes thousands of leaves, all you need is a good transmap for the leaf and a decent texture. Need skin pores? Bump maps! Need some fine bits of geometry that aren't too complex, just to give some raised edges? Displacement maps!
Look at the older products in DAZ3D's store. These were modeled "way back when", before the i5/i7 and motherboards commonly equipped with 16gig RAM and nobody had a 64bit OS commonly available. The product marketing shots were generated with old Poser or DS versions. The textures were created in old versions of Photoshop, GIMP or, perhaps, texture painting apps in higher-end 3D packages. Monitors didn't commonly exceed 1024x768, either! There was no such thing as ZBrush and most people weren't using the old versions of Mudbox, either. (Maybe the old Sculptris, here and there.) AND, to top it all off, if you have some of those older products that were widely popular, you'll notice that many things that we might consider today "should" have had certain features done with actual geometry, instead of bump/displacement, did not actually use geometry to render those features. And, most of those products had polycounts that would have been considered to be "lower" than a high-definition product at the time. (IMO, many DAZ3D products today for Poser use rely somewhat too heavily on texture work, that I've seen, but I'm not familiar with any of the products exclusive for DS only.)
In short, you can get very good results with much lower polycounts, but you have to be willing to reach outside of just the geometry of a product in order to produce those results.
If you have any specific questions relating to the model in question and don't want it public, just send me a PM and I'll try to help, np.
The reaon for the size is two-fold. FIrst, because it needs to interact with characters directly in renders, both externally and internally, thus it needs to be to scale. Secondly, as a 3D diagram of the interior deck layout to show the viability of the interior layout to make sure it would actually fit in that ship's hull.
Consider modeling it in sections that make sense from the camera angles you'd normally use. Then, as you begin to work on the next section, start the basic, low-res, object set coming off from the previously finished one. Save that low-res version once you have it finalized, before moving on to the details and such. Save that file, export the low-res stuff, check it to be sure it's good, then delete the prior work except for your low-res starter, save as a new file, then start with all the high res work on the next section.
That way, you have a background, low-res, object to use, sort of like a matte-painting, but something that will highlight/shadow/occlude/etc realistically when you're rendering that high-detail section and need part of the next in the scene. If, when finished, you can map the low-res object in a similar way, you can even use the same texture sets. (This is just a suggestion, if you're worried about overloading your comp/renderer.)
In most renderers, the up-front costs are not the geometry, but high-resolution texture sets. If you find your renderer choking, make sure your texture sets are clean, compressed appropriately, and aren't terribly over resolution. IOW - You don't need a 2000x2000 texture for a render that will only end up rendering that area at an effective ratio of 200x200. In extremis, going through and compressing a low-res texture set for heavy renders involving lots of background stuff isn't a bad idea. (It's also generally better to use material functions for textures, as they have no front-end loads to speak of and are generally easier to render on the back-end.)
Alphas/Specular take a lot of processing power for lighting and material effects, too, in many renderers. Instead of just having to process lighting around geometry, which they're built for, usually, they have to process the map and geometry in order to figure out effects. In short, in some situations, it may actually be quicker to render a surface with "holes" in it (for instance) if that's actual geometry instead of a transmap/alpha with limited geometry. Weird, but true. Dunno if it's applicable in your case, though. Was just a thought.
I hope you post some works in progress! I love watching how sci-fi models progress. Wires are always welcome, too.
Thanks for that advice, biut it still doesn't answer the main question. How do I make sure everything is the right measurements? I've been using Hexagon for 4 years now, and unless I missed something there's nothing in the program's grid to set it to say 1 meter squares, or so in order to build something to an exact size and dimension.
Have you tried Slosh's Measure Wall ?
http://www.sharecg.com/v/69559/favorite/21/DAZ-Studio/Measuring-Wall
That's fine for working in DAZ Studio, not for Hexagon, and it's way too small (it only goes to 10'). The YZ-900 is 53.4 meters long (the length of a 747 jumbo jet).
In case you missed it, I uploaded a hexagon file with size of your ship in length/width, along with the layout image textured onto it. It should help with eyeballing the ship and its relative size to other objects with along with their position/thickness
But to answer your question, everything is all relative in hexagon. If something has a length of say 53.4 in the properties panel, on export you can choose if that means feet, meters, etc. I'm not sure if it has a specific measurement system as I've never really needed it, I've just did the math in my head on what the dimensions of something should be.
Size doesn't matter....
OK, sorry, I couldn't resist that quip. Evidently, to some people, size does matter. :)
On the right-hand side of the screen, under the Scene window, click on the Properties tab. From there, you will be able to set your unit of measurement. That will be the unit that is being displayed when you look at the object Properties window (Top right-hand display window).
But, it means diddly-dooky. (Technical term)
In an earlier post, I tried to stress the relevance of "proportion" rather than "measurement." Hexgon DOES NOT have any decent mesurement tools. It just doesn't. The best you can do is to work with relative internally valid measurements, not actual ones. Alos, be aware that Hexagon does not like large objects. I don't mean large in the way of polygons, but large in the way of physical size. Hexagon's cameras do not deal well with large scaled objects at all.
But, just because Hexagon doesn't have a diverse selection of measurement tools doesn't mean anything, really. You think if they were so important, they'd be there right? EXACTLY! They're not important. Only relative measurements are important. That's why something like a blueprint, imported and loaded onto a flat plane, are the preferred choice, here. If you were using CAD software or simulation software, then the demand for actual measurements would be very real. Real materials behavior differently, depending on scale, after all.
Don't worry about anything other than creating a very accurate model based on relative measurements. Later, in whatever your preferred renderer is, you can scale it up/down as necessary. However, you should try to start at a good base "size." To do that, we have to know what figures/renderer you're using and what their sizes are and any conversions that are necessary. Here's an old hand-me-down for you, that may help illuminate the definition of futility for you:
http://www.morphography.uk.vu/scaleobj.html
As you can see, the basic measurement units vary widely. AND, let's not get into the great Poser Unit controversy... :) DS may have some tools to help you measure things. Poser 11 has advanced measurement tools that allow you to have very accurate real-world measurement of any part of a model. (It's darn awesome, to be honest!)
A couple of things to note: I don't use DS. I prefer Poser. P11, IMO, has a host of better features, particularly where it comes to sculpting/rigging/content creation. If you are going to be using the Hexagon Bridge tool, I can't help much, there. If you're going to be exporting/importing, you'll have to check to be sure you have a decent import size. It's always better to re-export at a decent relative size if you need to heavily scale an object once imported. (ie: Do it on the front-end instead of the back-end, when possible.) Once inside your renderer, you should be able to scale things suitably using whatever your chosen renderer provides for you in terms of measurements.
Lastly - I can tell you right now that the interior of the ship that you have laid out will, without any doubt, "fit" inside the exterior model of that ship. I'm certain of it. Why? Because, you can always scale that interior down to whatever size you want... :) It "looks" relatively sane in regards to a believable interior, so I'm not sure why you're so worried about it. If you're worried for some fan-based reason, slim it down some and account for the extra space being filled by bulkheads/armor/power-conduits/etc that can't normally be seen.
There is a free Autodesk Fusion 360 CAD program too for what its worth,
as a Carrara user I am thinking I must start learning it or other modelers for the same reasons Hexagon users might need to look for alternatives.
Tramp, if you use it to make a 1m plane, then use the multi-copy tool you'll be able to make what-ever size grid you want. I'd aim for a massive chess board with numbers running along the sides.
You're welcome for the "dissertation." I respond to posts fully because I do not know the level of knowledge of whoever may read my post. Because this forum frequently has either technical questions related to general 3D modeling or "noobie" questions, I choose to fully respond to them with as much relevant information as is practical.
.Just saying if you wanted to build a spaceship just like the old startrek blueprints deck corridors bulkheads and all that you'd be in trouble with hex on that.
No, you would not. Hexagon is a standard 3D polygon-based modeling application with subdivision capabilities and limited texture painting ability. It is fully capable of being used to model something as simple as the old Star Trek deck corridors. Both Anim8tor and Wings3D are great, free, basic polygonal modeling apps and plenty of people have also used them for modeling great things.
It's all about application knowledge. Knowing the application is half the battle. Preparing one's work-flow is half the battle. Actually pointing at things and pushing verts is... well, part of half the battle. :)
I don't know why Hexagon takes "many minutes" to open whatever model it is you're talking about. I can open 100k poly objects in seconds with Hexagon. A couple of things to think about would be to delete or move .mtl files from the same directory as the object being imported. If you need materials applied, apply them from within Hexagon, itself. Also, it may be that making Hexagon Large Address Aware could help. (See here: http://www.daz3d.com/forums/discussion/23044/is-there-a-hexagon-x64-available) People also have various results with Import vs Open, so you may try either Importing the file into a new Hexagon workspace or simply Open the file as a new Hexagon workspace. Hexagon doesn't lock-out those choices and can, at times, handle them differently, even though it treats some file-types as native files.
Note: If Carrara is having a problem with exporting object files derived from an original .an8 object, either Carrara is having the problem or Anim8tor is. The wavefront object format is very, very, simple. You can check the object file contents yourself with any text program (I recommend this: https://notepad-plus-plus.org/ ) to see if there are apparent inconsistencies - http://www.martinreddy.net/gfx/3d/OBJ.spec
LOL!
Hey, I understand your affection for a much-beloved computer. But, you're really pushing things with that machine... :) 3D modeling is intensive and machines especially geared for it are some of the most powerful desktops around. But, you can get refurbished machines, even i7's, for really cheap, these days. A mom&pop store down the street from me has old i7 refurbished machines with 4gig RAM and decent, for their time, video cards for just around $100. (Monitor/Mouse/Keyboard not included, some machines have extras) I've been thinking about cobbling together a render-farm box and using the store to source used parts. :)
One thing that may make a huge difference on older machines is that Hexagon has some semi-dynamic lighting. It's not great and I often curse the lack of proper lighting controls, but it is dynamic and that eats up processing power on any video card. I don't know what the lighting schemes for Anim8tor and Wings3d are, but chances are if you find better performance using those programs, it has to do with how the main working area is displayed/lit. Hexagon's code hasn't been revamped in giga-years, either. So it is finicky on some machines, especially those with video cards that get upset with some OpenGL rendering. The only recent updates for Hex involve the DAZ bridge, most likely because DAZ either can no longer touch Hex's code, don't have the tools, or don't have anyone experienced in the language it was originally written in, or just don't care to invest any money in it... :) So, virtually any 3D program that has had continued development will play more friendly with certain hardware.
I posted my own Hex/Nvidia-based settings here: http://www.daz3d.com/forums/discussion/16493/hexagon-crashes-very-often/p2 No crashes, no problems, runs fine on all the latest drivers. I hope it helps! (Note: I've also made it Large Address Aware and that seems to help, at times.)
I forget what it was, but I tracked down the issue to some specific changes done with OpenGL a long time ago. Since Hexagon was written a comparatively "long time ago" and no recent updates have been made to the program other than DS/DAZ Bridge functionality/compatibility updates, Hex was never updated to deal with these new OpenGL changes, which are not completely backwards compatible, according to the articles/posts I read on tech forums.
Short version - You gotta tweak settings in both Hex and your vid driver, these days, to get Hexagon running trouble-free with "modern" hardware.
There was a 2.5.1.79 version released in 2011. I tried it for a while, but stayed on 2.5.05 after having a few issues.
Well, I've finally started on the model. I have to give thanks to User.Operator for the tamplate made from my deckplan (even though the texture wouldn't load). I noticed whent I loaded it, that Hexagon showed the right dimensions in units, so I could begin. That doesn't mean it'll load into DAZ Studio at the right size, but still.
You have to go into the shading domain panel on the right, select the domain, then in the panel above it, select the image file included with the Hexagon file. That should make sure the texture applies to the model. If not, try checkboxing the flip horizontally or vertically settings.....Hexagon isn't great for texturing, you'll often have to export models with flipped texture settings to get them to be unflipped on import to another program.
Yeah, not too worried about it. Here's the WIP picsI have so far. I've actually started working on the interior floor plan already.
Very nice! Keep it up and keep us updated! :)
Well, Ive got some new WIP pics.