Fun With Hair...NOT!
 SileneUK
Posts: 1,975
SileneUK
Posts: 1,975
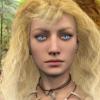
OK, I don't know what is causing my various hair shaders to suddenly go electric blue! (Not his crotch smiley...the brows in the first image).
I have several different hair areas. The body is one, hands and feet another, and eyebrows another, and the head is Phil's Adrea Hair which uses a proxy.
So at first I thought it was a thing with Adrea hair. It has a right and left head zone, so sometimes the blue is on the right, sometimes on the left.
Sometimes it is the whole body, or one of the other parts above-named. It's never all of them at the same time.
This shot is of the eyebrows as it's the last malfunction I captured this evening.
If I am in the hair room and toggle from uv to geometry and back, it goes away, until next time. I have tried leaving them on one or the other setting and it makes no sense.
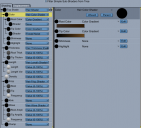
All I can think is it's the shader itself. The whole body has this same shader used, just the length and density changes. It has several variables in it as in the other image below.
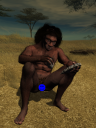
Any ideas? It's always electric blue! And if I don't' toggle it away' it shows up in rendering as well. So the image below is a normal render... I forgot to render with the blue showing. I have been working on this chap for a long time this week, so am really hoping to sort it as I need him for an essay that is now due!
 Silene
Daz 3D is part of 
Connect
DAZ Productions, Inc.
7533 S Center View Ct #4664
West Jordan, UT 84084
Licensing Agreement | Terms of Service | Privacy Policy | EULA
© 2024 Daz Productions Inc. All Rights Reserved.
Comments
So... it's only electric blue like that while in working view? The rendered one (shown here) looks great, doesn't it?
Man, this is one awesome looking character!
Thanks, Dart. He's been a lot of work...but all done in Carrara this time.
Here's a render with blue on the whole body... working view as well. Just happened this minute as I was tweaking something else not hair related!
Have to pop out for a bit...back later. Hope someone has an idea of how to avoid this. It's got to be in the shader mixer upper?
It's not in the hair shader you've posted... that's for sure.
What does your Scene effects area look like?
Ambient?
Atmosphere?
Do you have fog in the scene at all?
No atmosphere effects, no special lights, this is one of those cycloplane scenes. I've tried just having it set up with nothing in it and just using the basic light that comes with a new scene. No difference.
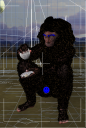
Here's him in the hair room showing the body and chest hair. Have one more shot to go and grab whilst he's in this blue state...
ETA: His genitalia were added after and so they were shaded separately, but they also get this problem, harder to see when that happens as that hair is a bit sparse. But it does happen.
I also get an unrelated glitch with this file. The hammerstone and the handaxe have sometimes gone 'missing' and get substituted as a cube. I do not know why Carrara does this. It happens from time to time. Did I remember someone saying it was because of an endless loop looking for edges or something?
I don't know, but I've had it happen to my dynamic hair once. But it might have been for the proxy I was using and not the hair at all. That was the one and only time I've ever got that error.
Okay, something is applying that glow to the hair - and it's not that particular shader - I don't think. Perhaps some sort of Toon override being selected by accident? Some sort of modifier or scene effect/filter?
I must say... I'm at a total loss on this one. Looks like it might be a blue Toon outline happening... but not really.
in poser, used to see blue when sss was usng duplicate id numbers.
does carrara assign id#s to hair groups ?
Misty, no SSS... but I was thinking of you as I wish I knew what to look for in a file if I could open it with notepad or something similar. I have no programming background at all.
Julien Inagoni (of http://www.inagoni.com/) did that once for me to find an errant object that was crashing my scene.
But it does not always 'save' or 'open' consistently....hmmmmmmm. And why blue? Silene
Face it, Silene... you broke it!
You know I'm kidding... right?
But I am beginning to have an idea....
Smurf idea?
Nope... I thought it might be the kink tool but didn't make any difference.
Maybe Phil will have encountered this as he works so much creating hair.
I will have to go back and open some older files and see if it happens with them. Maybe it's because I am using the same shader colour combo in so many different areas at the same time? But why blue? If they all defaulted to black, I could understand it.
Off to sleep... you poor folks in the Eastern US... all that snow. Yikes! I do not miss living in New Hampshire at all this time of year. Silene
yep, I've had this happen a few times over the years... for memory I think it's in the global shader settings... and it carries over from other shaders if you adjust the settings in the shading domains.. doesn't happen all the time but had me stuffed and took me a long time to find the culprit.
Watch out for the ever changing names soon we wont know who we are talking to or about.
Stezza, what did you do??? Was it blue? Was it the fractal noise? Thanks for the post! Silene
Hmmm, just out of curiosity:
In the skin shaders for the character, are there any blue or bluish colors? Check the Color channel, is the texture map multiplied by a blue color? Is Highlight blue at all?
I used a CrazyBump Normal Map in the Highlight Channel. But not for the hair head (that's a Phil head proxy), and not for the genital hair. Both head hair and genital hair turn blue. Just the body/torso has it. Could that be it?
OK, I've opened a copy of the file, removed all those normal maps, and saved, (discarded unused shaders first)... and have reopened it three times and no blue hair! How strainge... so it was creeping up the face into Phil's proxy head? I guess the real test will be continued non-blue incidents, or maybe changing the highlight to pink to see if that affects hair as well.
Wooohoooo.... too soon to celebrate? Silene
ETA: BUGGER BUGGER BUGGER..... it didn't hold, it opened blue all over his body this time!
Absolutely! Try running a render without it!
Besides, you don't want a Normal map in the highlight channel. That's Mec4d's Homo Erectus M4, isn't it?
If so, try going into Runtime > Textures > Catharina Textures > Homo Erectus M4
She has all manner of maps in there, including Specular. If they're to intense, try sliding the brightness down to, say... 33 or so.
She also has SSS maps in there. Sometimes I like to multiply those by the Spec maps in the Highlight channel - like this:
But before experimenting with that stuff... just to analyze this issue, try turning the Highlight Channel to None
Sorry to say I'm posting this and disappearing again...(almost 2am).
It's a long, long, long shot but do you happen to have turned one of your lights negative? There's a tick box in the settings for any light you select. In Version 8 onwards?
This is very unlikely to be the problem, I think, but if anyone wants to check what I'm getting at it's worth having a play with two bulbs and an object in a scene. Give both of the bulbs different colours such as pale blue and cream. Then switch on the different combinations of one or both lights being negative. Some interesting effects seem to happen.
It's always good to have more ideas to look at when troubleshooting! Good call, Marcus!
Hi Dart, It's not the M4 Homo Erectus, it's a G2 that I sculpted the head on myself and then 'borrowed' only the plain skin texture from Gurumarra from and then made my own adjustments of the skin tone, and my own bump maps etc. Only the normal map had that purple glow, but I removed that and it didn't make any difference at all.
Marcus, I will have a play again with lights... have to get this chap into my essay tonight, so have run out of time as I still am 'knapping' the hand-axe LOL!!
Thanks for all suggestions... I just have to set up and preview render and fingers crossed that one out of 5 times I do not get any blue in any of the zones, so then I will take the render pass and deal with lighting later!
There has to be some sort of setting switched on in one of the effects panels somewhere. Argh!
SileneUK, I hope very much that you succeed in getting the renders you need. My advice only amounted selecting each light to check whether the 'negative' tick-box was selected. Unlikely, I know.
Without wanting to distract from the topic when help needed is urgent, I've rendered the effect of negative lights in an example where standard grey cubes are lit by:
Blue light only;
Cream light only;
Blue light negative, cream positive;
Cream light negative and blue light positive.
Edit to add: the third picture shows how colours can be weird if one light is negative. The overall colour is not one that would be expected from the cubes' textures or the colours of the lights unless one of these was negative.
Hi Marcus, I am just using a simple light dome I made that Evil Producer helped me with. It's just a ring of replicated lights in a transparent dome with 7% lighting on a dull/grey colour. I thought I'd solved it for a while when I made a everything a group...but it only lasted for about 4-5 saves.
It's not critical... I can work around it. But next character I set up I will make each hair shader different and not consolidate them...that was my other thought.
Thanks again, everyone! Have to move on now.
To unconsolidate them, just select one and, in the shader tab use the drop down, scroll down to the bottom: New Master Shader.
We can then copy from one into the other and make desired changes.
Repeat for any other consolidation you'd like to unconsolidate.
I always like to start with consolidating because a lot of content now comes with very large maps, and since they don't load with their Spec in the Highlight nor with Normal maps, I'm often adding even more - so I like to keep things tidy.
Carrara Hair shaders are often so tiny they won't add hardly a thing to the system resources, so it's fine to keep those separate. I say that referring to the usual hair shaders, though we may still add large maps to them... and that's where I'd be careful again.
I doubt that your consolidated hair shaders are the issue, however.
Since you have a good save on this scene, try deleting everything except the character. All of the scenery and such. Keep the lights at first.
Is the blue still there?
If so, try making new lights.
I de-consolidated the hair shaders and gave each area their own master... no difference. The head was always separate anyways. But going forward now... will try and get this beast done today!! Thanks for all the help, Dart and everyone else.
==== crosses fingers ====
Here's the different poses I have spent all day adjusting.
The blue hair stuff just got worse and worse, then it started doing it in shades, bright, dark... some were so dark I could not detect them until I rendered. It was very frustrating. For those very dark ones that I could not fix with postwork in PS, as it made the hair look smeary, I found I could apply a gold photo filter (sort of in reverse of what I would do in my younger days when DIY blonde hair colour came out brassy, I'd use a blue rinse LOL).
I think the blue stuff must have to do with the programme whilst performing the 'generating hairs' function whenever I'd use the rotate tool to pose the figure. The hair would totally disappear, then re-generate (using that annoying percent increment thingy). I could avoid that generating scale if I hid from 3D view the haired areas, but it did not stop them from showing up blue when done posing and ready to render.
It is totally unpredicable. If I make a new figure in the future , I am going to have to figure out a way to overcome this. It has never happened before. Trial and error I guess. Just took me twice as long to do this project! Arrrrrgggghhhh!
Anywhoooo... this is what I have. It's all to have a diagram and schematic drawings of graphics, etc superimposed on it. Have to get started on that now....
ETA: It's an archealogical illustration... and you really cannot see the genitals. I didn't have time to bleep them out.
Thanks for alerting me to this thread - it is not a problem that I have seen before and I really don't understand what is going wrong, it sounds very odd indeed! At first I thought it was just when you were setting up the scene, but clearly it was apparent on your renders too. It must be some sort of random error in Carrara from what ou have said, it doesn't seem to have any logic to it. I don't think it is anything that Adrea Hair is doing. Maybe it is an issue with having so many different hairs in the scene as they can be quite intensive? But I am just guessing, I really don't know.
Normal maps should only go in the bump channel which is set to the Normal Map setting, it doesn't make sense putting it in a highlight channel, as you have probably realised.
I'm glad you got some usable output, even if it did take you longer - and it looks great!
I'd almost like to see screen shots of everything. The scene settings... all of them. The render settings... all of them. Each light, each effect panel... something is just odd.
Silene, have you tried dragging just the character into the browser and opening it in a new, empty scene with just the default lights and nothing else?
That is absolutely the next step I woud take.