More Non-photorealisitic Renders (NPR II)

19293959798100

Comments

  • juvesatrianijuvesatriani Posts: 556
    edited May 2021

    Artini said:

    juvesatriani said:

    Filament Photoshop Post

    Trying Filament as base render and give color shift+boost in photoshop

    Very nice and Filament is very fast to render. Please make more Filament based images. How to deal with Genesis 8 characters in Filament?


    Will do in next experiment !! Meanwhile I`m uploading simple video how to getting same fx using my photoshop action ( which I`m also including in link below ) so you can get the base idea. Of course that not the only way to doing it . it just how my way to get out as posible from 3D apps and toying with 2d image or video editors LOL

    https://drive.google.com/drive/folders/1_P-1Sob2UXDE3PVP0EV-M1_W-2DsU2km?usp=sharing

    EDIT : TO use my action you need to have Free GreyCstoration plugin ( to replace oil painting) . You can get from here

    https://ccm.net/download/download-666-greycstoration

    Post edited by juvesatriani on
  • pavsikakyjpavsikakyj Posts: 139

    juvesatriani said:

    Artini said:

    juvesatriani said:

    Filament Photoshop Post

    Trying Filament as base render and give color shift+boost in photoshop

    Very nice and Filament is very fast to render. Please make more Filament based images. How to deal with Genesis 8 characters in Filament?


    Will do in next experiment !! Meanwhile I`m uploading simple video how to getting same fx using my photoshop action ( which I`m also including in link below ) so you can get the base idea. Of course that not the only way to doing it . it just how my way to get out as posible from 3D apps and toying with 2d image or video editors LOL

    https://drive.google.com/drive/folders/1_P-1Sob2UXDE3PVP0EV-M1_W-2DsU2km?usp=sharing

    EDIT : TO use my action you need to have Free GreyCstoration plugin ( to replace oil painting) . You can get from here

    https://ccm.net/download/download-666-greycstoration

    Great look. Care to answer some questions on Filament? What shaders and lights did you use? Is it possible to render in Filament with CPU? How fast rendering is?

  • juvesatrianijuvesatriani Posts: 556

    pavsikakyj said:

    juvesatriani said:

    Artini said:

    juvesatriani said:

    Filament Photoshop Post

    Trying Filament as base render and give color shift+boost in photoshop

    Very nice and Filament is very fast to render. Please make more Filament based images. How to deal with Genesis 8 characters in Filament?


    Will do in next experiment !! Meanwhile I`m uploading simple video how to getting same fx using my photoshop action ( which I`m also including in link below ) so you can get the base idea. Of course that not the only way to doing it . it just how my way to get out as posible from 3D apps and toying with 2d image or video editors LOL

    https://drive.google.com/drive/folders/1_P-1Sob2UXDE3PVP0EV-M1_W-2DsU2km?usp=sharing

    EDIT : TO use my action you need to have Free GreyCstoration plugin ( to replace oil painting) . You can get from here

    https://ccm.net/download/download-666-greycstoration

    Great look. Care to answer some questions on Filament? What shaders and lights did you use? Is it possible to render in Filament with CPU? How fast rendering is?

    I`m just loading the set and playing with Filament draw option via Menu>Create>New Filament Draw option node. Usually I set ISO to 0,25 and play with another setting . There is no additional shader . This set already have plenty of point and distant lights so it I just need to boost light scale in Filament Draw option .  If yours doesnt come with plenty light you need to add manually by yourself. 

    Filament use render preview so it should be pretty fast . Not sure how GPU have impact in here . My laptop only have 4GB VRAM ( GTX 860) so its should ok using Filament with modest specs. Dont forget to set your render engine to viewport

  • ArtiniArtini Posts: 8,904
    edited May 2021

    Thanks for sharing your solution.


    Post edited by Artini on
  • pavsikakyjpavsikakyj Posts: 139

    juvesatriani said:

    pavsikakyj said:

    juvesatriani said:

    Artini said:

    juvesatriani said:

    Filament Photoshop Post

    Trying Filament as base render and give color shift+boost in photoshop

    Very nice and Filament is very fast to render. Please make more Filament based images. How to deal with Genesis 8 characters in Filament?


    Will do in next experiment !! Meanwhile I`m uploading simple video how to getting same fx using my photoshop action ( which I`m also including in link below ) so you can get the base idea. Of course that not the only way to doing it . it just how my way to get out as posible from 3D apps and toying with 2d image or video editors LOL

    https://drive.google.com/drive/folders/1_P-1Sob2UXDE3PVP0EV-M1_W-2DsU2km?usp=sharing

    EDIT : TO use my action you need to have Free GreyCstoration plugin ( to replace oil painting) . You can get from here

    https://ccm.net/download/download-666-greycstoration

    Great look. Care to answer some questions on Filament? What shaders and lights did you use? Is it possible to render in Filament with CPU? How fast rendering is?

    I`m just loading the set and playing with Filament draw option via Menu>Create>New Filament Draw option node. Usually I set ISO to 0,25 and play with another setting . There is no additional shader . This set already have plenty of point and distant lights so it I just need to boost light scale in Filament Draw option .  If yours doesnt come with plenty light you need to add manually by yourself. 

    Filament use render preview so it should be pretty fast . Not sure how GPU have impact in here . My laptop only have 4GB VRAM ( GTX 860) so its should ok using Filament with modest specs. Dont forget to set your render engine to viewport

    Thanks! Will try myself. How about shadows in Filament?

  • vrba79vrba79 Posts: 1,297

    Artini said:

    Oso3D said:

    Nothing fancier than straight PWToon render. My recent discovery that render line tessellation 1 works great with PWToon has really... enthused me. The only real trick now is managing lighting and simplifying textures and relying more on bump and outline to define many elements (particularly background elements).

    This is my vulpine. So, again, texture mapping doesn't work for dhair, but in this case a single color works fine (if I wanted I could take the time to separate out zones and create multiple fur items, but I didn't feel like it)

    Previously I had used a narrow threshold for shading to create a more 'toon' sense. Now I'm electing to control that more with lighting (with some shadow softness, but not much, and no AO). A lot of the simpler appearance I had hoped to achieve is really best done by changing the textures to be either a single color or, if I need to, really go in and make a newer, very subtle shaded texture.


    So it looks like, PWToon strikes again and gives even better results than any iray based techniques.

    Very nice images.

    You just can't go wrong with PWToon, its a very worth while investment!

  • pavsikakyjpavsikakyj Posts: 139
    edited May 2021

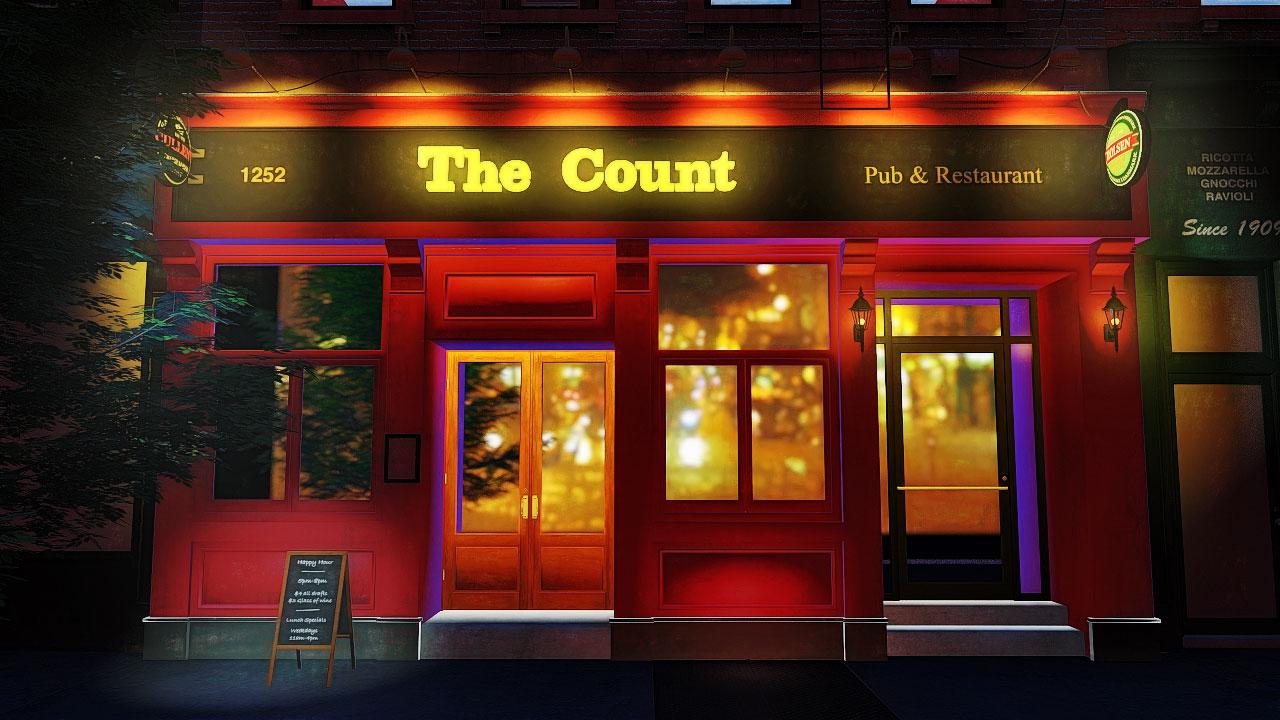
    Continue with Topaz Studio

    PubS.jpg
    1280 x 720 - 186K
    Post edited by Chohole on
  • csaacsaa Posts: 812
    edited May 2021

    pavsikakyj, this is beautiful work. Thanks for sharing.

    Cheers!

    pavsikakyj said:

    Continue with Topaz Studio

    Post edited by Chohole on
  • Oso3D said:

    And another, tweaking method:

    In this case I used shader pass to create a sketchy look (soft light) and then straight shader result (overlay) to darken and get the light balance right.

    A very effective result. This design would fit right in with a DC Mystic Hero comic or something from the League of Extraordinary Gentlemen. I like the glowing bits on the creature. My one critique would be that the detail on the column behind the creature is filling in the creature's mouth, which harms the composition. But, as this is really a focus on line and render technique, that's of minor importance. Well done.

  • mmitchell_houstonmmitchell_houston Posts: 2,472
    edited May 2021

    Here's my first attempt at illustrating the character, Cerebus the Aardvark. I got lucky and found a 3D model of him over at ShareCG, and then I just couldn't resist taking a stab at him (so to speak, since he would  slaughter me if I were to actually pull a blade on him!). I'm mostly happy with the results, but I do see a few spots where he needs a little attention. Since this is just a quickie character study, I didn't worry too much about the background, so I just pulled in some basic elements from the Clip Studio Paint brushes.

    This is also my first attempt at inking with vectors. Well, mostly vectors, because the base renders are still in raster format, so those layers stayed in that format. But the touch up uses vector brushes, which was an exciting addition to my usual workflow.

    BTW: The old-school screen tone was added because that's how Cerebus was originally printed. Trust me, this is very much in keeping with the character.

    Post edited by mmitchell_houston on
  • pavsikakyjpavsikakyj Posts: 139

    Kinda like a result


    pubin.jpg
    1280 x 720 - 261K
  • pavsikakyjpavsikakyj Posts: 139

    pavsikakyj said:

    Kinda like a result


  • kenmokenmo Posts: 895

    mmitchell_houston said:

    Here's my first attempt at illustrating the character, Cerebus the Aardvark. I got lucky and found a 3D model of him over at ShareCG, and then I just couldn't resist taking a stab at him (so to speak, since he would  slaughter me if I were to actually pull a blade on him!). I'm mostly happy with the results, but I do see a few spots where he needs a little attention. Since this is just a quickie character study, I didn't worry too much about the background, so I just pulled in some basic elements from the Clip Studio Paint brushes.

    This is also my first attempt at inking with vectors. Well, mostly vectors, because the base renders are still in raster format, so those layers stayed in that format. But the touch up uses vector brushes, which was an exciting addition to my usual workflow.

    BTW: The old-school screen tone was added because that's how Cerebus was originally printed. Trust me, this is very much in keeping with the character.


    Looks great...

  • kenmokenmo Posts: 895

    pavsikakyj said:

    pavsikakyj said:

    Kinda like a result


    Looks awesome.... 

  • kenmokenmo Posts: 895

    Portrait of an Elderly Lady

     Playing around with light, shadow and rim lighting. I created this illustration digitally using DAZ Studio 4.15 & Iray, Photoshop CC 2021 & ArtRage 6. Character is Ms Chow Genesis 8 character purchased at the DAZ Store.


    Portrait 08 Elder Lady {2021}=KRM02.jpg
    1400 x 1400 - 396K
  • pavsikakyjpavsikakyj Posts: 139

    kenmo said:

    pavsikakyj said:

    pavsikakyj said:

    Kinda like a result


    Looks awesome.... 

    Thanks. Topaz Studio 2 is a real pearl. Especially with Photoshop. 

  • pavsikakyjpavsikakyj Posts: 139
    edited May 2021

    This style is quite suitable for characters either.


    vladtalkright.jpg
    650 x 900 - 35K
    Post edited by pavsikakyj on
  • VyusurVyusur Posts: 2,235

    kenmo said:

    Portrait of an Elderly Lady

     Playing around with light, shadow and rim lighting. I created this illustration digitally using DAZ Studio 4.15 & Iray, Photoshop CC 2021 & ArtRage 6. Character is Ms Chow Genesis 8 character purchased at the DAZ Store.


    Wonderful! I like the painterly impressionistic effect on this portrait. I also have ArtRage 6 but I haven't tried it so far.

  • VyusurVyusur Posts: 2,235
    edited May 2021

    Here I tried to achieve pencil drawing look. It was Iray renders filtered with Akvis.

    Faust G81_02neon.png
    1000 x 1300 - 819K
    Faust_neon_01.png
    1000 x 1300 - 896K
    Post edited by Vyusur on
  • kenmokenmo Posts: 895

    pavsikakyj said:

    This style is quite suitable for characters either.


    Looks very good... 

  • kenmokenmo Posts: 895

    Vyusur said:

    Here I tried to achieve pencil drawing look. It was Iray renders filtered with Akvis.

    Like the pencil effects.... 

  • dakinidakini Posts: 142

    mmitchell_houston said:

    Here's my first attempt at illustrating the character, Cerebus the Aardvark. I got lucky and found a 3D model of him over at ShareCG, and then I just couldn't resist taking a stab at him (so to speak, since he would  slaughter me if I were to actually pull a blade on him!). I'm mostly happy with the results, but I do see a few spots where he needs a little attention. Since this is just a quickie character study, I didn't worry too much about the background, so I just pulled in some basic elements from the Clip Studio Paint brushes.

    This is also my first attempt at inking with vectors. Well, mostly vectors, because the base renders are still in raster format, so those layers stayed in that format. But the touch up uses vector brushes, which was an exciting addition to my usual workflow.

    BTW: The old-school screen tone was added because that's how Cerebus was originally printed. Trust me, this is very much in keeping with the character.

    Looks good! What software are you using for your vector line art?

    I'd never heard of Cerebus before so I Googled him.
    What a fun character, obviously, not someone to be trifled with!

  • dakinidakini Posts: 142

    pavsikakyj said:

    pavsikakyj said:

    Kinda like a result


    Very nice!

  • dakinidakini Posts: 142

    Vyusur said:

    Here I tried to achieve pencil drawing look. It was Iray renders filtered with Akvis.

    I like both of these images a lot!
    I'm impressed with the results you've gotten with Akvis. Your images look much better than many of their promo images.

    Akvis is new to me. Would you mind explaining a little about how you like it? Did you go with the whole suite of products, or just a few of them? Are you using them as standalone products, or plugins for other programs like Photoshop?

  • vrba79vrba79 Posts: 1,297

    Thinking of getting back into YouTube again, with a new Horror Hosting show. "Dr Sinister's Night Terrors"

    So naturally I had to do a render of the titlular character. This is all G1 stuff.


  • VyusurVyusur Posts: 2,235

    dakini said:

    Vyusur said:

    Here I tried to achieve pencil drawing look. It was Iray renders filtered with Akvis.

    I like both of these images a lot!
    I'm impressed with the results you've gotten with Akvis. Your images look much better than many of their promo images.

    Akvis is new to me. Would you mind explaining a little about how you like it? Did you go with the whole suite of products, or just a few of them? Are you using them as standalone products, or plugins for other programs like Photoshop?

    Thank you for your kind words! In this particular case, I used Akvis Neon Standalone. I always use standalone filters wherever possible. I also often use Akvis Sketch standalone.

  • juvesatrianijuvesatriani Posts: 556
    edited May 2021

    Great Render + Filter Choice guys !

    Here my attempt to create retro pinup style using Filament and Photoshop

    Filament Edit

    Filament2.jpg
    1000 x 751 - 632K
    Post edited by juvesatriani on
  • kenmokenmo Posts: 895

    juvesatriani said:

    Great Render + Filter Choice guys !

    Here my attempt to create retro pinup style using Filament and Photoshop

    Filament Edit

    Looks awesome.... 

  • vrba79vrba79 Posts: 1,297

    Filament, eh? I might have to give that a look.

  • dakinidakini Posts: 142

    juvesatriani said:

    Great Render + Filter Choice guys !

    Here my attempt to create retro pinup style using Filament and Photoshop

    Filament Edit

    Very nice!

This discussion has been closed.