Please Help with Portrait and Figure Lighting - Indirect Gamma 2.2
 Diomede
Posts: 15,182
Diomede
Posts: 15,182
Please help with lighting rig
Had a conversation that got me interested in attempting more realism than I normally do. I've watched PhilW's tutorial and I've followed some of the forum discussions, but hadn't paid as close attention as I probably should. I highly recommend Phil's realism tutorial. I don't have any of the HDRIs that can be shared, so I made a simple 3 point lighting rig of glowing sphere spotlights. The bulbs are cutouts of vertex spheres, and they are contained in a cylinder, sort of like a regular spotlight. The shaders for the bulbs have glows with values over 7,000 depending on key, fill, or rim. Similarly, the glow channel of the bulbs are multiplied by different colors for warmth or coolness. I have indirect light enabled. I have gamma set to 2.2. I have placed the rig inside a simple box made up of planes with the default shader.
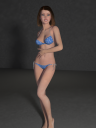
Test #1 - simple figure made up of items acquired fom the Daz store. This is the G2F Ysabeau character (slight other dials spins) wearing Hongyu's bikini 2 with '5 Times a Lady' long hair. The settings for the skin shaders are similar to settings for any of Ringo's skin shader products. Pose and expressions bought from Daz store.
Problems
- see splotches on floor and back wall?
- odd shadow transition on figure?
- other?
I have attached the lighting rig scene without the G2F figure and accessories. Feel free to explore, improve, experiment. Just load up your own figure and post some test renders. I'd very much appreciate contructive criticism on the light rig.
See attached zip file.


Daz 3D is part of 
Connect
DAZ Productions, Inc.
7533 S Center View Ct #4664
West Jordan, UT 84084
Licensing Agreement | Terms of Service | Privacy Policy | EULA
© 2024 Daz Productions Inc. All Rights Reserved.
Comments
Had a quick try with your lighting rig, but had no light on my Vicki-6, will try again tomorrow morning when my head is a bit clearer.
In the meantime I used EPs 3 point light setup as a comparision http://www.sharecg.com/v/49996/gallery/7/Material-and-Shader/Carrara-7-Studio-scene
These tutorials are helpful, I am only good for lighting for anime character but not for realistic characters, I was challenge to do a realistic character I had to struggle a bit.
Hmmm. Wonder why the prop lights are not working.
- Did you open the zipped scene as a new scene? If so, the render settings should have been saved (I hope).
- In the render settings, is gamma correction enabled and set to 2.2?
- In the render settings, is the box for indirect light checked? (and check the box for light through transparency for transmapped hair, eyelashes, crneas, and similar)
- For the prop lights, check the shader for the bulbs. The glow channels should be set to multiply. The first multiply channel should be a value and set in the thousands (eg. Key set to 10,000). The second multiply channel should be a color. (eg. fill set to a light blue).
- Is your subject placed where the prop lights are aimed? Upon default load, the lights should be aimed roughly at the center of the scene.
Here is the lighting thread that PhilW started that I am roughly going by.
https://www.daz3d.com/forums/discussion/25644/make-your-most-realistic-renders-ever/p1
Hi Ted! I tried your scene as is. Then I changed some things to my taste. I can not say that I am completely satisfied. I almost never use indirect lighting and never use gamma correction. It doesn't work for me and isn't worth it /imho/. I prefer Carrara's bulbs with soft shadow enabled as key light, and distant lights with soft shadow enabled as fill and rim lights.
Couldn't sleep so I turned the computer back on.
Opened your light scene first this time around and did a quick render, lights are working !!! Previous time I loaded Vicki in then added the lights so that must have been the problem.
Will have a play and see what I come up with, although the test render I did was much the same as yours.
Out of curiosity I also did a render with Vyusur's rim lights. https://www.daz3d.com/forums/discussion/comment/3702061/#Comment_3702061
Comparison Diomede & Vyusur lighting rigs
Thanks for posting the file, Veronika. You get great resuts. I will experiment more.
I haven't been using indirect light or gamma correction either. For these kinds of renders, sometimes I had been using spot lights with the half angle widened (lower number) and the angular falloff more dispersive (higher number) in order to try to soften the result. Other times I would put a bi-gradient in the background, enable sky light to fake GI, and use one scene light. Can't say I was ever gettng realistic results, but for what I was doing I wasn't concerned.
Thanks, Bunyp. Good to know that there is some light in my scene, even if it is not particularly good light.
Thanks. For indirect lighting rigs, the presence of walls matters!
I love the Realistic Rendering course for its immense wealth of information, and it goes especially well when combine with Jeremy Birn's Digital Lighting and Rendering tome.
In the end, like Vyusur, I don't find the power of indirect lighting (especially using glow channel for light-casting bulbs) to be worth the extra crunch on the system.
Some thoughts:
I used to always use a bulb (key) and distant for fill and rim as well, but have since switched to all spotlights for figures. I love the control. Of course, when it comes to scenes, I treat each as a new challenge, while keeping to certain conventions so that my scenes are all lit in a similar way against my character lighting.
Most of my renders you see - the characters are lit by their own spotlight rig (newer ones with soft shadows on all) as well as most of the lighting that was used to light the scene. Since Rosie's hair is four figure hair models stacked, each with transparency, I have that in a group, and often ask many scene lights to ignore it, then duplicate those and have them light only that hair group, but without shadows, or something similar. Her hair really slows down a render. But I've noticed that it looks a lot better (more realistic) if I don't separate it from the lighting and just wait - but it's a huge difference. For animating, my renders take about a minute per frame at 720p. There are exceptions, but mostly that. My Generation 4 version animation renders were between 23 and 46 seconds per frame.
As Jeremy Birn says (not a quote, just capturing the gist from memory), we have it lucky in the realm of digital lighting and rendering in that we can cheat!
I find myself using all manner of tricks that I've picked up from many people - mostly here in the Carrara forum. It's really fun to open old files I've saved from way back when. I really sucked at lighting! LOL
Astrophotographers (and casual observers alike) prefer the moon when it's either waning or waxing - never when it's full. Why? Shadows. Portrait photographers are no different, but they get to control the intensity of the shadows, not only just in brightness (darkness) value, but in color as well. Then add in a strong Rim light to make it al punch!
Carrara Browser's 3 point lighting presets are a lot of fun to try, and tweak to one's liking as well. When I get the chance I'll download and try your pack! ;)
Here is a different approach from me.
Spot lights for key and rim lights.
A light dome of distant lights at low power for the fill lights.
Gamma set to 2.2 with indirect light.
Store bought G2F character and clothing (Ysabeau 6 in the garden party dress). Hair is Carrara dynamic hair (custom) with highlight and shininess turned way down. Pose and expressions store bought.
Looks really nice!
It can also be a nice trick to exclude the ground (and other non-character elements) from the Rim, so the Key ends up casting the more prominent shadow on the ground.
At first I was wondering why the shadow (on the ground) ends at her waist. Alas... end of the plane! Silly me!
So you enjoy using Gamma Correction = 2.2 as well, eh? Here's a fun tip:
Have you ever toiled away at making a beautiful 360 degree scene, dropping in a spherical camera and making a high res spherical map - only to find that using it in GC = 2.2 renders results in a nasty over bright mess?
Carrara doesn't do that to texture maps, but it does to Background maps. Bummer.
Fix:
Also, using GenX2, my new Rosie figure is made using Ysabeau's head (on Genesis 1). I really like Ysabeau!
great tips dartanbeck
interesting post @diomede
I downloaded your light setup and gave it a whirl.. unfortunately it doesn't work in with my ways as it takes too long to render stuff.. I'm impatient that way.. but was interesting pulling apart your thought process to see how it worked.
I just go for the cheap and nasty way most times with just 3 lights for my figures.. turning off shadows for rim light and also fill light and using soft shadows for the key light. That's how I usually roll
simple example posted below.. great ideas being posted
Big improvement Diomede - after your thread asked the questions I went and looked at ring lights (in the real world) user tips.
Bought what I learnt int0 Carrara and found the ring lights act nothing like supposed 'real' world ring lights.
On the other hand using a rectangle in the shape lights section gave reasonably portrait lighting (well several rectangles)
Out of interest the lighting in the skeleton scene is one bar light from memory - so those shape lights are certainly well worth exploring as an adjunct to three point lighting.
The other things I have noted in the past is on the dark side of the face/body` the background is lighter and vice vers - just adds punch - great for painted portraits
nice thread tooo
This was never meant for Portraits
Attached is the Character Template that I use when bringing in a new figure to optimize and save to my browser. I actually have the background map saved in a textures folder in my runtime setup, but for this, I included the map and saved the scene directly in the My Objects folder. So if you simply drag the contents of the zip into your My Documents > DAZ 3D > Carrara 8.5 > My Presets > My Objects folder, that will be exactly how I saved it. But as long as you know where it is (or if you wish to replace it with your own) you may put the included map anywhere you like.
Things to know:
There's a spherical background map made using my environkits loaded into the scene, but the Backdrop is set to Color = Black. I do this for setting up characters so that reflections work, but I still have a black backdrop as I test render, etc., Just change it to None to render the map, but in GC=2.2, it comes out too bright. Insert a sphere and use the map on its glow channel is a better way to do that.
This is not set up to be the entire illumination - just the character's solo illumination. This way I can light my scenes and save them independant of the characters. The scene lighting with then catch the character and create the shadows from the character onto the scene, etc., and scene shadows will always be hindered on the character via this rig.
I almost always adjust the placement of the individual lights on a per scene basis.
My Rosie character uses duplicates of each light which is linked only to her hair and those do not cast soft shadows - hence the Clothing folder. In that case, I change the "Only" list on these existing lights to the individual figure and the clothing group, and the new Hair lights only for the hair.
dB's Character Template Carrara Scene Download
I'll try and make some screenshot tips after work
Adding everyone's ideas for future reference !!!
:)
This thread kinda got me interested so did a couple of renders with Gamma and Skylight { default setting of the provided setup file }
First the render took forever - so as I'm impatient there has to be another way.
Second, I thought the result was "Flat" and less than realistic as in this one .
Dieomedes said at the beginning - "got me interested in attempting more realism than I normally do " So what is more realism ? What is a realistic render ?
need some benchmark here which surely has to be a " photo / screen shot ' of a real person.
It would be interesting to have you guys say what "factors" you consider makes a " photo realistic" render.
Is it "sharpness" for example - not all portraits are pin sharp but a high level of detail is apparent in most photos. I just throw it open as to WHAT makes an image look real ' if thats what this discussion is about. Defining "realistic" is step one and how we get there in Carrara is step two. Lighting is part of it of course.
this is v4
three spheres as lights
gamma 2.2
indirect lighting
As a matter of fact (and by a strange coincidence), I'm working on lighting and more specifically on how to extract usable lighting from high quality HDR.
So I started a some tests from HDRI Haven Studio suite (High quality, free to download).
You can download the light sets from the file section of the CTS project. But more about it in another post.
First, what can you get with it (Mid-leg view, Carrara Hair)
Now, A Pierre Gonnord style also with Carrara Hair
And now still a Pierre Gonnord style but with transmapped hair.
Now, how to make your own :-)
Quite easy:
Speed is not too bad (except as usual for hair, Carrara or transmapped). Depending on the proportion of hair on the screen, the render above took between one and three minutes (30 seconds without hair, but SSS).
The lighting is designed to give maximum contrast and colour dynamic, with dark and crisp shadows giving dramatic renders.
Also, it's designed for speed. I'll provide later this week another version of this file with high quality lighting that take about 8 times longer to render.
Enjoy!
One more remark.
Shaders are important for a photorealistic render.
Skin is the "lana elite" shader from GKDantas. I just changed the "eye surface" shader because there was nothing to reflect. Instead, I changed the shiness and highlight setting to react to lights (10% hightlight, 20% shiness)
Cloth and Carrara hair shaders are just out of the box).
Main work was on the transmapped hair shader.
I upped the bump to 25%, lowered the hightlight map to 50% and set shiness to 0:
I hope it helps
thank you once again Philemo - you are a genuis !
+1
+ another 1!