[Released] Lighting Designer - Auto-Fill [Commercial]
 RiverSoft Art
Posts: 6,646
RiverSoft Art
Posts: 6,646
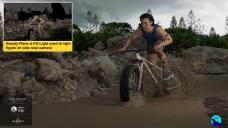
 Work smarter not harder! Perfect, precise, and absurdly fast, the new Lighting Designer - Auto-Fill by Half Life and RiverSoft Art will enable fine-tuned mastery over light in your Iray renders! With an easy to use and intuitive dialog, 3 powerful new custom shaders, and containing over 50 ready to use reflectors, emissive mesh lights, and spotlights carefully calibrated for studio or outdoor scenes, Lighting Designer - Auto-Fill gives you completely unprecedented control when lighting your Daz Studio scenes.
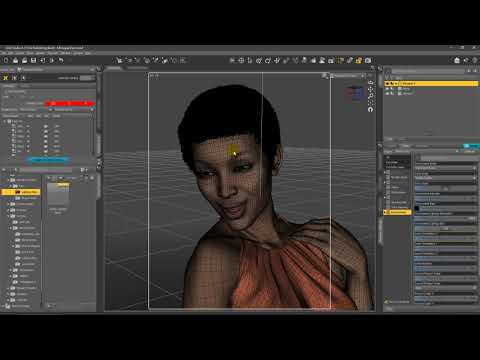
The Lighting Designer Create Fill script is designed to create reflectors, emissive mesh lights, or spotlights to precisely target any polygon on an object in your scene. Select the polygon you want to light using Daz's Geometry Tool, and the script will create a reflector or light precisely pointed directly at that polygon as well as positioned exactly at the specified distance away. Yes, it is really that easy to set up any number of lights you desire!
Lighting Designer - Auto-Fill also includes 3 powerful new custom-built shaders. The Multi-Emitter Shader introduces the ability to add an extra Luminance image (named "Hotspot Image") that will be composited with the regular Luminance. This Hotspot Image can be moved and resized within the Auto-Fill Plane to achieve any number of complex light stacking effects. The Gobo Emitter Shader uses a procedural texture to mask the Luminance and Cutout Opacity of the Auto-Fill Plane for complex visual effects, such as to mimic light coming through a window. The Ghost Emitter Shader creates a ghost light, an invisible light in your scene that can be precisely placed where needed while being unseen by the camera or reflections.
- Intuitive and powerful dialog for creating reflectors, emissive mesh lights, or spotlights precisely targeting any polygon in your scene
- 3 custom-built shaders for special effects
- Over 50 reflectors, emissive mesh light, and spotlight presets
- Create Ghost Lights, invisible lights in your scene that can be precisely placed where needed while being unseen by the camera.
Deliver a massive speed boost to your scene setup process and at the same time easily get the lighting you intended every time using the new Lighting Designer - Auto-Fill!
Features
- Lighting Designer - Auto-Fill
- Lighting Designer Create Fill Script (.DSE):
- Non-Emissive Tab:
- 01 Black Absorber
- 04 Reflectors
- Plane Outdoor Tab:
- 15 Light Plane Options
- Plane Studio Tab:
- 15 Light Plane Options
- Spotlight Outdoor Tab:
- 08 Spotlight Options
- Spotlight Studio Tab:
- 08 Spotlight Options
- All Panes:
- Light Distance
- Camera Controls:
- Longitude
- Latitude
- Radius
- Reset Camera
- Non-Emissive Tab:
- Additional Included Scripts (.DSE):
- Auto-Fill Fill Setup
- Auto-Fill Re-Aim
- Auto-Fill Spotlight Setup
- Fill Light Materials (.DUF):
- Non-Emissive:
- Black Absorber
- Black Reflector
- Gold Reflector
- Silver Reflector
- White Reflector
- Outdoor & Studio Calibrated:
- Beauty Dish 2up
- Beauty Dish 4up
- Beauty Dish
- Double Ring Light
- Ghost
- Ring Light 01
- Ring Light 02
- Softbox Gobo Horizontal Slats
- Softbox Gobo Random Grid
- Softbox Gobo
- Softbox With Hotspot
- Softbox
- Umbrella With Hotspot
- Umbrella With Ring Light
- Umbrella
- Non-Emissive:
- Lighting Base Render Preset (.DUF)
- Lighting Designer Auto-Fill Manual (.PDF)
- Textures Include:
- 8 Transparency Maps (1024 x 1024 up to 2048 x 2048)
- 11 .EXR Maps
- Daz Studio Iray Material Presets (.DUF)
Tutorials


Daz 3D is part of 
Connect
DAZ Productions, Inc.
7533 S Center View Ct #4664
West Jordan, UT 84084
Licensing Agreement | Terms of Service | Privacy Policy | EULA
© 2025 Daz Productions Inc. All Rights Reserved.
Comments
Looks amazing! Would love to see more pictures, esp. of the gobos.
The Gobos are custom dynamic shaders -- so they can be many things depending on your needs (though the base function is the standard "window" light). However it should be emphasized (for this product) the lights are meant for illumination (rather than reflection) and, with the exception of the Ghost plane, should be used off-camera.
I plan to do a YouTube livestream the day after release to go over some of the finer points using the product.
Here is a screen grab of the Gobo material parameters. As you can see by changing the parameters you could get many different types of window effects, including prison bars. Add your own image to show the scenery "beyond the window" to complete the effect in a more complex way.
It is worth noting that these are not "gel" lights, so the effect is not the same as light from a focused spotlight being blocked, casting shadows against the object -- this is strictly to add complexity to unfocused lighting (like a real window would usually provide). Think softbox lighting, which is in keeping with the "Auto-Fill" part of the product naming. A gel light would in no way be considered a proper fill light.
Not sure how you did this but it sounds very promising,
Interesting. Hope to see more renders.
I've been using Lighting Designer for every render I am doing. It is tremendously versatile -- however there is not much looking at a render will tell you about using it. The reason is: the purpose behind this product is to create fill lights (https://en.wikipedia.org/wiki/Fill_light). If done well, you most likely don't even notice a fill light... you only notice if it isn't there. Lighting Designer Auto-Fill is designed to help you control your shadows in almost all the ways mentioned in the Wikipedia link (including "negative fill").
Both of these renders are for other products but I used Lighting Designer Auto-Fill to help control the shadows... in both cases I was using the Iray Sun/Sky which is great, realistic and fast. However Sun/Sky has the disadvantage of creating really strong shadows. Using a few Auto-Fill planes really helped define the 3-dimensionality of the figure(s) in a extremely fast and simple way. There is almost no render I can imagine where you don't need to do this (to at least some degree) to get the best possible results.
That said, the idea of using a fill light (or reflector) is nothing new -- what is so cool about Lighting Designer is the way it does it. Easy, fast and effective -- seeing it is action is different from seeing the results, which is why I made the videos.
@Half Life
maybe some example pictures with a version of with fill light and without fill light would help?
I guess I could, but there are already tons of photography tutorials out there about lighting-- here is a really good example: https://digital-photography-school.com/how-to-make-diy-reflectors-for-tabletop-photography/
Nothing that was done in that example is not just as true in Iray. The same rules and tricks all apply.
As suggested, I rendered a with-and-without version of a recent scene. In the first I have only the Iray Sun/Sky... as you can see the heavy shadows are really obscuring some areas which I wanted to see some detail. So the second version has a few Auto-Fill Planes added to lighten the shadow areas to varying degrees. While this certainly is not the only way you could use Lighting Designer it is definitely an approach that I use frequently. Before Lighting Designer I had to position planes manually, which took way too much time and had an unreliable level of precision. Now I simply identify an area that is too dark for my taste and add a Auto-Fill plane -- super simple, super fast, highly effective.
And here is the Aurore promo without a Lighting Designer Fill and with Fill
Can this also be used for the other lights, like back light and key light, as well?
I wonder, how easy will be to find the proper polygon, to use it with Auto-Fill.
As I show in the second video you can easily change the intensity of any of the Auto-Fill objects after they are created. I set the starting point for all the objects to be good for controlling shadows (Fill Light/Reflectors) because this is the thing that is needed/missing most often when it comes to getting better, more photographic results in Iray, but the created lights can be made to serve any function you want. In the videos I show how you could light a scene from scratch using only Lighting Designer. So it is very versatile.
Finding the proper polygon to select is as easy as looking at the preview render. If everything else in the scene looks good but there is one area that looks too dark then that is where you make your selection. It does take a bit of practice/experience (like anything else) to get good at knowing the right thing to do... but Lighting Designer Auto-Fill makes placing the objects so fast and easy that you could experiment with many variations in a very short period of time. So even if you are not confident in your ability to know what is "right" you can make your renders better just through the ability to experiment with many different results rapidly. The more you do it the easier it gets.
I would also add that the main script creates an Auto-Fill fill/light directly along the surface normal of that polygon to ensure the light from the Auto-Fill object is illuminating the selected polygon at peak efficiency. However, nothing stops you from moving the light and then re-aiming at the polygon. You can move your lights/fills and then use the "Auto-Fill Re-Aim" script to automatically aim the light right back at the polygon. So if you want to make a light that is coming from the front and is aiming directly at a subject's nose (no matter how the head is turned), you can easily do so.
Ok, thanks for the explanation. Will wait for the release, then.
I may just have to put my renders on hold until this appears
You're welcome! I can't wait.
No, I wouldn't want you to stop. Besides, you need to do the "BEFORE using LD" renders anyway so you can post before and after pics in this thread
I love you.
Laurie
Off topic, but where are her arms?
If I get this product right there are some presets for interior and exterior lightning.
Based on this, the exposure value is 13 and internal around 7.
Would be be possile to make calculate the script the correct values of the light, bases on the exposure value? If use sometimes other exposure value, like 11 or 10 for interiors.
I would also like to know, if the script has some collision detection. E.g. if two figures stand face to face each other, or there is a wall close to the figure. Can the script detect this and position the lights properly?
LOL.
They blend into the coat. One is behind and hidden, but if you look carefully, you can see her left arm.
The script does not do either of these functions right now. If the product does well, we are considering doing an add-on which will adjust luminous when you move the lights closer/farther away (though this could be very difficult with the emissive mesh lights). It might be possible to do something with the exposure value as well.
I know you won't but ... if you do add that feature please don't make it automatic!
Definitely not, if we do create such an add-on, it would be an option.
One thing I don't recall seeing in the demo videos is teh option to set (or alter) the lumen value of the lighht prop/item added via the script
Once it is in the scene the Auto-Fill object can be adjusted like any other surface or spotlight. This is shown in the second video.
Yes, I remember seeing that, but it still might be nice, at least, to be able to spcify basic qualities/parameters such as lumens, colour, etc., when adding via the script.
The script is only meant to automatically positioning the Auto-Fill objects in 3D space (not a simple task it turns out). It is entirely possible to create your own presets for the script to place however.
The concept of modifying the objects while placing them is fairly complex due to factors like the different results between spotlight settings and materials settings. Not to mention that most of the materials used in this set use custom shaders -- some of which have more than one luminance control. I don't think it would be impossible to implement, but it would likely be extremely labor intensive due to all the variables. That would drive up the cost of the product considerably. So I think options like that are best offered as optional upgrades rather than force everybody to pay for features they may or may not actually want/need.
I suspetced as much, being an ex-programmer, plus it would be close to replicating V3Digitimes Iray lighting control product?