Hair Today
 laststand6522732
Posts: 866
laststand6522732
Posts: 866
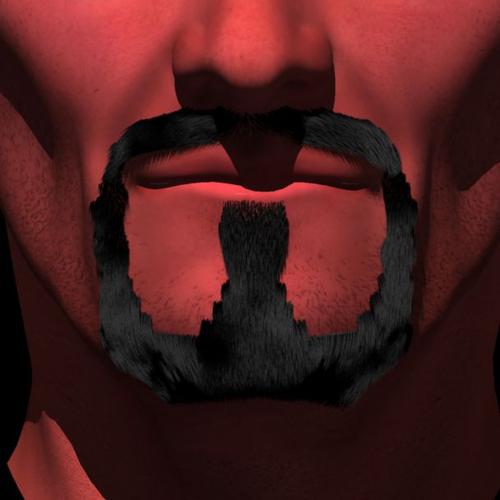
This (below) is my first venture into the hair room. It's a fair beginning. I do like the hair room tools, the few of them I can use.
Following cripeman's advice, I made a chin cap in Poser. It's a figure, so it will animate. But there's something I'm not happy with. See those stair steps? They show the corners of the polygons.
Here's what I'm thinking. I should be able to take that chin cap into the vertex modeler (after I learn to use the vertex modeler), and turn those square polygons into triangles, with the fourth vertex in the middle of the hypotenuse. I think I can turn those stair steps into smooth edges.
Am I on the right track?
Anything particular I should watch out for?
Thanks.
Daz 3D is part of 
Connect
DAZ Productions, Inc.
7533 S Center View Ct #4664
West Jordan, UT 84084
Licensing Agreement | Terms of Service | Privacy Policy | EULA
© 2025 Daz Productions Inc. All Rights Reserved.
Comments
The best thing to do is going in the modeling room, select the zone and clic to the tab "Model" and "Triangulate Polygons"... (One, two, three times...)
Or you could use the density add or density remove tool to paint the edges of the polygons to soften them.
This is using the hair cap, and it's a bit exaggerated, but I used the Density Remove tool- the clump of hair with a "-" sign to paint around the edges of the vertices. If you make a mistake, you could use the Density Add tool to fix it. It's the hair clump with the "+" sign.
Now here's another trick to define where the hair grows. You can add a density map in the hair length channel in the hair shader. It's basically a gray scale image map. White is full length, black is no hair and shades of gray in between are various lengths. the brighter, the longer, the darker the shorter.
I don't animate with the hair, so I usually just grow it on the figure and use the figure' UV map as a guide for when I paint my density map.
Painting the grow region is a bit easier than editing the mesh. ;-)
I had not learned something yet again today, thanks to you it is made.
I test that tomorrow, thank you Evil!
And I have Holly to thank for a lot of what I know about hair!
Something else to consider is that beard hair is different in its properties than head hair. It is more wiry, thicker etc. Have no fear though, you can use multiple hairs on the same model, just like you can use multiple surface replicators on the same surface! You could have on hair you define as beard hair and one you define as head hair. The beard hair could be thicker and stiffer and the head hair could be more fine and have more flexibility.
Ah HA! I was beginning to suspect I was going about it the wrong way.
I'll give this a try.
Is it actually possible to edit the vertices in Carrara, or do people use another program for that?
Thanks.
At first I tried creating hair groups without caps, a head group and a chin group. The selected group was green, the other group was blue. Everything looked good till I used the length setting in the General tab. It changed both groups at the same time. Argh! That's when I made the chin cap. I haven't made a head cap yet, so I haven't tested the length setting again yet. I have great expectations. :cheese:
We can do everything in Carrara !
There are a lot of tutorials on the net, an exemple:
http://www.youtube.com/watch?v=jPh72xHjFD0
Ah HA! I was beginning to suspect I was going about it the wrong way.
I'll give this a try.
Is it actually possible to edit the vertices in Carrara, or do people use another program for that?
Thanks.
Very easy to edit vertices within Carrara. It's just easier to paint in this instance.
At first I tried creating hair groups without caps, a head group and a chin group. The selected group was green, the other group was blue. Everything looked good till I used the length setting in the General tab. It changed both groups at the same time. Argh! That's when I made the chin cap. I haven't made a head cap yet, so I haven't tested the length setting again yet. I have great expectations. :cheese:
In the Objects Browser, under hair, there are hair samples on hair caps. You could just delete the existing hair and use those. There are also hair caps that came with Carrara's native content.
So far, I find the Density Remove Tool to be a guessing game. I can't see my results in the hair room, I have to go back to the assembly room (it doesn't show in the preview pane, maybe because I made the cap invisible). I haven't learned to love that wild gyroscope cursor yet either. The point of it is not clear to me. I'll need some practice at this.
So far, I find the Density Remove Tool to be a guessing game. I can't see my results in the hair room, I have to go back to the assembly room (it doesn't show in the preview pane, maybe because I made the cap invisible). I haven't learned to love that wild gyroscope cursor yet either. The point of it is not clear to me. I'll need some practice at this.
White is full density, blue is no density. You can adjust the tool size by manually typing a value lower than 1 by typing a decimal value. Try starting at .5 and go down from there for more control.
I certainly like the goatee. So you've made a chin cap. You could select that and click the edit mesh tool in the upper left of the toolbar - modeling in the Assembly room - and select those verts where they form steps and drag them to where they would look more natural. The magic of using a 'cap' style mesh is actually on a wonderful track to be - as you can add the hair to the whole thing like that. I like what you've done. The mesh manipulation I was just talking about could probably even be done while the hair is on it - so you can see the results as you model.
Very cool, Professor Rottenham!
Wow. Now I have to go back and read this cool stuff that evilproducer wrote. I could tell it was different than my gut instinct, so I wanted to tell you about that before I crash for the night. Tired.
The problem I have in the vertex editor is that I don't know how to control the movement of the vertex. I need a checkbox that says "Constrain the vertex to move only on the plain of its polygon." These vertices are moving in Z on me. I see tutorials about creating cylinders and cubes, but so far I haven't seen how to move a single vertex.
As a paintbrush, the Density Remove Tool has a considerable "feather" characteristic. Editing the polygons would be much more accurate.
I'm pretty sure you can get a sharper edge by adjusting the fall-off in the tool.
This isn't meant as a dig, but to use any tool to its full advantage, requires practice. It can be frustrating, but I'm sure even Leonardo broke a few marble arms off his statuary when he was learning to carve marble. ;-)
Much agreed, evilproducer! I'm going to learn to manipulate these vertices if I have to print the PDF out and eat it! :lol:
I actually use 3D paint to create a mask to use in the length channel of the hair shader.
you can create a new universal shader for the figure that uses a few nice big black texture maps for shading domains you wish to fuzz up, click on the little paint brush and eye icon in all of them in 3Dpaint, paint on it in white and shades of grey, save it to your browser and it will save the changes on your maps.
put your original texture back on your figure the add the maps you created in the hair texture length channels
your whole figure can be haired but only the painted bits have hair grey bits shorter according to intensity.
I also have done this in real time too for diffuse using 3D paint on the millenium cat. video
Thank you wendy♥catz, but right now, that's over my head. I've bookmarked it for when the time comes.
Having dreamed about this program most of the night, I got up early and was able to edit the chin cap vertices properly. Well, a lot better, anyway. I'm still fussing with it.
The problem I have in the vertex editor is that I don't know how to control the movement of the vertex. I need a checkbox that says "Constrain the vertex to move only on the plain of its polygon." These vertices are moving in Z on me. I see tutorials about creating cylinders and cubes, but so far I haven't seen how to move a single vertex.
As a paintbrush, the Density Remove Tool has a considerable "feather" characteristic. Editing the polygons would be much more accurate.For something like this, I wouldn't suggest using soft selection or anything like that. Looking at your image shows exactly what I mean. You see where there are 'steps' in the shape. Use the translate tool and select one point at a time. You could try using 'X' symmetry, but I would likely do each individually. So:
Select one of the points which creates a step - the corner of the step.
For more control of the movement direction - to follow the direction of the actual polygon, look over to the right panel, towards the top where you may place a selection in "World", "Something Else(can't remember)", and "Selection". Choose 'Selection' and the translation arrows will now align to the direction of the selection.
Now just move the points along, one at a time, to change the outline shape to something smooth.
This is why I suggest to model in the assembly room - so you can position the vertices correctly.
Basically you'll be turning square-shaped polygons into something that more closely resembles a triangle, even though they still have four points.
Another option to try is to select two points, each being the outer corner of a step, and go Model > Link (Shift Ctrl L) and see if it draws in that missing line. This might actually make for better topology, which would (should) result in better hair placement. If the link is successful, you'll now have a triangle polygon where a step used to be. Continue this process for all offending steps.
EDIT:
After looking at your image, I feel that this would make for a better option - but which ever is most comfortable for you. Personally, it would bug me to leave the mesh stepping like that - even though it's not visible. All of the threshold advice and masks, etc., is excellent advice - and should also be learned - as it helps immensely in Hair making endeavors. But singe you've already made this fine mesh cap, you have already created a nice mesh defining where the hair should grow. All you need to do is to eliminate those steps, which is really quite easy, using either of the methods I've mentioned. Might take a little time, but still easy.
I am doing just this as you speak, and I am pleased with the results. Symmetry is working well. I haven't put the hair to it yet, but I am optimistic. If the results look wrong or weird, I'll try the three-vertex thing you suggested.
This character is a fastidious bugger, and I want him to be well groomed in a closeup. Other characters - I have four in mind - will have different needs, so will use different approaches. Vertex modeling in Carrara has been high on my list of tools to learn, so I'm glad to get started.
Thank you.
Vertex editing came out not bad, room for improvement, but OK for a first try. Now here's another hair question.
The hair brush is able to brush the hair right through the object it's on, and out the other side. Is there some way to stop this, or is hair brushing just a learned skill requiring finesse?
I think you can restrict it to the mesh, or you can select the guide hairs in the region that is supposed to be brushed and then they will be the only ones effected by the hair tools. You can use the selection tool and drag to select the guides and if you get any you don't want, shift-click to deselect the ones you don't want. You can also shift-select any unselected guides that you wanted to include in the selected guides.
I've been laboring under a false assumption.
I learned about Cartesian Coordinates quite a while back. X is left to right, horizontal as you face the cube. Y is vertical. Z is depth. I thought this was some kind of a standard. I never questioned it.
Inadvertently, I just learned that Carrara swaps Y and Z. :ohh: This is why some of the controls haven't worked for me. Argh...
If I was a drinking man, I'd go for the bottle now.
Leave it to the Frenchies that wrote it. ;-)
Or maybe think of it as the Ford of CG. Ford looks at what GM and Chrysler do, and then does it the completely opposite way. :lol: That doesn't mean Fords are bad, hell, I've got an F150 4X4 with over 200,000 miles, and the worst thing I had to pay for was a governor on the transmission. The same with Carrara, it does things a little differently sometimes, but that doesn't mean it's not a good piece of software.
That should be the worst it has to show me.
Compared to Poser or iClone, the Carrara UI is the least inscrutable. It has the best learning tools as well. It's the only one of the three with modeling tools. The program is stable and fast. I've decided to go with Carrara.
I study every day, so I'll be here every second or third day. Thanks for your help.
I'm glad you had fun and good results with the modeling. Another trick you can try now is to turn off hair collisions on the actual character, and sink this mesh slightly below the surface, or raise it - what ever you need to do with it. Such well groomed facial hair shouldn't really need to be animated anyways, right?
The method I've been experimenting with comes from Infinite Skills Advanced Carrara Techniques, taught by our very own: Mr. Phil Wilkes
Phil's most generous working files include a V4 hair setup, V4 Proxy model (stand-alone and animate-able) and a V4 Conforming Proxy. He didn't have to give us this stuff - but he did. That set of things is certainly worth well over fifty bucks alone! Anyways, the way I use it is to turn off hair collision on V4, as I've said above. I then use the conforming proxy model and the included hair. It's a great starting point for a V4. Eventually, I want to get more of his hair products, too. In the thread I started on Dynamic Hair, 3DLust has some excellent tips, and Holly pipes in as well as Wendy and others. Practicing with the settings for collision, gravity (scene effects), etc., also plays a big part in animating the hair. I try to imagine how much friction I ant the hair to have, itself- and then how much does the clothing have - even though I actually have hair collision on the clothes turned off - and I'm using these settings on the proxy instead. So I'll edit the proxy to the shape of the clothing too, if necessary - more fun modeling in the assembly room.
You know... trying to do any of this stuff without a modeler... yikes! Carrara just nails it on the head, right?!!! :)
Leave it to the Frenchies that wrote it. ;-)
Or maybe think of it as the Ford of CG. Ford looks at what GM and Chrysler do, and then does it the completely opposite way. :lol: That doesn't mean Fords are bad, hell, I've got an F150 4X4 with over 200,000 miles, and the worst thing I had to pay for was a governor on the transmission. The same with Carrara, it does things a little differently sometimes, but that doesn't mean it's not a good piece of software.
It is all the same the “Frenchies” and…. Americans who developed Carrara!
The way to do this would have been to offer a NORMAL/WEIRD setting in the preferences panel.