Daz 3D is part of 
Connect
DAZ Productions, Inc.
7533 S Center View Ct #4664
West Jordan, UT 84084
Licensing Agreement | Terms of Service | Privacy Policy | EULA
© 2025 Daz Productions Inc. All Rights Reserved.
Comments
I think that might just be the HDRI I'm using, DOF is currently disabled on the camera.
Shoulder Cat
Mk0
I decided to try out Power Pose, and modelled it off of the antics of an overgrown kitten. I can see the appeal, but I don't think I'll make much use of it going forward. I prefer working in one dimension at a time, and I find that numbers help me. With Power Pose, I kept getting a joint good on one axis, only to lose it while trying to get the other(s) where I want them.
No reference pic because that cat is very camera-shy: If he notices you get a camera out, he will stop doing what you wanted to capture.
I have no idea yet where I want to take the image. The cat's posing can use a bit more work (especially getting the paws right), and I think I want to experiment with dforming a bit. It's probably going to become an indoor scene, but past that I have no plans.
That cat turned out so cute! How did you get the model to get that expression?
My 3rd attempt at rendering!
The cat's expression is entirely down to gross joint controls on the head and neck: 12 degrees here, -6 degrees there; otherwise entirely stock. One of the adjustments I'm currently making is playing with the finer details.
As for the human, that would be 36% Excitement HD, 63% Incredulous HD, 36% Smile Full Face HD, and 36% Surprised HD; all from the basic Genesis 8 Female Expressions. I should really start playing with the facial rig directly, but for now those sliders are quick and get the job done. Honestly, I'm probably going to keep relying on that one package until I either want to do something it can't do or the next Genesis comes out.
Hello,
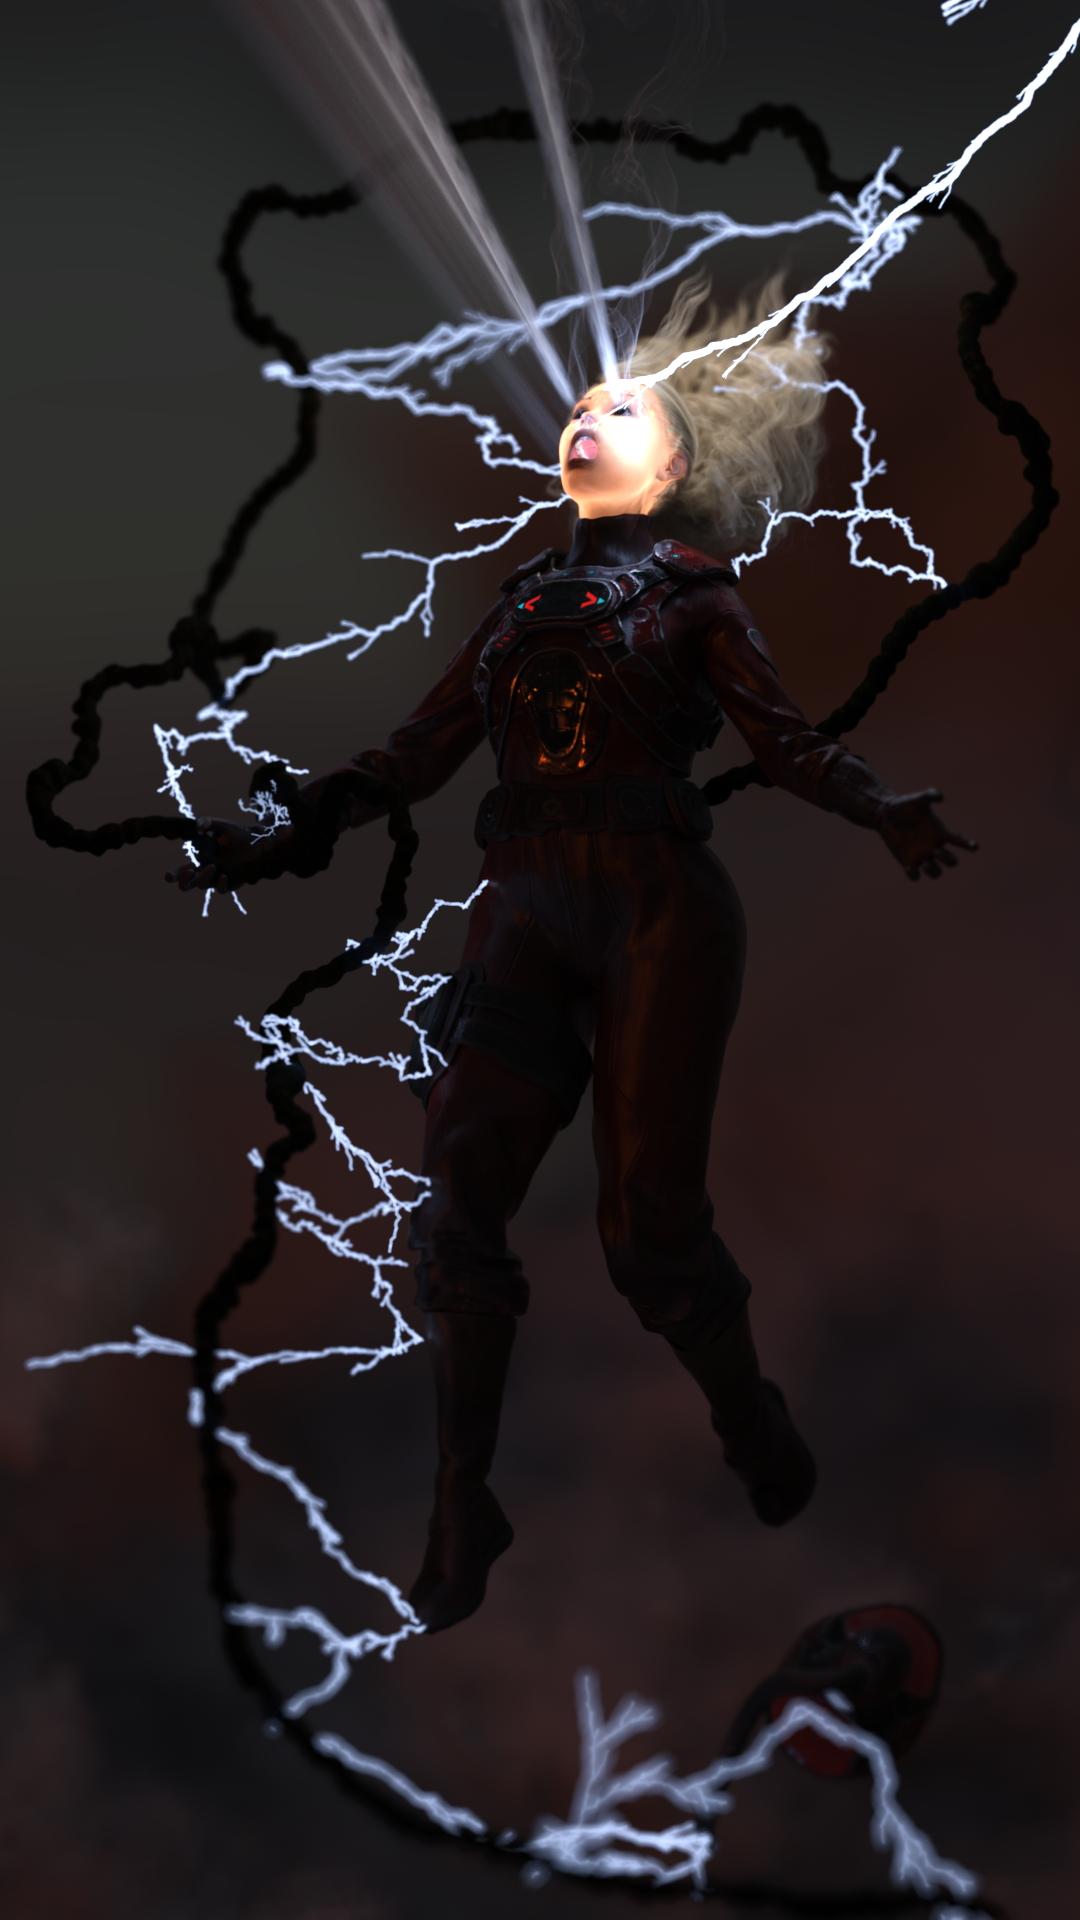
i keep working on my "Sunny" and added some "brizzel" and "dizzel" here and there. I mean lightning. ;)
I also added more emissive lights to the colored Buttons at the Suit. (dirty work on the Diffuse Map, deleted all Stuff that do not emit light and put it in the Emission Map)
I tried to set a logic Golden Rule.
After 3 Days rendering i got this:
@L'Adair: Thanks for sharing your Render Settings. I thought the caustics do not change much in render time, because time was the same. So Render Quality hit in and any rendering was less then 2 hours. But the rendered Iterations went down.
After switching off all that things the most grain gone. :)
Another entry. Feel free to give opinions. I will upload the full-size image at the end of the month.
I'm loving how she looks and the lights coming out of her eyes.
Not so much the lightning and the black thing in the background. For me it takes from the realism of the photo.
I'm sorry I don't have enough experience with these sort of things to tell you how you could make it more realistic
Alright I played around with the camera a bit more and I think I actually kind of like this, I may have accidently undone some previous recommendations that were made, sorry.
3 days?
allow me, what render settings are those?
a question, is this fast or slow?
Before I purchased a bleeding edge computer with an Nvidia card, (3-1/2 years ago, so now more on the dull edge…) I would wait as much as 7-8 days for my barely-powerful-enough-to-open-Daz-Studio computer to render an Iray image to 2500 iterations. Back then, all my images were rendered CPU Only. To be fair, 3DL renders weren't much better. That's why I spent $3100 on a new computer. But that was over two years after I started working with Daz Studio, because I had to wait until I could afford it.
@Smoerebroet, don't be discouraged by the time it takes your computer to render an image to your liking. At least you have a computer powerful enough to run the software. I picked up DS 3.0 during a free promotion, (when Daz had both a standard version and a pro version, I think,) and my computer back than couldn't even open the software. Being an electronics technician, I've been fascinated with 3D graphics most of my adult life, but I never spent the money for high end computers and was not able to use any of the 3D software I'd managed to pick up here or there. I honestly didn't expect DS 4.7 to run on this computer when I installed it, but a friend needed a wyvern-like creature for a book cover, so I gave it a shot. (It worked. I got addicted. What more can I say? lol)
@_ AL1vE _, I shared my render settings earlier in this thread, here. I go into an explanation of why, if you're interested, but here's a list of those settings:
These settings turn off the Stop Conditions of Quality and Time. Then the only condition the rendering algorithm uses to determine when to stop rendering is Max Samples. (You cannot turn off Max Samples.) With 4.12, I really don't need such a high sample rate. Later versions of Iray do much more with each sample. I end most of my complex renders by 7500 samples, and I stop simpler images in the 2500-5000 range. A lot of how long is dependent on whether or not refraction or reflections are involved. I let the images render longer to bring out the subtle details when glass and/or liquid are in the image.
Thanks for the criticism. :)
The black thing, do you mean these nice guts? xD
I played around with different shader, but in that render i forgot to give them glossy back. I can't remember what shader they have now, certainly some cloth or fluffy shader.
I'm also not very experienced in realism rendering, but i try.
The lightning is difficult, to much possibilities, to free to use. I made 5 different versions, with less, with ridiculous many lightning. But I'm very sure if i put a "real" lightning in it, everything would be white and nothing to see.
I'm still searching a program to create "Lichtenberg" fractals for the skin, but I'm not successfully. :( (I'm not that good in math to do it myself.)
Short answer: I would say it is poorly slow. But i don't care about to give my PC some work. ;)
My settings are close to L'Adairs Comment: https://www.daz3d.com/forums/discussion/comment/5497836/#Comment_5497836
But only 8000 iterations, caustics on. Maybe 5000 is enough, depending on how much stuff is to be rendered and the resolution of the picture. (I'm not 100% sure.)
I have a 2016 XEON Quad, 32GB RAM and a Radeon RX 480. Not the newest stuff but very stable. No blue screen since years. :D
That's my dream. As long as an Nvidia that can render that fast cost more than all other parts of a PC in summary, i can't and wouldn't buy. (Where is my lottery jackpot?)
@L'Adair how many years ago was it that you first tried Daz?(5 Years?) What's your PC spec now and is 3d art your profession now? I have been doing it as just a side activity but I wonder how 3d art plays in profession.
I'm not discouraged. I have alot of fun with DAZ till now. :) Even a render needs 3 days. But honestly i wouldn't render longer that these 3 days. I was still able to work with Lightroom or Krita (My test for a Photoshop Derivat.) in the first two days while DAZ worked. Slow, but it worked.
Btw of iterations. Do you know what happens (missing) when a render is canceled. I mean, when the max Iteration is set to 15k but canceled at 8000 what will be not complete rendered? (Lightspots, Colour, Black Spots, Edges, surfaces?) What is the "last" thing that iRay render or add?
Max Samples: 15000
is that correct?
I probably would think more of 1500 at most but more likely 150 to 600
some settings in case the upload didn't work
but I have to say I don't render heavy stuff in DAZ but in Blender with ProRender because I'm a AMD guy (not really by choice but it happened that way)
share your thoughts please
@TristanQEverett, When I first tried Daz Studio? Based on my profile "joined" date, I'd have to say September 2007. That's when I "bought" the free 3.0 version. I bought this computer, an off-the-shelf HP, (from Costco, so you know it was already on the edge of obsolete,) in the summer of 2014. End of September, 2014, I made my first real purchase—the aforementioned Wyvern, along with the PC Membership and the Ranger Bundle for G2F, among other things. This computer is an HP 700-327: Intel i7-4770 @ 3.4GHz, 16GB RAM, 64-bit Win7Pro OS. I still use it for everything but graphics.
Though not exactly a "side activity" as I'm retired, this is just a hobby for me. A very obsessive hobby, but still just a hobby. For now.
The reason I bought The Beast was because this computer was totally useless for anything else while rendering. That means, for days at a time, even trying to check email was an exercise in frustration.
My render computer was built to order: The CPU alone was over $2500. Here's what got:
That's the gist of it, anyway. I paid for little things to make it run quieter, and they had some free items I accepted, (but still haven't used!)
The case is huge, which means there is a lot of room for air flow, helping keep heat issues at bay. I was going to get a second GTX 1080, but then prices skyrocketed thanks to the "cybermining" craze. Now it would be cheaper to add an RTX 1080, (maybe even 1080Ti,) than get another MSI Armor. So I make do with just the one video card. The power supply may be overkill, but it also runs cooler, and I'm prepared for the day I can get dual video of cards of an as yet undeveloped technology! lol
Besides replacing the watercooler after a bit over one year, I also purchased another 32GB of RAM. The Windows paging file can really cause trouble with the LAMH Catalyzer. 64GB alleviated that problem for me, along with adding restriction to the paging file. (Though Substance doesn't like the small paging file one bit. It's always something!)
I'm not the one to ask about how 3D art plays in profession, but maybe @knittingmommy is around and can give you some insight on her workflow. She's a published author on Amazon, and if I'm not mistaken, uses 3D to create her bookcovers. In fact, there are quite a few people in the forums who create bookcovers with Daz Studio, though I don't recall names at the moment.
Yes. That is correct. However, I'll manually stop a render at any point, if it looks "done" to me. I determined that default many versions of Iray back. I've just never bothered to modify my default settings. If I'm rendering while I sleep, I see no reason for the render to stop in the middle of the night. lol
But I also tend to render dark images, with or without high contrast. For example: Enemy Of My Enemy, or more recently, Hospitality or Working Late. It takes longer with darker images, even when you set up the lighting to be brighter and use Tone Mapping to render darker. And sometimes I just can't get the look I want with the Tone Mapping trick.
As I said, with simpler image, (and brighter,) I frequently stop the render at 2500-5000 samples.
By the way, I usually find something I need to fix, so I stop the renders by changing the Max Samples in the Progressing Rendering settings. That way I can do a spot render of the fix at the same number of samples.
Also, Daz Studio is the only 3D program I render in; The only 3D program I feel I'm any good with, actually.
Snip
L'Adair and @TristanQEverett- I've tried making my own covers, but they've never quite worked out yet because most of what I write is romance. The romance niche hasn't been very accepting of 3D cover, but that's changing. I'm also still honing my postwork skills. The best covers I've made so far are ideal for cozy mysteries which I don't write yet. I'm saving those covers because I do have plans to write some cozies in the future. For my romance covers, I've mostly used purchased covers to date or covers I've made using stock images. I have a few Sci Fi books planned and I'm planning to do the covers for those books with Daz assets. I think my skill level is almost there for the types of covers that are popular in the sci fi niche. That's also where you'll find most Daz assets in covers. They are great for doing space scenes and aliens and spaceships. Urban fantasy also has a lot of great covers using Daz assets.
Tthere are some professional cover artists that do use Daz Studio to render out assets to use in their covers. I've learned a lot from them about how to make the most of Daz Studio assets. If a person were to get good enough, they could make decent money using Daz Studio for cover art. Most covers go anywhere from $45 to well over $300 depending on the cover and the artist.
However, I have used Daz Studio to make clipart which is totally fun and can be profitable. I've also used Daz Studio to make some coloring book pages. You can get some really great linework with LineRender9000. I haven't done this, but I know there are some Daz people who upload their artwork on stock photo sites like Shutterstock and Depositphotos. There's a large number of fantasy artwork on those sites that are very well done using Daz Studio. I'm not sure how much people make by doing that though.
Most of what I use Daz Studio for as an author is set up scenes to make it easier for me to describe in my books. It's really beneficial if I have an action scene and I need to know where everyone is and what they are doing.
As for how long it takes to get proficient? That's a tough one to answer because everyone's skill level and how much time they have to devote to learning how to use Studio and then postwork is going to vary. I started in 2014 according to when I made my first purchase and logged into the forums for the first time. However, I didn't get serious until late 2015. I spent most of that first year making really bad renders. I learned a lot about how to use Studio and spent a lot of money on things I probably didn't need buy. I've found I have an addiction to buying shaders so I can pick them apart and figure out how they did that. I didn't get what I would consider somewhat good until the last couple of years. It was like a lightbulb went off inside me, and my renders improved exponentially. I can't really say what that trigger was, but suddenly it was much easier to get a decent render. I still have my flops though. :)
Workflow is a little hard to describe because it depends on what I'm rendering and what I'm using the final product for.
For book covers: I don't render out full scenes. I render out one or two characters or a spaceship or a background piece. Then everything is put together in a program like Photoshop or Affinity Photo (my newest favoriet program!). That's where most of the magic happens when it comes to book covers.
For rendering the scenes from my books, yes those are rendered full out. Scenes I think are good enough, I've uploaded to my author page or shown my fans. They go crazy over stuff like that so it's good PR. I've also made some cartoons of characters from my book and my readers have enjoyed those.
For coloring books, I usually render out a full scenes, but I've also rendered out one or two things at a time to build up my library of images to create new coloring pages from assets I've used before. I try to make these so there is very little postwork so these are mostly straight renders that I then vectorize for later use.
@TristanQEverett Take the time to learn the program and figure out what it is you think you might want to do with Daz Studio in the future. Whether it's clipart or book covers or something else entirely, you need to figure out what your goals are because each one has a completely different set of skills you need to learn, both inside Daz Studio and in other programs. Just remember that for most (not all) artists that use Daz Studio, it's only the beginning. The render is the first step. Learn everything you can inside Daz Studio and you're halfway toward whatever your goal is.
I hope that helps.
Daz Studio has some amazing tools. We are also using Iclone7 with realtime Mocap, 3DXchange, no name a few. I find that most artists seem to shy away from micro-close-ups. As you see in this render I focus on them to bring a more semi-photo-reaistic look. I do have many years in the business and a Director's eye (this can help), but anyone can achieve the right look with the proper lighting, camera's, and Iray settings. If you back off on the ISO Settings/Enviroment/ISO or Turn off the Headlamp on your Camera settings and add your own spotlights you can reach a more dramatic effect. Don't rely on Post-Processing to achieve the look. I've used Photoshop for 25 years and it can be a cruch for some artists. We are producing a Full Length Animated Feature (Star Centurions) with assets purchased or licensed from the Daz Store to show artists the true power of the platform with minimal production time. The image submitted was achieved in one hour. This is what I do: 1. Create New Cameras 2. turn off Camera Headlamp 3. Place 3 Spot Lights in the Scene. (Standard on the set in hollywood). Light Temperatures, (Based on the Films Color Pallette). Usually 6500K for Warmer enviroments, 7200K for cooler enviroments. If your background is the North Pole (7200K) if it is a warm sunny day in the country then (6500K) 4. Render a shot with 3DL settings and adjust lighting to your liking. 5. Turn on Headlamp and Iray render 2nd. shot. This is what you achieve in the image attached. Piece of advice fellow Artists; Turn down the lights! make your shots dramatic do not be afraid of the dark it belongs with the light. Best wishes, Michael Spartan/CEO Hollywood Aimation Studios.
I am still working on my other image of the couple in Rosemill Moor room but thought I'd also ask for some feedback on this image too
This is my first draft of my image for the current Hivewire challenge (I hope it is ok to ask for feedback on an image that is for another site) I used IBL Master for the lighting. I'm planning to add more flowers - The tulips and Lillies were the freebies from Hivewire and I'm planning to add pansies too. The cat was another one of the freebies.
The girl is FWSA Finley with Growing up morphs applied to turn her into a child.
@Knittingmommy Thank you for your time and explanation. @SFXDIRECTOR Thank you, Great tips and I will keep them in mind.
@sueya You are doing great. I don't see anything out of place. Good use of Hdri in the background. The cat looks natural but isn't her tail bit too straight but nothing too serious. The pose of the girl also looks very natural. There is a lack of shadows overall in the scene but I will assume it is a cloudy day. Looks great even without heavy shadows. Great Work! I do feel like its not a good idea to post pics here which aren't related to challenge. At the very least, Mentioning that it's not an entry at the start of the post might help a bit.
Great work. I also wanted to suggest about camera angle but you did that before I was able to say it. This is just my opinion. I think the camera is still a little too high above the ground and I think the camera should focus on the subjects of the image which are the models but after looking at the picture for a while. The Chandelier, window lights, and chairs are kind of pulling my attention away from models. This is all just my opinion and I have hardly any experience to make a judgment. I will look forward to the next version.
I like your shoulder cat. When I was little, our Siamese would ride around the house, wrapped around my dad's neck. Good memories.
I have taken @TristanQEverett 's advice by changing the camera angle and focusing on the couple. I'm pleased to see that both figures are now reflected in the mirror. I was wondering whether to remove the chair
I haven't had much success with the volumetric lighting so I removed it and used the Gobo option on the light coming through the window. I tried to create my own light gel as I wanted to use one with a blue gradient but I couldn't get it to work. I just applied a blue gradient layer to an existing gel and blended them together in Photoshop but then I couldn't load the file I created in Daz Studio. I've attached another image to show what this looked like with the volumetric light.
I think I found the problem. The Iray render was stopping after about 10 minutes, which on my old computer is not very long. I reset it to run for a couple of hours (what it normally takes) and got this image. (I also rearranged the lighting and some materials slightly. And @no nose was right about the zoom not being correct. Here is the (almost) final render.
Another Entry. Could anyone tell me if this and my last entry is too dark or are they decently-lit? I forgot, was there an upload quality limit of 800 pixels? I will upload all my entries again before the challenge ends with more info about how much effort I put in these and which is a beginner and which is intermediate.
A first iteration of my vision.
I think those mirrors are small. I once did a render with a mirror that was small and did not show the reflections well, so I stretched it horizontally to get a proper reflection. Seeing there are two mirrors here, you can remove one and stretch the other which will remove the empty mid part and will help show both models. I still feel the camera is high. I have no idea what to say about chair but it less distraction now. You have made a beautiful scene. Again this is just my opinion and you are free to do what you like. Good luck!
Decided to try and turn off the emissive light I was using for the face, does it look any better?