Problem with realistic renders in Bryce and when exporting and sending things to Daz Studio
 ChrisSerket
Posts: 202
ChrisSerket
Posts: 202
Before I tell you my problems, I want to mention that I do not speak English, so I am using google translate to write to you.
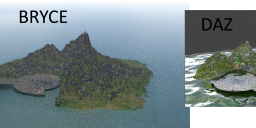
Well I'm trying to render (or sets of renders since it's supposed to be an animation) as close to a photorealistic result in Bryce 7.1. I know very well that Bryce is not photorealistic, but I have seen several users of this forum achieve results that seem totally photorealistic. I have Bryce's PREMIUM option selected for the best result, but it still doesn't convince me and when Bryce finishes rendering, it still looks very pixelated (I'll attach image below). Could someone tell me the most realistic Bryce setup or what else should I add? I don't mind that it takes a hell of a time rendering.
Well, my second dilemma is that thinking that maybe Bryce has no solution, I moved my scene to Daz Studio (the most current version), and imported it in both .OBJ and .3ds format (I had to use for the latter format Hexagon to send it to Daz Studio for the bridge), and setting the parameters to the maximum when exporting (maximum number of polygons and vertices and maximum quality of textures), but it still looks like I showed you below when rendering (not to mention that the water and the city are not bryce's, and that makes it look incongruous.)
And as for the bridge between Bryce and Daz Studio, it doesn't work for me when it comes to sending things from Bryce to Daz, but it does work when I send things from Daz to Bryce.
Personally I don't know what to do, and if I had to choose one path I would choose to achieve the best render on Bryce himself.
Any advice?
Regards.
Daz 3D is part of 
Connect
DAZ Productions, Inc.
7533 S Center View Ct #4664
West Jordan, UT 84084
Licensing Agreement | Terms of Service | Privacy Policy | EULA
© 2025 Daz Productions Inc. All Rights Reserved.
Comments
ChrisSerket - welcome to Bryce! I do not see where the problem is - the language is NOT the problem. I do not see pixelation but it might be that the terrain has the default 512 ultra-fine resolution, which is not exactly ultra fine. Try with a higher resolution (1024 massive resolution or 2048 gigantic). Bryce uses grey-scale height maps Studio cannot import (hence the bridge doesn't work). You seem to have figured out how to export the terrain from the TE (terrain editor) as an OBJ mesh which Studio or Hexagon can import. Please note that Bryce uses procedural textures that are exported as images, and they seldom look good; bump, specular, etc. are lost. That is why the water and the city look bad in Studio.
Yes, I understand what you say.
And it makes a lot of sense to me, so my idea is to do this in Bryce even if it takes weeks to render about 10 seconds of animation.
I love Bryce's landscape style and find it to be quite intuitive, which is nice.
Lord Horo, where can I see the ultrafine thing?
Good. Select the terrain and click on the [E] to open the TE. The rest is in the picture.
Hi Chris and welcome to the wonderfully baffling world of Bryce.
I see not pixellation but noise in your render. This can be improved by increasing the RPP setting in the Premium Render window. (it defaults to 4 but really for most things, you're going to need 36 or more. Each incremental increase in RPP (Rays Per Pixel) will double your render time, so it's always a good idea to test how much you need to reduce the noise to a level you find acceptable.
As a side note, if you're thinking of rendering an animation in Bryce, you most likely wouldn't want to use any of the common noise adding settings like True Ambience or Soft Shadows because your resulting animation will look like it's being invaded by a giant swarm of ants as all the noise jumps around from frame to frame.
Getting photorealistic renders from Bryce requires a lot of things to be in place. Materials used, Lighting set up and render settings and even Camera Settings & Position all contribute to the photorealistic result. It is very rare that you can apply a preset Bryce Material and have it looking great, which in turn requires a good deal of knowledge about the Material Editor (and sometimes heaven forbid, the Deep Texture Editor). Lighting is fabulously versatile in Bryce with a selection of different lights available, The Bryce Sun (which can easily be turned on and off), IBL (Image Based Lighting) using HDRI Backdrops and all the settings in the Sky Lab can add realistic looking atmosphere to a render, but again, the preset skies are now very old and don't take advantage of the most recent additions to the Bryce Toolbox (I say "recent" but that was 11 years ago), so knowledge of how to use the Sky Lab is an advantage.
Render Settings are massively complex, but as a rule don't ever use the Fine Art setting, it has no real advantages but it will give you the longest render times imaginable. The Regular Render and the Premium Render are more than just 2 render settings, they are completely different render engines and both have advantages and disadvantages. Personally I find the Premium to be the most efficient and depending on the subject matter, True Ambience gives the most realistic results (as long as the Rays Per Pixel is set high enough to reduce the noise).
But really, there are a thousand different things to consider when setting stuff up in Bryce... Luckily you're in the right place as we're a helpful bunch and can/will talk you through stuff as it occurs.
Many thanks to both of you, you really make me feel like I put my doubts in the right place.
I personally didn't want to have to send this scene to Daz Studio as it was losing the visual effect I wanted to give it. So they have saved my life.
Now I'll try the ones they both say.
But I have a doubt. Is there a way to change the preview window (which by default is wireframe in my opinion) to a 3D window where it can be viewed with geometry (albeit an approximation to what will be displayed when rendering) like what it does Daz Studio, Carrara and Hexagon?
Edit:
I was checking the "ray per pixel" and they were at 64, does that mean I would have to put it at 144 or 256 so there is no noise?
Yes, you can change the settings for the main window... Though if you try it, you might decide quickly to go back to wireframe as it slows workflow down a lot. It can take Bryce a while to redraw the screen when you're moving stuff around etc.
Running down the bottom right of the screen, there are a set of small icons. You want the one that looks like a Cube just above the + and - magnifying glasses.
Open GL Mode: Smooth Shaded or Texture Shaded will give the result I think you're looking for.
I understand, thank you very much.
So to reduce noise would it be more advisable to set it to 144 or 256?
For the render you posted above, I would be looking first at the Haze settings in the sky lab (switch it off to see what effect it has on the quality of the render) and selecting the water plane and having a look in the material editor to decrease it's frequency... Thereby making the ripples on the water bigger and less likely to produce artifacts.... But yes, as a general rule, the higher the RPP is set, the less noise you will get in your finished render.
Also in your Render Options window, you will see a setting for Maximum Ray Depth in the third column under the heading 'Optics'... Set that to 3 (it defaults at 6) to potentially speed up your render. Not by a massive amount usually, but every little helps. 3 is usally enough unless you've got glass or other obvious stuff you need to see through properly.
I understand, because I just put it at 144, but I don't feel any change in the final render compared to when it was at 64.
It just took longer to render.
I will test your solutions right now.
By the way, in another post I saw a user who recommended the following:
"Set the bump value to within the range of -20 to 20".
I wanted to try that too, but I can't find that BUMP option to change the range anywhere.
Where would you see that?
For me, personally, Bryce's way of things with this case is not very natural. Like i sometimes have to "change something - render - change more - render - change - render" each seconds for smallest change (and sometimes it ends up that i was blind a bit in wireframe and did wrong move, so i redo, see render, then redo again), in situations when in wireframe i almost don't see what is what and loose orientation in space (and if i have many boolean shapes, all those negative objects are huge distractors)... So of course Flatshaded 3D view is something much more convenient for me (maybe cause i experienced a bit of Blender, Maya etc. before brycing). However... From my experience, those Opengl modes are not very stable and sometimes doesnt provide good visibility. So, it's complicated :) And i kinda dont understand how artists like Steve Winter can do brycing in wireframe when they have hundreds and thousands object at once and not hidden :D
You mean bump mapping in Material editor (M)? Though there should be some "input" (you choose from which texture channel it takes) to make it work. Sorry, can't explain things properly today. Hopefully someone will answer in more details.
I agree with you about the 3D views as it doesn't even show me the water completely (just one segment).
And about the BUMP, well I have no idea the truth. But these were all the words of that user:
"Set the bump value to within the range of -20 to 20. This is the limit of what is reliably within the capacity of the render engine to simulate accurately (reason for those that want to know, is that beyond this value it is possible to generate simulated geometry normals that pass through the geometry surface from which they virtually eminate - not really possible in the real world - "reflection correction" option clamps these to true perpendicular geometry if this happens otherwise the get locked to tangential or fall through the geometry surface - all these states result in "noise") "
Akmerlow: Display as Box is a great option especially for large groups you don't need to individually edit (Grass, trees, Booleans etc.) Helps Bryce along very nicely not having to draw all those wire frames and helps to see where you are in a scene. You can also increase and decrease the resolution of the wire frame making it easier to see what you're looking at... Though again, it's a trade off as more resolution of wireframe slows window updating down.
Chris: Bump... Bump can happily go from -999 and +999 (if you type it in instead of using the slider), reducing the bump level on a water surface will just make the ripples less obvious. That aside, if you click on your object and clickthe 'M' button in it's foating menu, it will take you to the Material Editor. In the column on the left under the nano preview, one of the options is Bump... Moving the slider that sticks out of the left side backwards or forward will reduce on increase the bump level (between +100 and -100), or you can simply double click in the number value box and type in your preferred level between +999 and -999.
I understand, and does that really help reduce noise?
It's that I did what you just told me and it's still the same.
Will reducing bump reduce noise?... Not really. Though if the bump is a high frequency, it can look very much like noise.
In your render options, do you have True Ambience switched on? If so, switch it off for now.
Do you have 48 Bit Dithering switched on? If so, switch it off for ever.
Do you have Gamma Correction switched on? If so, switch it off for ever.
Now in theory, if you don't have True Ambience switched on, you won't get anywhere near as much noise (but you will see that your render looks totally different)
I also wonder (because this could be one of hundreds of things), that you may be in "Fast Preview" Mode... To check this, see the row of green balls at the bottom of your main control down the left side of your screen?
They are a row of 5 balls, one large one in the middle and two smaller ones each side. Make sure all 5 are Green and that none are greyed out. Now click the large one in the center to start a full resolution render.
I had TRUE AMBIENCE disabled and "Gamma Correction" also disabled, but I did have "48 Bit Dithering" enabled.
PS: I have had all 5 balls green, and all the render tests I have done (including the one I left attached in my first post above) were pressing the big ball.
Now I'll try rendering again, to see if the noise thing changes.
Edit:
I'm attaching a screenshot of what my render settings currently look like (I apologize, I should have shown them to you quite a while ago).
Finished noticing something.
Noise only appears in shots from far away, but near shots are not.
In my case I need the distant planes.
What I can do?
When you make your animation, the video editing software you use to put it together will add some Anti-Aliasing to the finished result smoothing that noise to some extent and with it being a moving picture, it won't be so obvious.
If it's just the distance that's problematic, you could alter the thickness and depth of the Haze so distance fades out more.
Or you could alter the material (in your case, the water plain) in the Material Editor to reduce it's frequency. Though that won't necessarily solve the problem, it will push it further into the distance. But it also might mean in the foreground your material looks too big.
At the moment, your water looks very wrong with the ripples being way too small, so could do with some adjustment anyway.
As a matter of interest, how big is your terrain? If you select it and click the 'A' (attributes) button in it's floating menu, the bottom line of the grid gives you it's physical size for it's X, Y and Z axis.
I understand, I will prove your observations.
And thanks for the water, I'm going to improve that.
One more question (I still don't prove what Dave Savage said), how can I create a forest in Bryce? (hopefully low poly, as it will be seen from afar within the island).
I know that Bryce creates trees, and I have created several, but they are high poly and also, it is somewhat tedious to put each one (even if it is copying and pasting), so I wanted to know if there is a faster method or a forest generator that brings the program (as well as the terrain generator).
I await your responses.
Regards.
Instances
Thank you very much.
I'm going to try it.
Hi Chris.
I hope this isn't too problematic for you if you're having to use Google Translate all the time, but you seem to be managing very well at the moment.
Here is a link to a thread where our Rashad has written a long detailed explanation of how to use the Instancing Lab in Bryce.
https://www.daz3d.com/forums/discussion/3381/how-to-use-the-instancing-lab-in-bryce-7-1-pro-a-complete-tutorial
This will help you quickly make a forest, but bear in mind that Bryce trees aren't small. There are some older type trees in the Preset Libraries that are almost Billboard type ones, but they really don't look good or convincing even from a distance.
I understand, thank you, I was actually just looking at that forum when you sent me that message, so this confirms that I was checking in the right place.
As for what you said about water waves, I went to the water materials editor and nowhere did it say "frequency", the closest thing was that of BUMP that I asked yesterday. Still, I moved the BUMP to 100, but I feel like it didn't change at all (at least from distant view) that changed relative to before. It's probably because I don't know how to configure the materials (or at least the options that are really essential for the waves in order to make the water look realistic).
What are the names of the exact options that I should edit in the water materials? (if there is any tutorial out there it would be much better)
Greetings and thanks again for answering (and for your patience xD).
Well the main problem is that you're trying to do stuff that requires you to know a basic amount of how to use Bryce... It takes a long time and a lot of patience and reading to learn how to do these things properly.
In the Material Lab, you will see down the right hand side, the components that make up your water material. Most waters only have one component and it's usually in the top row of the four channels available.
There are four small round buttons (two above and two below) around the three pane window (that shows the Diffuse, Alpha and Bump of the material). If you click on the top left button, you will open a sub window (these are commonly known as the Golden Tools because of their colour).
The top set will alter the frequency on the X, Y and Z axis, the middle set will alter the rotation and the bottom set will alter the offset. We're just interested in the top set for Frequency.
Click in the middle of the crossed arrows and drag to alter all three axes at once, or click on the axis you want to change and drag to alter them individually.
The numbers are a percentage so the lower the number, the smaller the frequency will be (meaning the pattern produced will be bigger). Set all the axes to Zero and click OK to leave the Material Editor. Check a render to see how the material has changed. Then repeat increasing the numbers until you have the desired effect.
You are right about that.
By the way he was also right in those of what made the water look bad and that in turn produced the noise was the size of the objects.
I dramatically reduced the size of the island and the city (and obviously zoomed in quite a bit too), and the amount of noise was greatly reduced.
However, this brought a new problem. For some reason now the island lost its touch of vegetation and was changed for a metallic one (I did not touch the materials at all, I only reduced the models). I had already noticed the metallic yesterday or the day before when I zoomed in on the island a lot, but I didn't think it would also happen when I zoomed in. Also the center of the city seems texture of very low proportions.
Can it be fixed in any way?
PS: I attach an image of how it looked before and how it looks now (the one on the right is now).
The material on the island is World Mapped so when you reduce the size of the island, the material stays the same size it was. Again, if you go into those same Golden Tools I mentioned previously, you can alter the frequency of the material on the island to put it back in proportion... Raise the number to increase the material frequency.
Thank you very much, you just saved my skin again.
At this rate I could end up hiring you for landscaping at Bryce.
:) :)
One more question, how do I change the proportions of the 3D view?
It is that by default they were 1514x845
In the File Menu, Document Set Up... Type in your preferred size rather than using the preset list down the right.