Daz 3D is part of 
Connect
DAZ Productions, Inc.
224 S 200 W, Suite #250
Salt Lake City, UT 84101
Licensing Agreement | Terms of Service | Privacy Policy | EULA
© 2024 Daz Productions Inc. All Rights Reserved.Daz 3D is part of
Connect
DAZ Productions, Inc.
224 S 200 W, Suite #250
Salt Lake City, UT 84101
Licensing Agreement | Terms of Service | Privacy Policy | EULA
© 2024 Daz Productions Inc. All Rights Reserved.
Comments
Monoprice makes a line of printers including a very low price one that has a self leveling print bed. It doesn't have the largest print volume but it is what I have and I quite like it.
Monoprice MP Select Mini 3D Printer V2, White - Monoprice.com
PLA doesn't need to cure. You can use acrylics with out any issue. You will likely want to sand down the piece at least a little before painting as paiting will tend to bring out the lines produced in the printing process. There are plenty of detailed guides on prepping 3d printed miniatures/models for painting which will show you the what this entails.
another place to buy less expensive but decent filament printers is Creality. They're having Christmas specials starting on the 17th. They have kits or some that you just have to assemble a couple of things.
I guess it OK to put link here?
There are a couple of sites that call themselves Creality ... the one you want is the "official" one. There is aslo a site that is mainly their company site.
https://www.creality3dofficial.com/
I have a Creality Ender 3 which is OK ..it is a kit and demands exact build. You can buy an auto leveler for it... under $200. They have others that are in the $500 range. Much larger build volume.
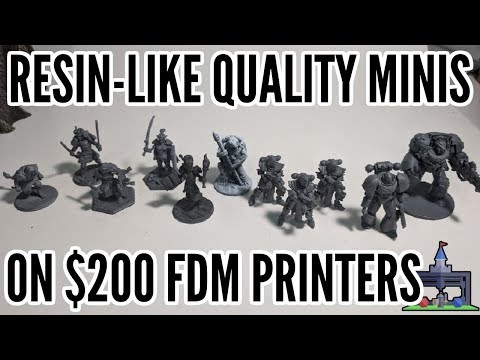
If you want to see what a Creality printer can do, check this out.... miniatures
Filament printer, PLA needs no cure.
Filament printer PLA may need some post work to smooth off. It could be sanding or it could be wiping down with acetone.
No post cure. (Did say this in a previous post but it obviously got missed in my other verbal incontinence.)
Regards,
Richard
This is an interesting thread for me at the moment because I am going to be starting 3d printing fairly soon. Many people might be aghast to hear that I bought my 3d printer on Black Friday ---LAST YEAR's Black Friday and apart from opening the box to look inside, I haven't even unpacked it yet. Yes, I've had too many other things which took priority this year.
The printer I bought was the Creality Ender3 Pro and I'm hoping it will make adequate prints of figures in historical costumes and robes.
I recently upgraded to the professional version of 3d Coat in order to sculpt my own work. 3d Coat is soon going to go to a subscription payment scheme and I rushed to buy the upgrade only to find a few weeks later that I could have saved $99 if I'd waited for Black Friday. That hurt, I can tell you.
Anyway, 3d Coat has 3d printing tools built in now and these are sold as a stand-alone product for those who might want these but not the full-blown software.
I don't regret going down the filament path because one reason I haven't started using my printer yet was lack of space - I built a large shed during lockdown and now have a lot of clutter stored there. Even so, I wasn't willing to dedicate a safe space for a resin printer. They are superb, of course but seem to need a lot of caution in order to use the chemicals safely. Something I don't hear mentioned often is the need to ensure that the print doesn't become an enclosed container full of of un-cured resin. But I'm sure they will come with plenty of safety advice.
Daveso, thanks for the video, it is encouraging me to get moving on the build (soon!)
Also, thanks for the Creality web link. When I bought mine I had trouble deciding which of the web-search results pointed me to the genuine manufacturer. In the end I chose the correct one but joined PayPal to pay for it hoping I would have an extra level of security.
Just to add two things:
1 The printer arrived at my address in the UK less than a week after ordering - I guess it was shipped from somewhere in the UK. Looking inside it is beautifully packed in foam compartments and without taking anything out, it seems to be of very good quality. I ordered and paid for a reel of filament at the same time. The printer comes with a small quantity - not much apparently. Anyway, the reel I ordered came separately from China and had travelled a good deal from place to place before even leaving that country. It finally arrived sometime in January, I think it was. Maybe COVID was to blame at that time in China.
2 I haven't been able to figure out whether 3d Coat going subscription means that permanent licences will no longer be available to buy. The various interpretations of their plans are a bit confusing.
Hello all!
I'm a bit rusty at the 3D printer topic, since mine haven't been on for a few years. Working on my cars, building or rebuilding my computers, etc.
I have 3 MakersTool Works printers. 2 of the MTW2 and an MTW3 which is half way thru an upgrade. Primarily I was making car parts, and replacements for broken household items. I wanted to eventually try my Daz figures, but haven't gotten around to it yet. Have used ABS and PLA due to relative simplicity of setup.
There are a lot of resources available, especially "How To", so may be able to help with some links if applicable.
Programs I have used include Slic3r, Arduino, Marlin, MatterControl, Cura, Skeinforge, RepetierHost and MakersTool Works versions of some of the same.
There are a lot of places to download "print ready" models, which I have done and then modified, but I have also created my own. My primary modeling tools are The Foundry's Modo and Daz's Hexagon (which was my first). I also have used TurboCad off and on for decades, which I now use mainly for saving in different file formats.
Will try to answer any questions, if possible.
FYI I had lots of problems slicing DAZ models with Cura (see https://www.daz3d.com/forums/discussion/453596/3d-printing-model-issues#latest) and someone told there told me it is an issue with model not being manifold, you'll need to fix that first before printing.
However, it seems to slice fine in Slic3r.
The manifold issue can be a big one with some slicing software. It doesn't seem to affect the Photon slicer much, which seems to determine external surfaces on a layer by layer basis, meaning it's unaffected by the slice below or above, which can heal holes quite effectively.
Regards,
Richard.
I think that's just a difference between FDM and resin printers in general.
if it is the same as most, the filament is enough to maybe set the unit up and test it. IMPORTANT: There are tons of videos on setting the Ender up. Check out CHEP and Luke Hatfield. Luke is the Ender 3 guru for sure. He wrote the "bible" on setting up the Ender 3. There is a series of videos based on his work that are very good and understandable.
https://www.youtube.com/channel/UCsdc_0ZTXikARFEn2dRDJhg
another thats good and covers many subjects. https://www.youtube.com/channel/UC5Lbnd97HV3rU98gcwHklzQ
one of the things I've found trying to print my creations from DS in Cura, it will slice and everything, but if the model is not set up correctly, there will be holes and weak points in the resulting print. It is important to correct any flaws in the model, I guess manifold is a big one...this is stuff I'm just learning about, so I don't know all the terminology.
Ive been thinking about using hexagon to try and get G3/8 models working. The process as I see it in my mind would be to take the model from daz to hexagon and join the models, hair, clothing, etc., by welding vertices and lines, etc, and deleting any remaining mesh that would be redundant, thus making the model manifold(?). Then I would increase polygon count through subdivision. It also sounds like holes would need to be removed or minimized. I havent tried this yet but I plan to.
How did you use hexagon in your process?
Although I have had an architectural CAD program since the days of floppy drives, I actually learned how to 3D Model with Hexagon when it was still being developed by the French team that DAZ eventually bought it from. Although I still have and use several other programs, the DAZ/Hexagon interface is ideal.
Understanding the term Manifold is the crucial part before trying to fix something yourself. Sounds like you have an understanding, and Hexagon can help with this.
In essence, a model is "manifold" when every vertise of the model is connected to another adjacent vertise. Consider these analogies.
Imagine a sphere in "3D" space in Hexagon. If you cut the sphere, all the way through, top to bottom, it still looks like a sphere, but instead of one "all connected" geometry, you really have two pieces of geometry. If you were to send these two pieces, thinking that they were connected, to a slicing program and try to slice it you will get the non-manifold warning.
Now, consider, say a bike in DAZ Studio with the ability to spin the wheels. If the model of the bike were one continuous piece of geometry, the wheels would be solidly connected to the frame, and any attempt to spin the wheel would also spin the frame. Since the wheels, frame, etc are actually seperate pieces of geometry, parented together, it looks like the bike is one piece of geometry, but if you tried to slice it you would again see non-manifold. In this instance, you could export the wheels, frame, seat, etc as seperate models, slice and print seperately, and assemble later.
Last example. Take a flat piece of ground and ram a post into it. From a distance, the two objects appear as one. Once again, not manifold. You would have to connect the post to the ground in a modeling program, delete the part underground and then you would have one complete connected geometry, or, manifold.
Hexagon can help do all these, but one word of caution. There is a somewhat fine line between too little and too many polygons (subdivision). Too many and it can take a long time to slice your model. Too little and smooth surfaces won't be smooth. Experiment to find what you like. Sometimes, exporting the model from DS at base resolution, and smoothing in Hexagon can help in locating areas that need fixing.
I suppose I should ask how familiar you are with Hexagon, so I can make sure I cover what you need.
Im familiar with Hexagon. Ive done a bit of modelling in it. So far I understand everything you are talking about. Im rusty, but it wouldnt take me long to get back up to speed with it.
I didnt think that high poly count would extend the print time. I figure that a good poly target for a G3/8 print would be similar to G2's poly count which apparently people are having success with in printing. G2 has approximately 20K more faces than G3/8.
Thanks for your help Melamkish.
AnotherUserName,
Rather than keep quoting, since I have seen some posts in the Commons about potential bugs (may be fixed), I'll just leave a new comment.
To clarify the Polygon count issue: It may take longer to print, but I meant that slicing the geometry can take longer. Depending on how the slicer is calculating and creating print slices, it has to calculate through each polygon. It is calculating the move positions of the bed and nozzle. Depending on the complexity of the geometry, it may also affect print time. I did a lot of testing in my early print days, opening the slice files and comparing them. If our sphere is modeled with say, 1000 polys vs. 10000 polys, it is obvious the the second would print smoother, but if the first is smooth enough, less calculations and print commands are required.
Often, a print calibration cube is recommended to check printer setup. A cube is another good example for poly count. As you know, a four sided cube is simple enough, but if the slicer is calculating the 90 degree change at the edge, with only one edge, the turn won't be very square. Adding edges near the turn points helps, in just the same manner as trying to keep a sharp edge looking the way you want when test smoothing in Hexagon. Sometimes, when using a complex model like the human figure, you have to keep the higher poly count.
If you intend to add hair and clothes to a figure, you will need to examine where the interface of say, shirt to torso is, and add, subtract, weld, delete geometry as required, to make the geometry manifold. Then test splice, test print, repeat if necessary.
Some of this information is to help you evaluate your geometry once it is in Hexagon. I did a lot of trial and error when starting out and just passing along some of the key points that gave me problems. Once your ready to start, let me know which figure, say, Genesis, Genesis 2 base model, and I can load it up on this side, and follow along with your questions and comments to help use Hexagon for this. Now that winter is upon us, I have some free time.
So, while I think that I have enough information to prepare the human model for slicing, I have no clue as to how I should prepare the hair. Wouldnt any slicer program read daz hair as just a collection of flat wavy polygons with no regard to texture or bump or anything like that?
The hair problem, where hair is made from surfaces only is a difficult one, and I'm not entirely sure how to get around it.
The model I printed used the now unavailable Las Vegas hair by Jim Burton. That hair was made from tubes, and it printed well: This one on V3 and G8F
I tried to tackle the issue of flat sheet hair in my own home written modeller. It worked after a fashion. The modeller was designed as a finite element stress modeller, and obj files are imported as shell elements. This kludge means there is a lot of ancillary information is held in memory, and there is a 1Gb total array size limit on the compiler I use. This is an issue with many hair models exceeding 500k facets (a majority of currently available hair models) as the number of elements increases by about 2.2 on average, and the thing runs out of memory. It does work on small hair models, like the 43000 facets of the hair above - but doesn't need to with that one.
Sorry, forgot to say what actually needs doing. The facets need to be selected, edges found, the facets copied in the -ve normal direction by a distance similar to the minimum printer print thickness, then the edges stitched up. I think it required around 600 lines of code in my modeller to do it.
Regards,
Richard
Ok. Hair with dimension is going to be preferable to flat plane hair. It would seem though, that in doing a model at 1/35th scale, which is probably the largest that ill start out with, the impression of hair for a hair model is going to be more important than actually achieving nicely detailed hair.
There must be an asset store somewhere that sells ready to use objects for print isnt there? Not that I want to start spending more on assets on top of the daz stuff, but it seems like a good head of hair for print might be woth investing in.
richardandtracy,
Thanks for the tip. Last night was going backward in time looking at various hair, but didn't get as far a Jim's hair. I tried extruding some base, and skull caps, but trying to match the geometry to the figure would be time consuming.
AnotherUserName,
There is actually a site sponsored by Makerbot that has lots of free print ready models, and was on this morning trying to find a model that I might examine.
https://www.thingiverse.com/
This thread has motivated me to get my printers back on line. Was almost done with a dual extruder and bed leveling upgrade when I had to stop. I ran Win7 to almost end of life and built my Win10 machine about this time last year. Learning how to make windows behave the way I want ( and not the way they want) has been time consuming!
I use models from thingiverse a lot. The quality can be all over the place so check what others have had to say about any specific model and don't get to attached to it if it doesn't turn out.
Thanks all.
I just re-installed hexagon. Im going to start playing around with G3F to start. Ill post picks while I go and describe what im doing.
Still havent picked up the printer yet but will soon. My Father in Law and I have been going back and forth about what to do about the cleaning and curing part of the process. We are going to go with the Elegoo Mars 2 Pro Mono.
Also going to look at a program called Meshmixer as I think it will help cut down on the preperation time for models.
Exciting!
I tried meshmixer on my machine. Loaded it when Win7 was still internet safe, and disconnected the PC when it expired. Meshmixer refused to work when off line. Not impressed.
Simple hair modelled from scratch as a manifold shape around a model you've taken into the modeller may well be the best bet for you. If working on 1/35 scale, the figure will be around 5cm/2" tall, so there really won't be much detail in a filament print, 200 facets would be almost OTT for detail on a Bob type hair.
Anyway, hope you enjoy the printer when you get it.
Regards,
Richard.
Here we go.
Specimen 01, The Lumberjack.
I decided to start with a model for my Father in Law so I am going to start with the lumberjack. I am using G2M. The challenges that I see come from removing some of the detail in the excellent clothing created by Luthbelina in the Diana and Jones Outfit, https://www.daz3d.com/diana-and-jones-outfit-for-genesis-2-male-s-and-female-s . I am going to start in Daz Studio, deleting geometry. The printer arrives Dec. 24.
Estimated Faces:
G2m = 21098
Blouse = 20268
Pants = 20281
Boots = 31198
Belt = 1986
Axe = 4194
Hat = 10360
Heres a question im hoping someone can answer. Im preparing the models head and im wondering if I need to delete unseen geometry. Basically, if I seal his mouth at the lips will that be good enough. Or, will the printer see the interior geometry like the mouth, teeth, etc., possibly causing issues?
The slicer will create instructions for all the geometry unless you tell it not to. Keep in mind that the interior will be open for most of the print.
Right, ok. Im still thinking in terms of rendering :)
Hi everyone. Im still here, havent abandoned this post. Ive been researching and working in hexagon to figure out what the process is like when attempting to make "manifold". Its alot of work but it isnt exactly difficult I would say. Ive experimented with Chitubox and Meshmixer. Meshmixer wasnt bad but I found that it still left holes when combining items to make the figure solid. Chitubox seemed to repair the figure holes better maybe, but the repairs wouldnt have looked good after printing and wouldve required some sanding, carving, whatever to refine. Not what I want to do with an HO scale figure. Hexagon seems like it will do well to make items manifold asuming one puts the time into it. My printer is still in the box.
The Genesis 2 geo mesh, which should be in everyones product library, was very welcome. It did the dirty work of preparing the eyes and mouth and if you are going to use G2 for printing I would definetely check it out.
A larger issue come to head though in working with this figure, the render of which I posted above. This process that ive been working on is simply not practical considering that my Father in Law wants enough of these figures to populate a model railroad that is literally going to take up half of his garage. I dont know how many models he needs, but its going to be alot. So ive come up with a plan that I think will be a long term solution but I am going to have to do even more research now.
After studying some HO scale figures, I came to the conclusion that the best way to get this done would be to create some morphs in G2 that would give the figure a number of clothing shape options. For example, I could create a "Hat style 1" which could morph a wide brimmed hat shape into G2's head. "Clothing style 2" could morph the shape of coveralls into G2's body, etc. Since I dont need to be concerened with textering, I dont have to worry about surface maps or anything like that. Ill have to figure out how to make morphs...
So I am ditching the above figure idea and going to head on over into the Hexagon forum to see if I can gather some info on how make morphs with hexagon. Ill link to the conversation when I get it up and running in case anyone is interested. In the meantime, im going to start designing my own first diarama. Ill have to use hexagon quite a bit for my own work since I want to preserve as much detail as I can. Ill also be working in a larger scale.
To be continued...
I've done some morph creating using Hexagon and the Daz to Hex bridge. Will look thru my tutorials and see if I may find some "freebies" from way back. I think I got some from the Daz tutorial section, but don't know if still available.
Finally got my printer back on line after about 3 years of inactiviy. Most time consuming part was going thru 10 versions of Marlin to see what changed in the controls sections. First calibration cube was as good as I remember!
Now the real work begins.
Nah, dont bother looking for those tutorials... I probably have them.
Im going to try to find the time to print the test figure this week. Im also giving alot of of consideration on how to cut down waste on things like gloves and such. I dont particularly want to fill my trash can with latex gloves for the purpose of my hobby. Id like to get some really good thick laboratory gloves that I can re-use, but, those are probably pretty expensive and in short supply these days.
If you look up Maker's Muse on youtube, he recently did a vid on the various free tools available to edit/fix figures for 3d printing.
I've used Gameprint for a few figures now, and I'm quite happy with the quality of the $2 stl files.
I'm attempting my first airbrush work, on a printed G8 figure printed with a anycubic photon she's a 6" scaled figure so i had to slice her in half as she's 1" too tall for the printer to print in one go, this enabled me to hollow her out to save on resin, though i failed to angle the parts so the front didn't have any points of support structure, which in this case left pock marks in the figure once i broke them off