Muscle definition and veins details wont show in Unreal
 fox5050
Posts: 53
fox5050
Posts: 53
Muscle definition and veins details wont show in Unreal. I have exusted Goolge and Youtube for an answerand found nothing so im posting here. Here is a photo of what im talking about when I say muscle and vain detail wont show in unreal engine. Is this normal or do I need to learn another way to import to Unreal. I used Daz to Unreal bridge. Thanks for taking the time to read this post.
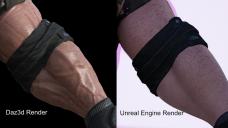
DazUnreal renders.jpg
1280 x 720 - 632K
Daz 3D is part of 
Connect
DAZ Productions, Inc.
7533 S Center View Ct #4664
West Jordan, UT 84084
Licensing Agreement | Terms of Service | Privacy Policy | EULA
© 2025 Daz Productions Inc. All Rights Reserved.
Comments
for thos details you have to use the bake process, or to bake the bump maps in normal maps when those things come from the normal map, or to bake the high resolution mesh into a normal map to add those details to the model, that is the issue, because the issue is which the models you are using or they are using a "high resolution (HD) mesh who have more polygons than the base or are using the bump maps which don't work in unreal.
this post maybe can help you understand better it
https://www.daz3d.com/forums/discussion/comment/5252246/#Comment_5252246
here a exemple (i've removed the color to avoid some forum issues but just the base color the "effect" maps are still there
for some high details you must work with baking it to the normal map.
Oh wow thanks so much Ellessarr. I will read that link you posted right now. I hope I can figure all that out LOL. Thanks again so much.
another way to do it is by using tesselation map texture, in case you feel the "normal map is not good enought, tesselation can do the trick too by creating a better volume illusion, but it's another process which i do not remember now how to do, but you can find video tutorials about it.
I so appreciate your help im about to follow your tutorial in the link you posted here. Your the best. Wish me luck.
I tried Blender ans XNormals but I only get the head to bake normal. Body never shows up.
this is a "trick" of the export, when exporting stuffs you must make sure the option "colapse uv tiles" is marked, here a exemple
this is inside daz.
Ellessarr you are a wealth of info. I need to hire you. LOl thanks so so much.
Thank so much for your help. When I use exNormal or Blender to bake they ask for a high poly and a low poly. Do I just export out of Daz3d in fbx and then another export with obj. So the fbx will be the low lopy and the obj will be the high poly?
yeah the fbx is the "low poly or base resolution, then inside daz you set the model mesh to max high resolution you can
max subdivision and the other max forget what, then it " "smooth the mesh to as if it was a "high poly mesh it will acess it highest poly count possible but i can't be exported in fbx but can be exported in obj, then set to export as obj, another important thing is make sure both mesh are being exported in the "same pose" otherwise it will generate "artifacts(bugs) in the bake, then before bake open both fbx and obj in maya/blender just to see if both are in the same pose.
i was thinking in make a tutorial about bake, but it would be using substance and not the exnormal, i'm still thinking but basically the process will be almost the same bu baking the high poly details into the low poly model.
With your help I think I understand how it all works. Thank you so much. I think most programs are the same in baking. Buttons might be in different place but same process.
Oh and just to confirm do I export both the low and high poly with just the body and no clothing just for the baking. Then do the Daz to Unreal bridge with all body and clothing and then add the created normal in Unreal somewhere.
I think I found my answer on this link. I see where you talk about it. a using DAZ content in UE4 thread - Page 3 - Daz 3D Forums
yeah you only need the body and even i can give you a tip for that, when exporting a "body" to bake high resolution", specially in daz i would recomend you to use the daz tool geometry editor, this tool allow you to "select" parts of the mesh then you can hidden or delete then to export only what you want then to proper export only the body mesh without some extras like eyes, tongue and fingers nails and avoid some weird artifacts i would recommend you to use the tool in this way:
load the character you want, i will load the base clay mesh of genesis 8 male as exemple:
then in the uper bar menu you choose "tools"
the in tools you choose geometry editor, it will enable the geometry editor mode
then you gona select the character mesh(make sure it don't have the eyelash remove it we only need to bake the main body mesh)
the you will go to the character mesh and right click on any part a menu will appear on that menu you gona choose: geometry selection ----> select by ----> surface, then the surfaces you gonna select will be arms, face, ears, torso, legs, lips, in the end the character will be looking like that:
you will notice which some places are not selected like eyes, toenails or fingernails(the most visibiles, also stuffs like teeth and mouth are not selected), leave then as they are
now you gonna again right click on the mesh but this time you will be choosing: geometry selection ---> invert selection, it will "invert the selection and make those parts you leave behind in the mesh being selected and the ones which you had selected are no more then the character will be like that:
then after that you gonna again one last time right click but this time will be:
geometry visibility -----> hidden selected polygon or you can go geometry editing ---- delete selected polygons, in this case it will delete the meshes it will means in case you need "use again the same mesh you need to load it again if you delete if you just hidden you just have to make then visible again in the geometry visibility ---- show all polygons.
if you are just hidden make sure in the export options the option "no hidden" is marked it make the process only export the visible parts then hidden ones are deleted in the process but not in the daz.
another note, when baking a character a good tip is if you have the "controls or morphs, to make the character close the eyes at 100% and open mouth between 50 and 100, why this? because the bake process take in account "how visible is the area is being bake" a open eye, will be baked as if the eye is aways open it means when you need to "close the eyes a big "artifact" will appear in the eye or if the mouth is closed during the bake the same thing happen when you make the character open the mouth you will notice a "mark"(artifact) around the mouth in the closed area, this is why you must make sure all the parts of the mesh are well visible during this process to increase accurace and avoid artifacts, another tip is to bake things like mouth and teeth separated if you bake then inside the mesh then it wil be a big mess because the missing light during the process", then if you want bake mouth and teeth or eyes for more accurace stuffs in case you have products which generate hd parts of those then use the geometry editor and surface to export them alone and make sure follow the rule of open mouth and any needed adjust to make sure each part of the mesh is most visible as possible to again increase accurace and avoid artifacts.
I still dont see the obj look any more detail then the fbx. First photo is obj in blender photo 2 is fbx in Unreal and 3rd photo is in Daz3d.
(Mod edit: images showing nudity removed. For details on how to handle nudity, read https://www.daz3d.com/forums/discussion/3279/acceptable-ways-of-handling-nudity#latest )
I wanted to check the mesh before I try and bake.
I also cant increase my subD level. Its at 0 and non adjustable.
In eXNormal I get htis error. And this is what the normal map looks like. Does this look correct.
It's locked - click the closed padlock icon on the sldier.
it's because of the "lock", if u pay attention in the lock click on it to "unlock" and you can only export above 0 in obj format, not in fbx, fbx aways will be 0 only the bridge allow you to export the level 1.
for the xnormal the issue would be the character being multiple materials maybe xnormal don't support it then in this case you must "bake each part of the mesh alone, like only arms, only face, only ears, only lips, only legs and only torso, export each mesh sufaces alone in the same way you would do with mouth and eyes. make a bake for each part, because substance paint allow you to bake multiple surfaces which maybe xnormals don't support.
because daz character are broken in multiple surfaces, it's not a single uv but multiples then probably xnormals don't support bake all the uv's at the same time.
Great thanks. I will try Blender if I dont get it working im willing to pay for Substance since I will be doing this a lot.I need the fastest work flow I can get for all this stuff. I need to start making my movie.
you can bake each part alone without any issue those "parts" you don't need to export to unreal, they are just to generate the normal map, you can keep using the "base body as you want without any issue", the bake process is just to generate a complex normal map, another note after look to the muscle guy i've noticed which he have pores and those stuffs which probably are coming from the bump map then you gonna probably have to bake the bump map into a normal map, but you must carefull adjust the "strength of the bump.
well bake is really a annoying process at the beginning but once you learn how to do it, it become pretty easy, a option for you can be for exemple combine some surfaces for exemple ears, lips and face in daz are placed in a way you can have then all in the same texture maps, then you can get face, lips and ears and bake then altogether in xnormals it not gonna have issues, the issues are due the all the surfaces being applied together but once you proper group the right surfaces then you can do that.
to be fair while for bake and others stuffs substance painter is really awesome, it's still have a issue which i want to learn how to solve which is exactly because he "generate too much textures" like in daz you can solve ears, face and lips in a single map, however when you do that in subtstance it create a texture for each one which make you have more textures than it was supposed to have then would be cool if we could find a way to "merge" some surfaces like the case of the "face" in a single one reducing the number of textures like it is on daz.
So much stuff LOL.Ill see what I can do tonight. So if I do the face, arms,torso,legs on its own separate normal map I add those normals to each part in Unreal.
Not sure it worked. What do you think.
in the face it worked perfect as you can see it more "detailed however i think you forget to set the "colapse uv" in both fbx and obj you must do it for both options.
Oh yes I set that in fbx and though it applied to obj as well. Again I thank you so much.
Looks good now.
hmm yeah if you really want perfection, i would say you must "open a little more the arms", it's have little artifacts in the armpits, whenever meshes are "too close" like legs being together or arms closed to the torso it can make artifacts or even fingers from hands or feet being "too close" or stick, it can create artifacts because the bake process will try to light the full body and if 2 places are too close it can "dark this area. like the armspit since the character is too bulk his torso is close to the arms then that zone creates a artifact for the bake. well this is just being a little pick, only if you want full detail perfection, then whenever you bake the character pay attention to see if all the places of the body are "well visible".
Yes I understand and was thinking about that. I am now in Unreal and tying to figure out how to add the normal. Im trying to follow your other post. a using DAZ content in UE4 thread - Page 3 - Daz 3D Forums
well it's just you need to replace the "old normal map you are using for the "new one" generated(you know how to genereate the maps right using the subtance)?, just replace each normal map in case it have one if don't have add the normal map to the material