uvmapping editor - seam/pin? cut/stitch?
 Mistara
Posts: 38,675
i been staring at this thing for 2 days, lucky my hair is already grey :lol:
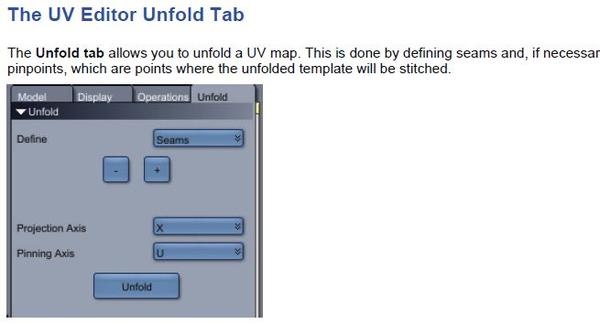
i'm interperting the seams and pins to mean i can cut/stitch in one operation?
but how exactly?
started with the old cube.
started with the Projection-box mode-apply
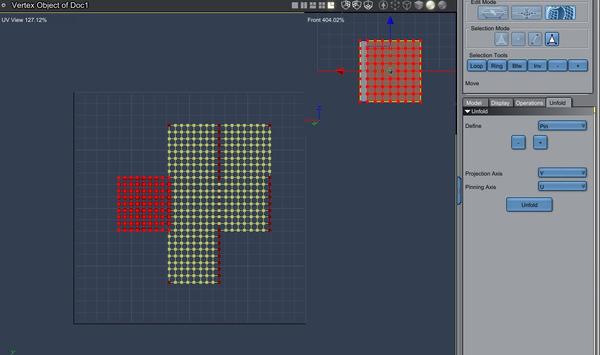
i want to move the 'front' of the box to the center of the template and arrange in a T.
top
left, front, right
bottom
back
when i move it around it's like psychedlic taffy, stretches and snaps.
is there anyway to turn off that behaviour?
Thank!!
failing miserably at this :down:
that's the front side of the cube on the left -


ca-seampin.JPG
655 x 354 - 32K


ca-cutstitchseampin.JPG
1069 x 633 - 83K


Comments
I am not a good resource for uvmapping help. However, a couple of links until TimA, Roygee, or someone else worth a dam happens along.
https://www.youtube.com/watch?v=YQQEh3vyVj0
http://www.awbenson.com/tutorials/Carrara_UV/UV_3.htm
The shading domains and the seams can be used in cooperation. If you have the seams surround a shading domain, then when you unwrap, you will be able to select just that region using select by shading domain. In Theory, the seam has already detached the polygons for you, but it can be difficult to select what you want. But you can use detach polygons command for your selection just in case. The seams divide up the mesh, which you can then move the pieces about and reorient, rescale, etc.
This is how I'd do it...
The most important part is to sit and stare at it for a few moments, mentally undressi... er, unfolding it. Think of it as a cardboard cut-out. ;)
no way, is that simple? ...
my default map looks a bit different than yours?
...
i like the btw selector button :)
Yup, that simple. Most of it is thinking about where to put the seams. You don't have to select all the seams in one go, you can do them an edge at a time if you wish - the end result is the same.
Your cube has more vertices than mine, maybe that's why the default map is different. I've certainly seen it map that way (it's some variant on spherical mapping I think). It doesn't really matter, co it won't stay like that for long! ;)
In case it's not entirely clear, I've highlighted which edges the seams are.
Thanks!!
this is so awesome. :lol:
what's the next shape harder to unwrap from the cube?
this is too much fun :)
"Be the ball, Danny."
:lol:
Have a think about a cylinder...
BTW, "Cylindrical mapping" is actually broken, as you'll discover it you try and put a texture on it. So it's better to unwrap.
For me, the most satisfying "simple" shape to UV map is an arch. I make a lot of arches! (windows, doorways, bridges, all sorts - there are arches everywhere!). I always start with a horizontal cylinder, flatten the base and extend it down. That could be your homework, if you fancy a challenge... ;)
"Be the ball, Danny."
:lol:
W-e-e-e-l-l-l, I'm waiting! ;-)
All in good fun. There had been a uvmapping thread somewhere in which you (TimA) and Roygee posted some examples of unwrapping things like tires. At least, I thought it was you (TimA) and Roygee, and I thought it was tires. That was very helpful to me, and would welcome more homework.
EDIT: to make clear you meant TimA. Evilproducer posted while I was typing.
Here is my attempt to use unwrap on a vertex cylinder. I did convert the caps from n-gons over 4 by using vertex to center. Looks OK to me. I used the new beta. Do I have something wrong? Or, could it be fixed in the new beta?
Hold it. I fail. I see now that you were saying that unwrap was the solution, not the problem. Is our homework the cylinder, or the arch?
Looks good to me (and you resisted the classic "meat & 2 veg" mapping too ;))
One thing to think about: generally its best to scale your UV so the model just fills the map - that makes the most efficient use of texture sheets and/or shaders. But you also need to consider having multiple objects on the same map, in which case you need to keep them scaled in proportion (otherwise the textures will look wrong)
The cylinder is (for me anyway) the route to an arch. Here's a quick rough & ready arch so you can visualise it. That started as a default vertex cylinder with number of sections = 1.
Have you ever done any sewing?
UV mapping is the same as making sewing patterns. It's like taking an already made pair of jeans, for example, and removing the thread at all of the seams until it is just pieces of flat cloth. You're taking a 3D object and "unwrapping" it (taking it apart at the seams) to create a 2D sewing pattern.
And the 2D "pattern" is what you use to apply the UV map textures, in the same way you lay out the tissue sewing patterns on the fabric before you cut out the fabric pieces. The tissue sewing pattern templates are the UV map, and the fabric is the texture map you're applying. And you can arrange the tissue however you want to get the fabric to look right on the final pair of jeans.
You can read up on the basic techniques and concepts of all UV mapping software (Maya, Lightwave, Carrara) in any UV mapping tutorial online. Those will give you a general idea of what is involved, what the terms mean, what the basic concepts are. Once you understand what the concepts are, then you can see how that is specifically implemented in Carrara. IMO, it's much easier to understand what you're doing first, then figure out how the tool works. But that's just me.
Personally, and this is only my opinion, the UV mapping implementation in Carrara is horrendous, so you might want to try some other tools when you're learning. The concepts and techniques are pretty much universal. Terms like "seams" and "pins" will suddenly start to make sense... :) :)
Thanks, Joe. Helpful for me, but I think Misty is already familiar with uvmapping in other programs and is just trying to get a handle on Carrara's tools for it. Like I said, helpful for me, so thanks.
:lol: would making an arch the boolean way be cheating?
Thanks, Joe. Helpful for me, but I think Misty is already familiar with uvmapping in other programs and is just trying to get a handle on Carrara's tools for it. Like I said, helpful for me, so thanks.
thanks,
every bit of advice helps. :)
Making the arch is part of the homework. ;-) Boolean could work, but could have some drawbacks. Here are some tips. In the second, Tim specifically talks about arches.
edge extrusion for a hole
http://www.daz3d.com/forums/discussion/7503/P30/#680456
explanation to use method to make an arch
http://www.daz3d.com/forums/discussion/7503/P45/#683441
Like I said, I make a lot of arches! ;)
Misty Whisky, if boolean works better for you, then by all means. There's almost always more than one way to do things in Carrara, and I don't reckon I know know even a fraction of them...
I wouldn't go so far as to say that UV mapping in Carrara sucks, but it does offer far less options and is more finicky than any other I've come across - Hex is streets better. It's OK for simple operations - which is probably why any tuts you come across show how to unwrap a simple cube:)
Probably the most notoriously difficult simple shape to map is the torus. In pic 1, the torus was mapped using a simple projection - looks OK, but is far from it. In pic 2, it has been unwrapped, without pinning. In pic 3, pins were added - much better, but not great.
The blue lines show the cuts and the dots; pins.
What I mean by options - see pic 4 - this mech I made was unwrapped in UU3D using the faces function, which lays out every face flat.- no good for using as a template, but great for 3D painting. This took less than 1 second to do. Bearing in mind that this is for my personal use and maybe offer it as a freebie, I'm not about to spend days unwrapping!
Rather disappointing that Carrara, which has 3D paint, does not have this option.
I always advocate getting a dedicated UV mapper for anyone who is serious about modeling - great time-saving investment :)
Thanks for stopping in, Roy. I was hoping you would. Yes, uvmapping in Carrara starts to go off the rails for me when I want to start using the pins. Even though both Mark Bremmer and PhilW have examples in their video tutorials (this is one case where Mark goes to more detail than Phil), I still don't have a good grasp of how the placement of two pins in relation to each other on the model drives the relation of the two pins to each other for the unwrap function. For me, using the pins is still entirely a case of trial and error. But there must be some sort of logical approach that is better than me randomly throwing some pins up there and then progressively moving toward a workable map. I hope?
One of those used handbooks I picked up came with a free version of a uvmapper utility. It has lot more functions than just uvmapping so I could see using that more as I get more familiar with it.
BTW, I've done my homework regarding the arch. Not great, but I think I did OK. Any I sights or homework related to using the pins? The torus example is exactly the kind of thing.
Roy,
I haven't been keeping up on the latest and greatest in UV software. What have you found to be good, and not too expensive? You mentioned UU3D?
ultimate unwrap, i think. :) yep. uu3d.com
2 arches could make a taurus :lol:
to restitch polygons i've detached, i would click the minus button for those seam edges in the unfold tab?
There's only a couple that run on a Mac, and they're both over $300 - too rich for my pocket.
started my arch with an oval.
was planning to dissolve the bottom verts.
connect 2 edges 3 down from the top, cut in 3rds - doh - stuck
i just have to learn to approach it differently.
Hi Joe - I don't know what the latest and greatest is - I bought UU3D years ago for US$39 and get continual free updates. It works great for me and I don't need anything else :)
OK, here's my views on UV mapping - forgive me if I take the long way round to answer the question, but I do feel it is necessary, rather than simply "This is how to unwrap a torus."
UV mapping is a whole art in and of itself and I do believe it is in the realm of the modeler in a co-operative pipeline. It is difficult to decently unwrap someone else's work.
Case in point - a few years ago I was asked to co-operate by a Daz PA who was into clothing and branched out to make fantasy buildings. The PA didn't know where to start with unwrapping the buildings. My first question was "How do you intend to texture it?" That is vital because how you unwrap and lay out the maps depends on how you are going to texture it. The answer was very vague, so I went ahead on the assumption it would be textured in Photoshop.
The mesh looked good, but once I started unwrapping, I found it was seriously flawed for a decent unwrap. Went to all the trouble of re-doing a great deal of the mesh, getting it all clean and quadded. The PA saw that as an insult and broke off communication, never to be heard from again:)
My basic approach to modelling is to plan backwards - once I have the concept, I ask myself three questions - is it going to be animated, how is it going to be textured and how is it going to be UV mapped? I bear the answers in mind throughout the modelling process, constantly checking on whether the modelling method I'm using is going to be conducive to making, especially, a good unwrap.
What has this to do with pinning? Firstly, geometric designs seldom, if ever need pinning, because they are generally already flat. If you take Joe's reference to laying out a paper pattern on a piece of cloth, you pin the pattern to the cloth - that simple. When you cut seams, the UV map unfolds such that the seams are opposite each other. Take another example - when you texture, you are basically projecting an image onto the model.
Think of projecting a picture from a projector - if the screen is flat, you get a good representation, but if the screen is curved, you get distortion on the curved part. Take the torus, or any other organic type of shape - regardless of what angle you project from, some part of it will curve away from the projector.
A cylinder curves in one direction, so doesn't need pinning, because it unfolds away from the cut and lies flat. A torus curves in two directions, so you get what happens in my second pic - tapering away from the projector . So you place two pins to attach it to the cloth; the software provides the hands which smooth it flat onto the cloth:)
So, where to place and how many pins? This will depend on the mesh and how you want it laid out. In general, and I emphasize very general, first unwrap and see whether it even needs pinning. If it does, in general, place one pin at each end, on the same, if possible, centre edge loop, opposite a cut and one vert in from the edge. This should normally be sufficient to get a symmetrical unwrap.
Then you need to take into account the axis of the unwrap - or projection. In my torus example, this was unwrapped in the X-axis, i.e. from the side. The pinning was done in the Z-axis, i.e. from the top. In general, you want to do the pinning at 90 degrees from the unwrap axis.
A good general approach is to imagine your model as being made of cardboard - study it and see where you would logically cut it in order to lay it out flat with as few cuts as possible; those are your seams. Test different projection axes to see which give the best unwrap, and if the unwrap is not symmetrical, place pins as described above.
Above all else - good mesh makes for a good unwrap:)
My apologies for being so long-winded, but I do believe that understanding principles is more important than simply showing "how to" - just hope I've managed to achieve that :)
Homework - a simple method to make an arch. Draw a circle, flatten the bottom half by scaling, pull down the flat part. Copy/paste and move the copy the width of the arch. Use the "Ruled surfaces" tool to join the two curves into a mesh, add thickness. Alternately, extrude the curve and add thickness.
Unwrap and pin:)
Wow. Hard to imagine somebody in the DAZ forum community had a sensitive and fragile ego. Go figure... :) :) :)
Anyway, that's an excellent tutorial on how to plan your modelling. I guess you're saying it's more than just learning the tool, you should learn, what, the concepts too? :) :) :)
Very nice Roy. I didn't know you're so proficient.
Thanks Roygee for the explanation about the pins.
Okay, here's my solution to the arch (other solutions are available...)
I started with a cylinder rather than a circle, cos we're going to need to add depth to the arch at some stage, and with a cylinder it's just one less step.
I always set the number of segments to 1. If you need more then by all means, but generally it's just wasting polys. Number of sides: 32. I'd probably use 64 if this was "in anger". The more sides the smoother the arch (you can use smoothing too)
"Scale" is a good way of flattening something, or lining up a bunch of edges etc. Just scale the axis you want to 0 (z in our case)
Once we've prodded it a bit to get the right shape, select and delete the inside and base of the arch.
Now we simply add thickness.
If we're making a window or want a rounded top, this could be enough.
But I'm going to flatten off the top (maybe this could be a bridge, or a stone archway....
Exactly the same as we did at the bottom, select the OUTSIDE edges (don't select the inside of the arch, or it won't be an arch any more!!!), and scale to zero. We can then adjust it for height etc.
Now to UV map it. An arch is very like a cube, and we can map it pretty much the same. But we need to choose carefully which faces will be our "arms"...